
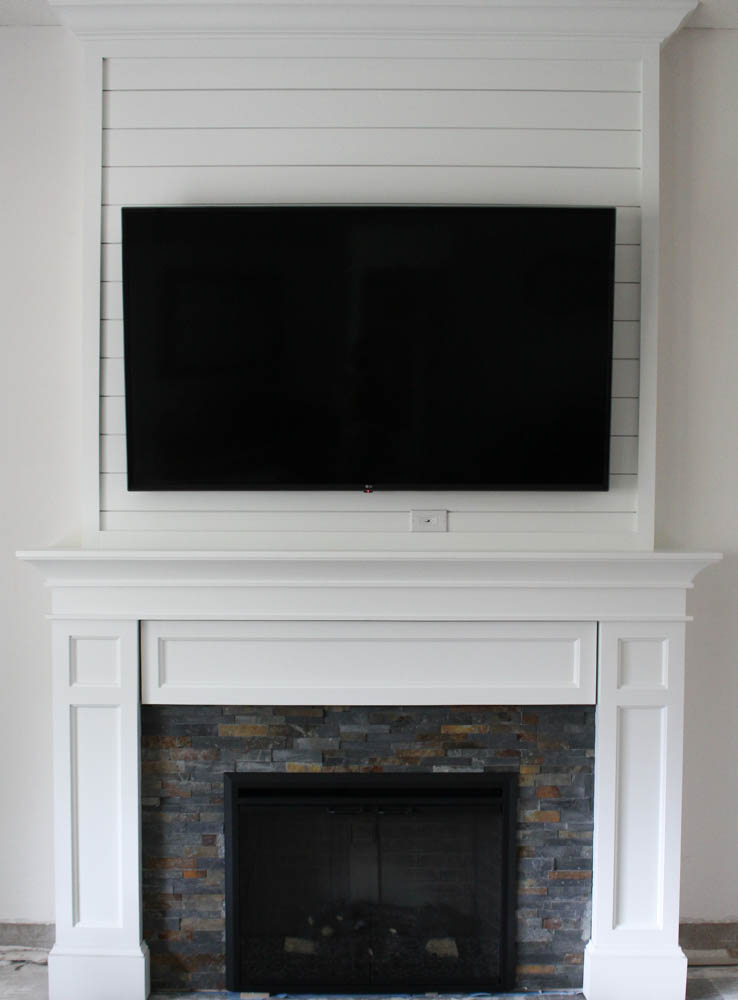
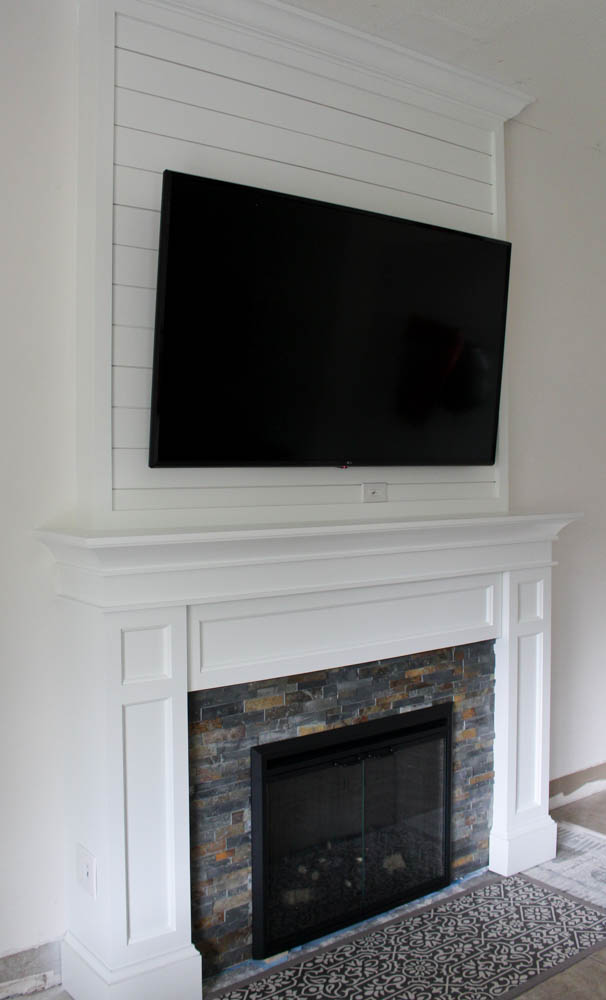
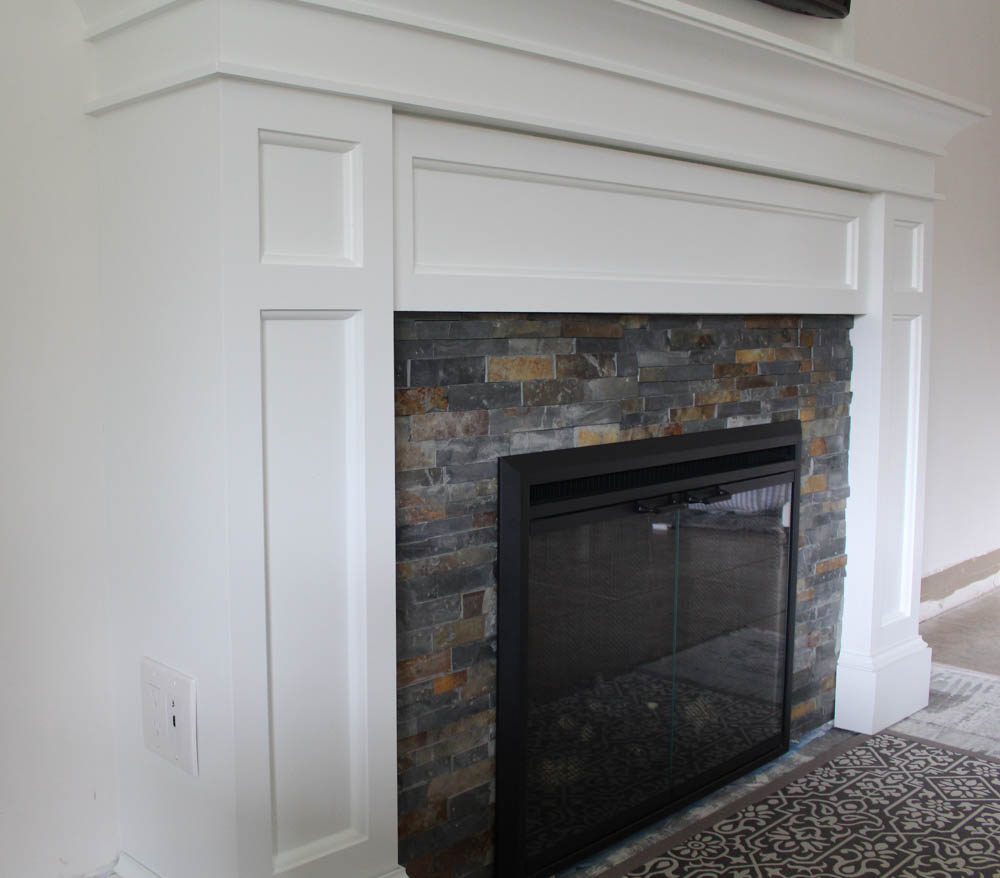
This is a step-by-step tutorial on how to build a DIY faux fireplace built-in with a hidden storage compartment!
If you haven’t already click here to read How To DIY Faux Fireplace Built-In With Hidden Storage – Part 1. Where I dive into all the important factors of a DIY faux fireplace built-in. I also include all the tools and materials used for this DIY project.
BONUS! Watch my YouTube video below to see exactly how we built this faux fireplace!
Without further ado let’s get right into it!
DIY Faux Fireplace Built-In – Legs
Normally you would start a project like this by building the frame. But we wanted to be able to have a functional living room throughout the length of this project.
So we started building all of the fireplace components in the garage first. Starting with the fireplace legs.
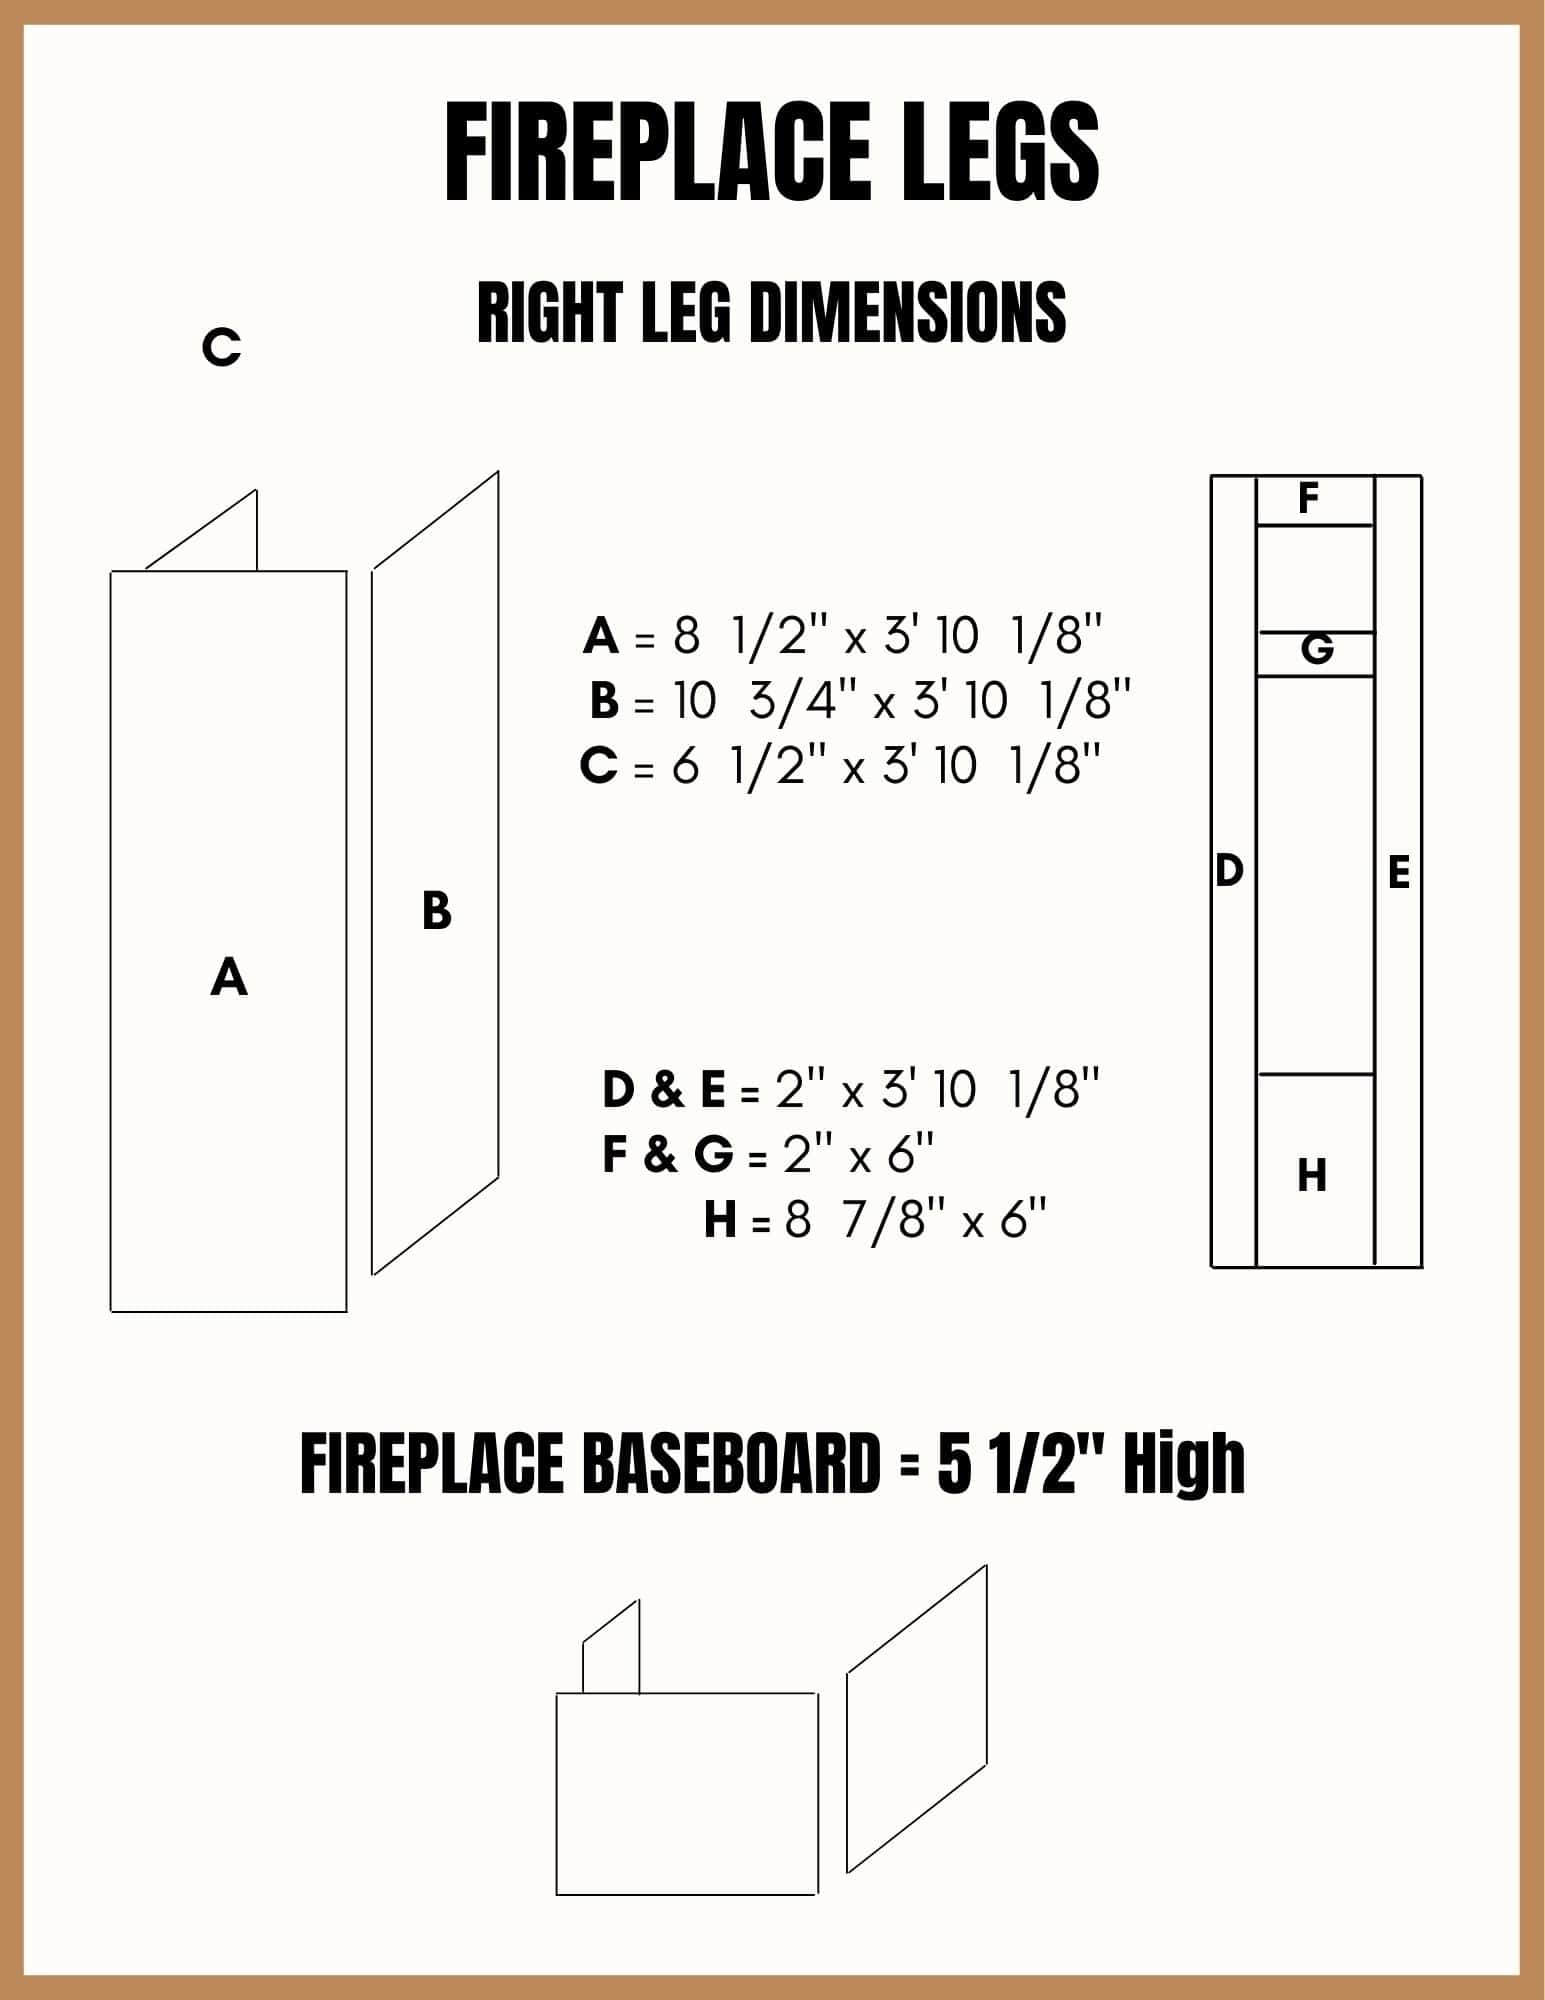
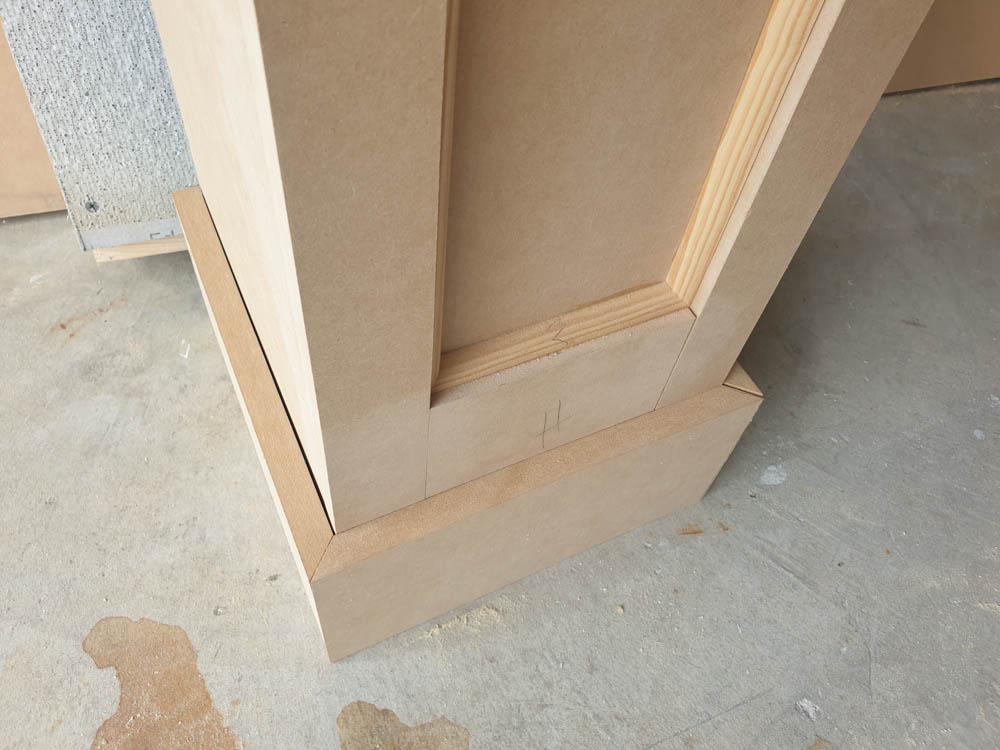
The fireplace legs were built to fit around the framing. This is why the measurements show that part B is deeper than part C. That is the side that buts up to the wall.
Note: The dimensions above are for the right leg. The dimensions for the left leg would be the same except that B & C would be inversed.
So first we cut out pieces A, B, and C and proceeded to glue and nail them together. Part 1 of this DIY series explains why we chose to work with MDF for this project and why you should too!
Once that was done it was time to cut the trim pieces that will go on the front face of the legs.
We cut the MDF trim pieces (D-H) in the dimensions shown above and glued and nailed them to the legs.

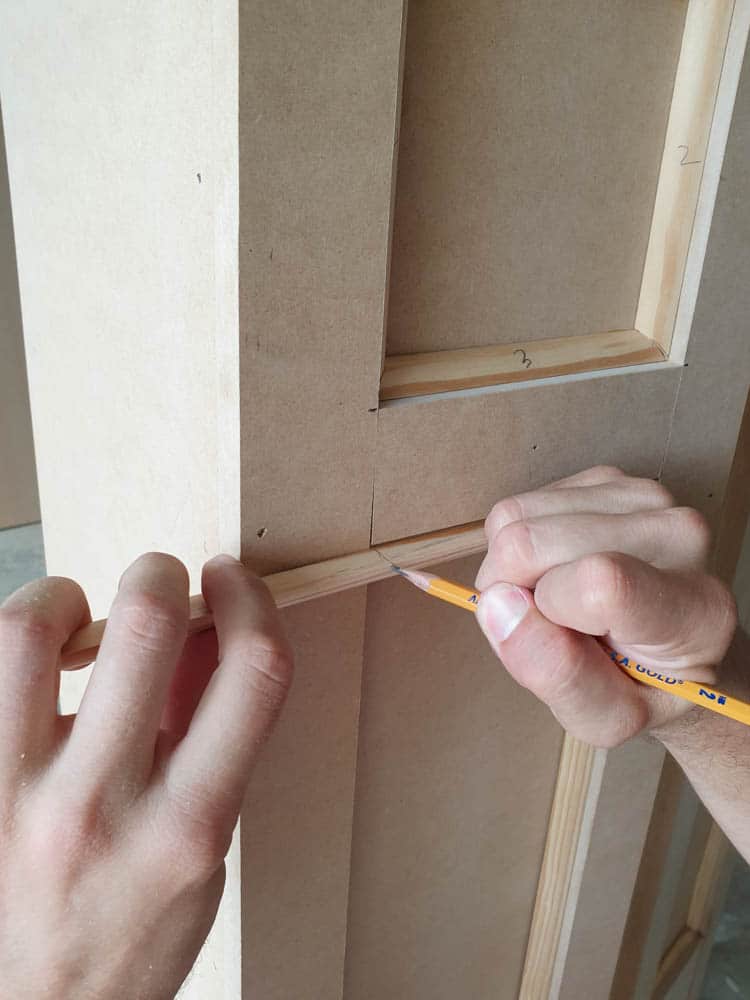
Make sure your trim pieces are level! And if you need to squeeze them in a little, do so carefully with a rubber mallet!
Note: We decided to cut another small MDF piece to fit between the leg for extra support.


Then we measured and cut these little quarter rounds and glued them to the columns inside our trim pieces. No nails are required for this step.
Baseboards For Fireplace Legs
The baseboard for the fireplace legs (also known as the plinth) are simple yet they add that finishing touch.
We used MDF for the baseboard as well but the trim piece on top is primed wood. We did not nail or glue the baseboard or the baseboard trim to the legs for a couple of reasons.

For one we didn’t want to have to work around the baseboard when it was time to tile.
Also, this fireplace is being built directly on our concrete floor (read more about the reasons why you should build on your subfloor in Part 1 of this series). Therefore the baseboard cannot go on until the new wood flooring is installed.
For now, we will put the baseboards in place without nailing them in. This way we won’t have to deal with ripping them out and possibly damaging them or the legs in the future.
Obviously, everyone’s situation is different. If you are building your DIY faux fireplace built-in directly on your subfloor (whether that be wood or concrete) then maybe you should consider doing the same.
But even If you are building this fireplace directly on your existing flooring I would still suggest nailing the baseboards to the legs AFTER you tile the surround cement board. This way you can place the baseboards nice and flush on the tile.
The same thing goes for the trim on top of the baseboards. We just cut and nailed the trim pieces to themselves but not onto the baseboards or the legs.
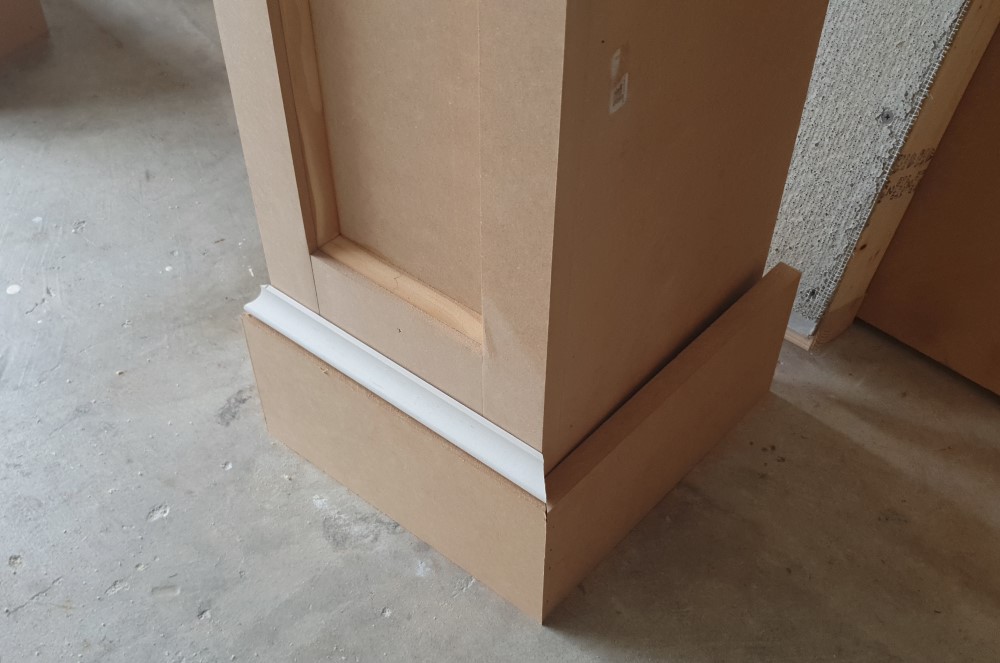
NOTE: The thickness of your tile will affect the depth of the baseboard. So it’s better to cut them a little longer and then cut them to the precise depth once your tile is in place.
DIY FAUX Fireplace Built-in – Hidden Storage Compartment
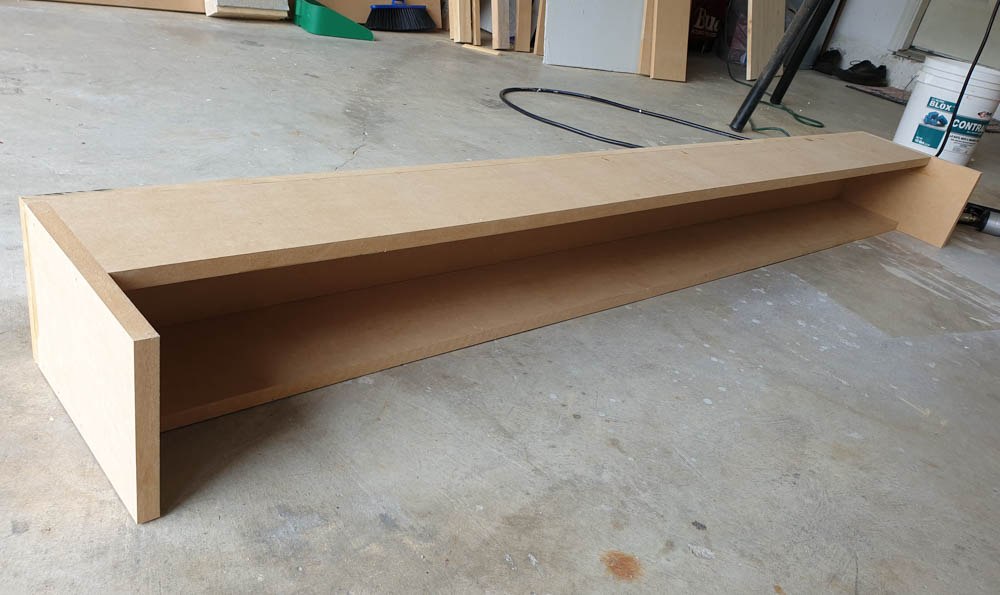
The hidden storage compartment wasn’t part of our original design. But we realized that for this DIY faux fireplace built-in to look good we needed to hide the TV boxes and cables somehow.
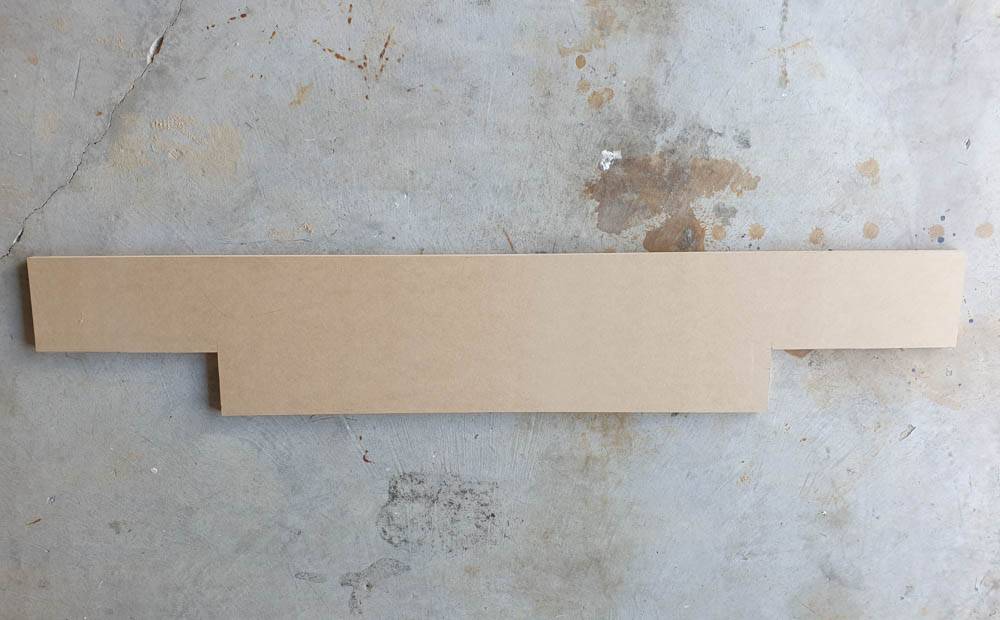
We knew we wanted the header of the fireplace (the piece between the legs) to be a little recessed from the rest of the fireplace.
And we figured this would be the perfect piece to make into a hidden compartment. For one, because it’s right under the mantel to the cables are easily accessible.
Plus, we needed a little gap around the door so that it could have space to open freely without hitting the other surrounding pieces. The recessed design allowed for that gap to not be too noticeable.
My husband found these AMAZING hinges that were the key to our success!
Now it was time to start building!
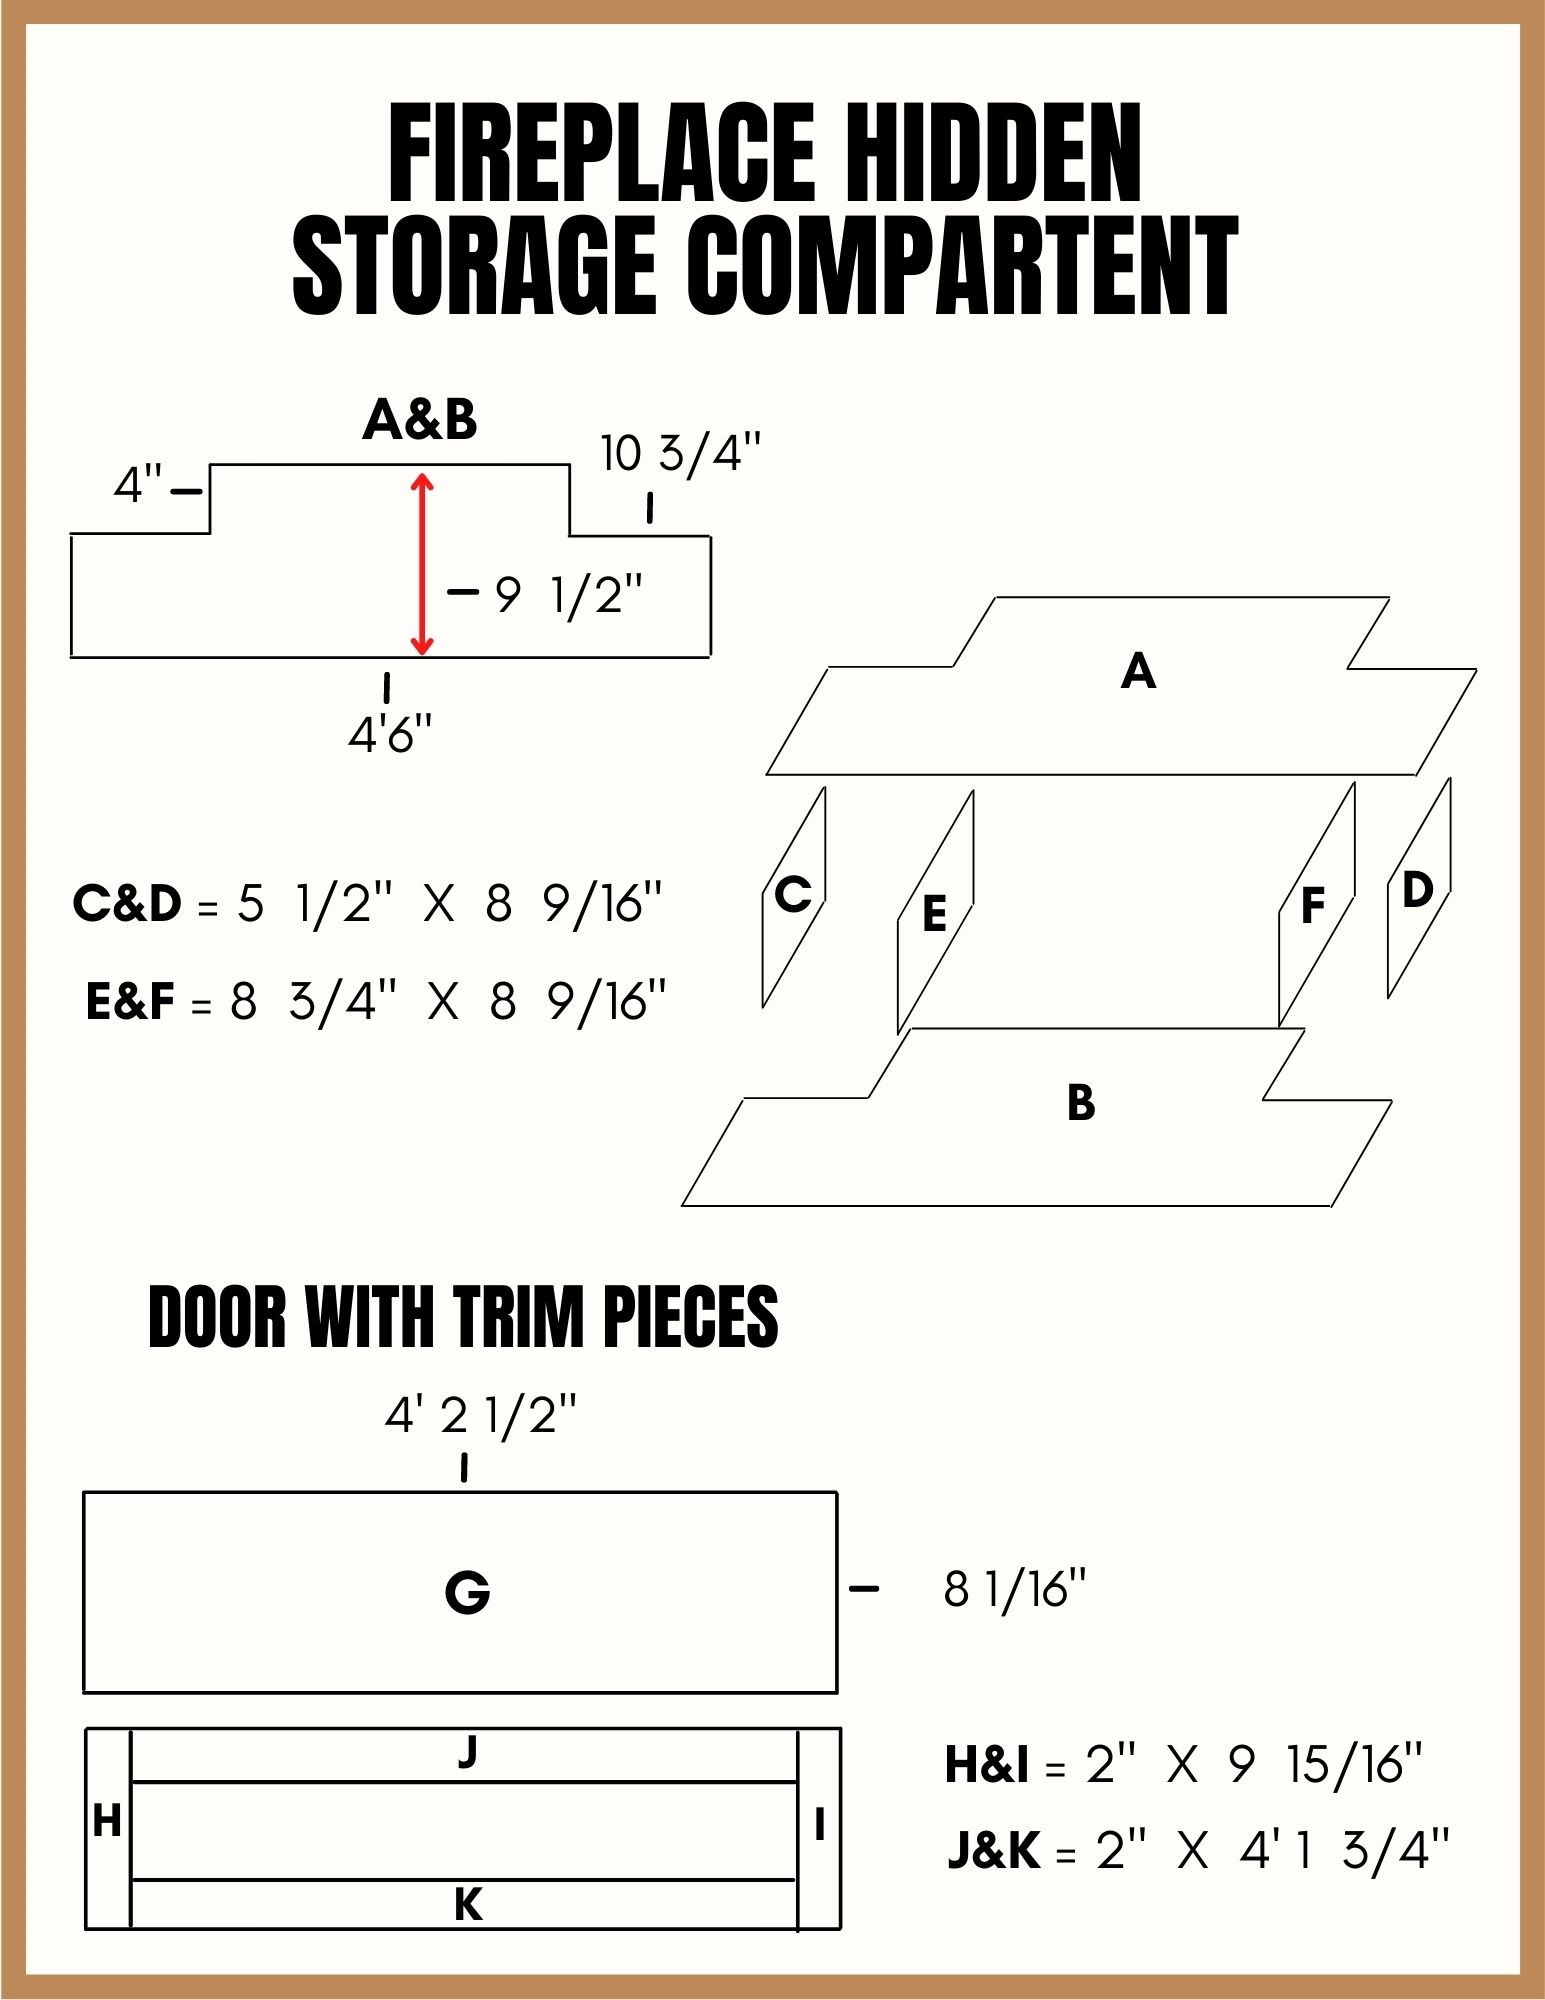
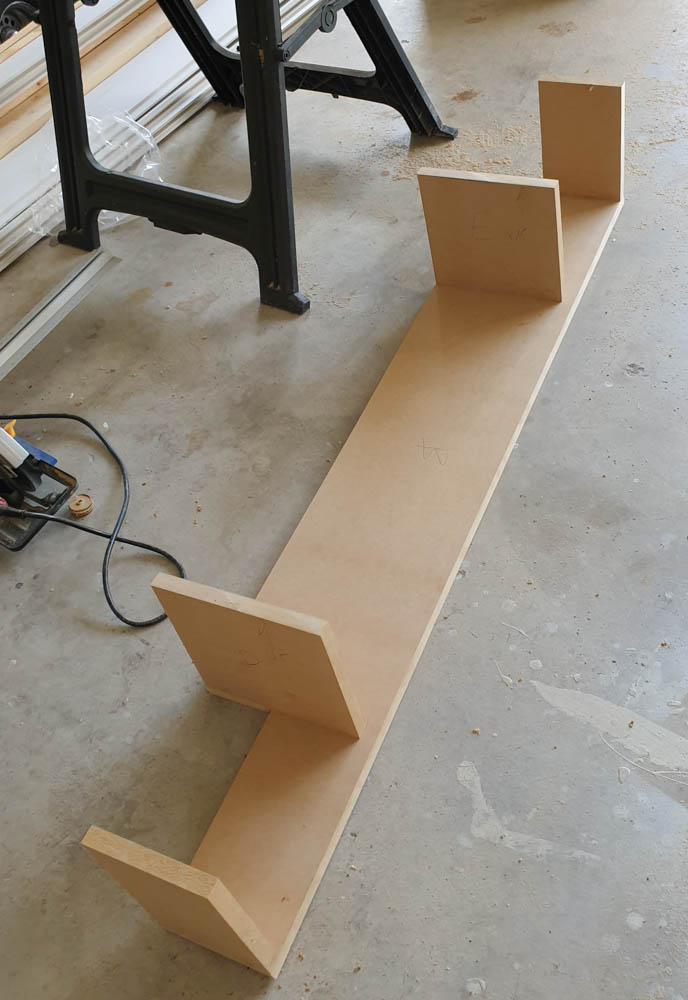
After we cut all of our MDF pieces to the dimensions shown above it was time to start assembling.
We drilled holes on part A for the TV cables.
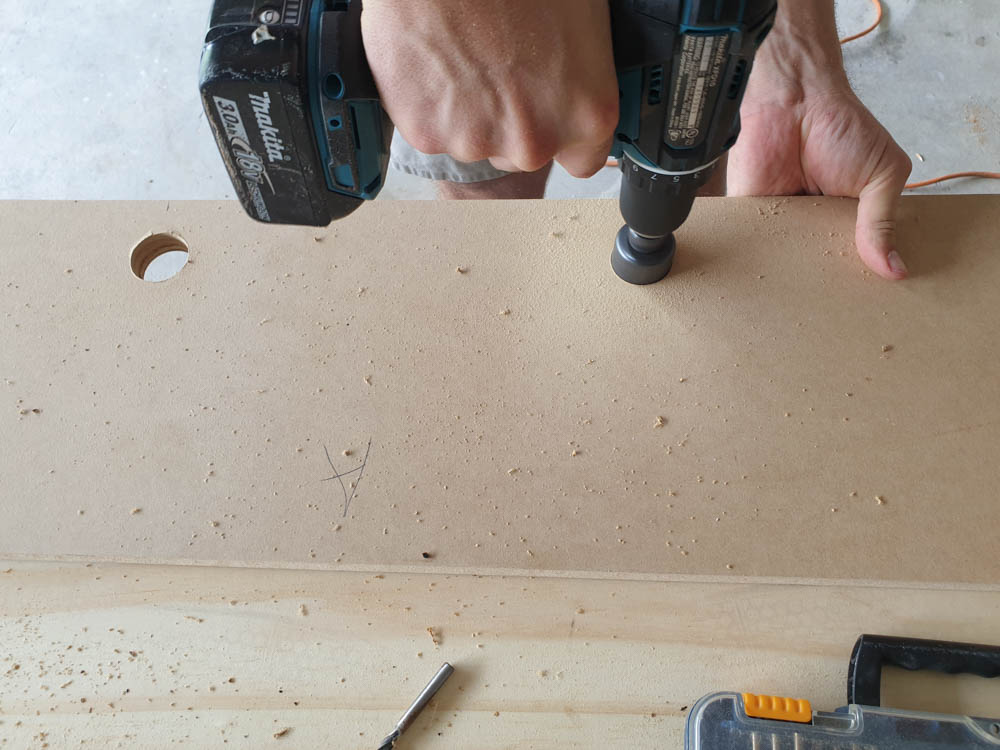
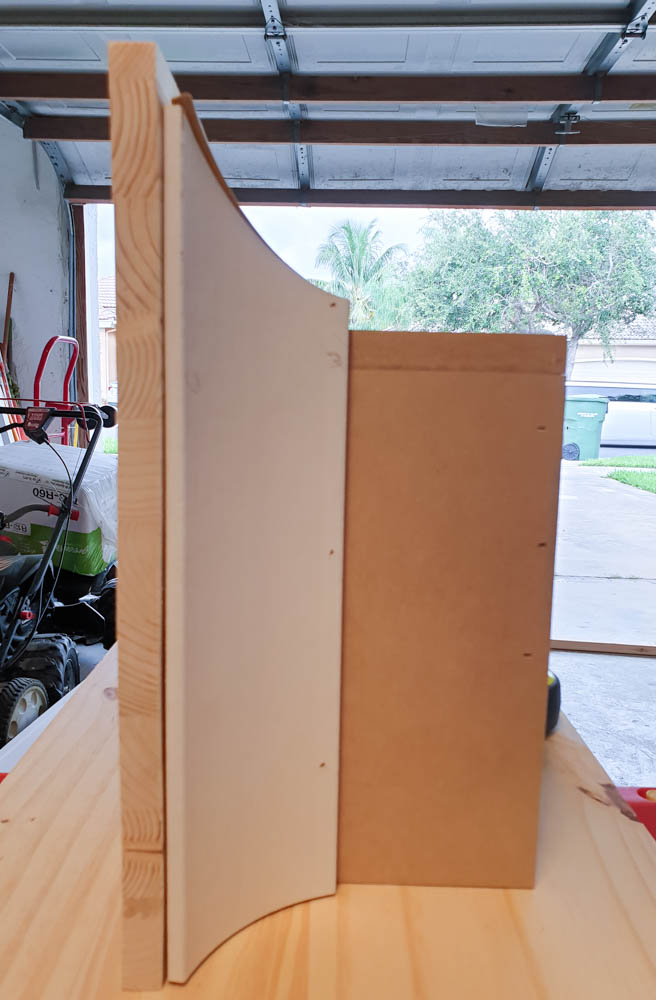
Then we glued and nailed parts B and C, D, E, and F together. Notice that parts E and F are not flush to the front of the storage compartment. This is to allow part of the door to “sit” inside the compartment once fully closed. The trim pieces that will go on the face of the door will be outside and still recessed from the rest of the faux fireplace built-in.
Next, we did pocket holes to attach the trim pieces (parts H, I, J, K) to each other with screws. This way it can be extra sturdy since there is not much area of the door we could glue or nail it to.
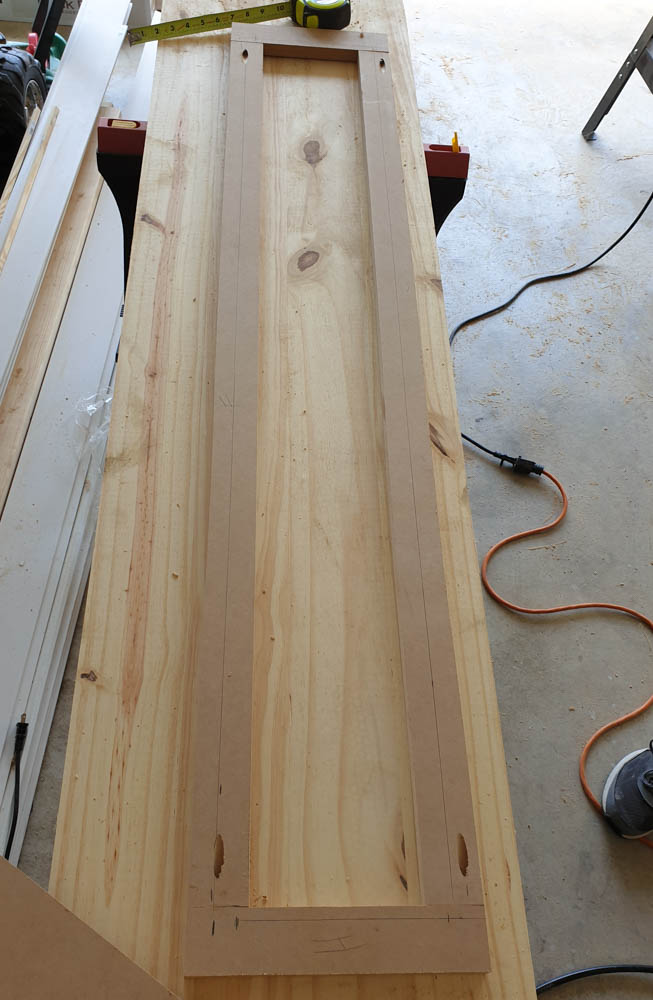
Then we glued and nailed the compartment door (part G) to the trim pieces.
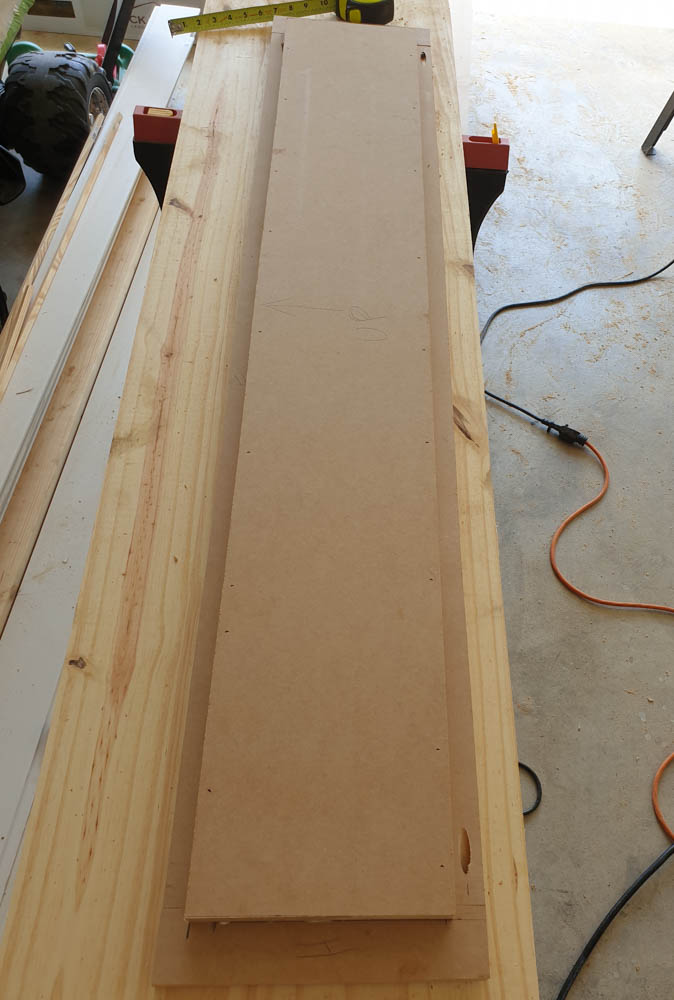
As you can see the actual door has to be smaller in order to fit into the compartment and have the trim still be recessed on the fireplace header.

The next step was to put the hinges on the hidden compartment.
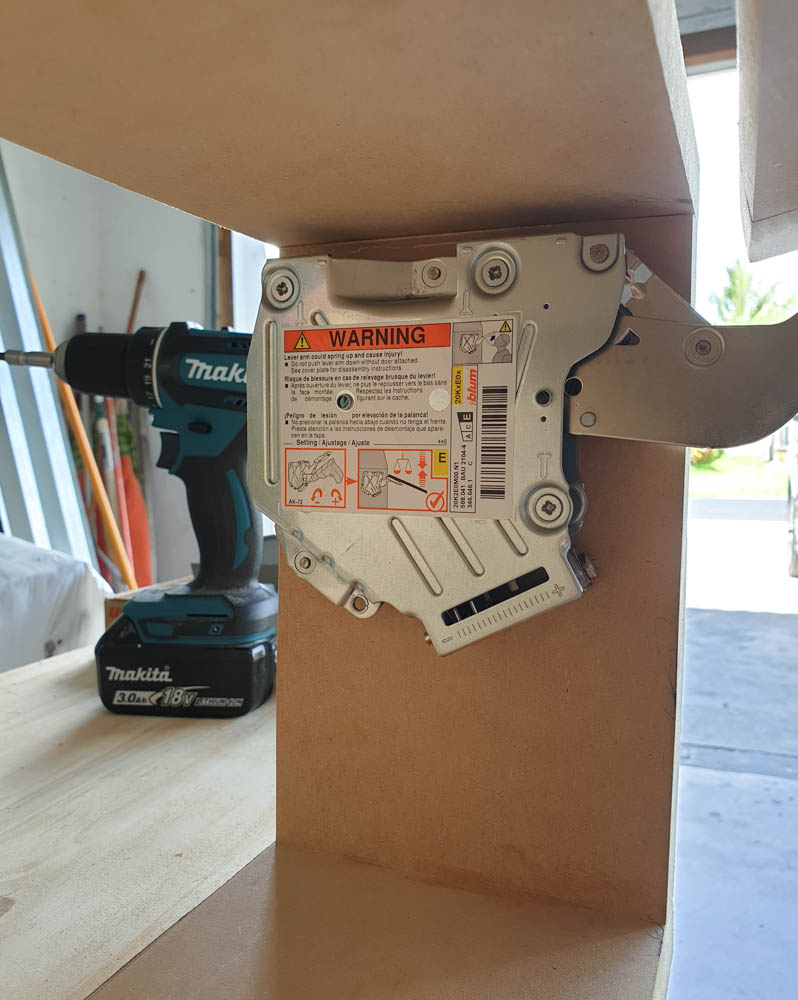
There are going to be some studs behind here so we added a piece of plywood behind the ends of this compartment to hide the framing.

Note: We had to make a little cut on the backboard in order for the hinges to fit. The hinges were a little bigger than we expected when we were designing our fireplace. But it worked out fine in the end because the hinges themselves cover it. These hinges do have covers but the covers didn’t fit in this small space.
Then we placed the mounting clips on the door (sold separately). And crossed our fingers while we placed the door on the hidden storage compartment!
The Hinges Overview
We absolutely LOVE these hinges! These are specifically made to open upward. This makes it easy to grab the bottom of the door and pull up.
These hinges allow you to leave the door open at whatever height you place it on. This is very important because you don’t want the door to close and slam your fingers!
Plus it has a soft close which works so so well! It even aligns itself once it closes. It’s perfect!!
And we are so glad we decided to have this little hidden compartment for all of the essentials. Now, this won’t fit gaming systems (although a switch might fit in here). But it will easily hold most cable boxes, remotes, cables, etc.
DIY Faux Fireplace Built-In – Mantel
The mantel was probably the trickiest to build. Our measurements had to be EXACT so that it would line up perfectly to the bottom pieces already built (the header compartment and legs). And if you know anything about carpentry then you know that every 16th of an inch counts!
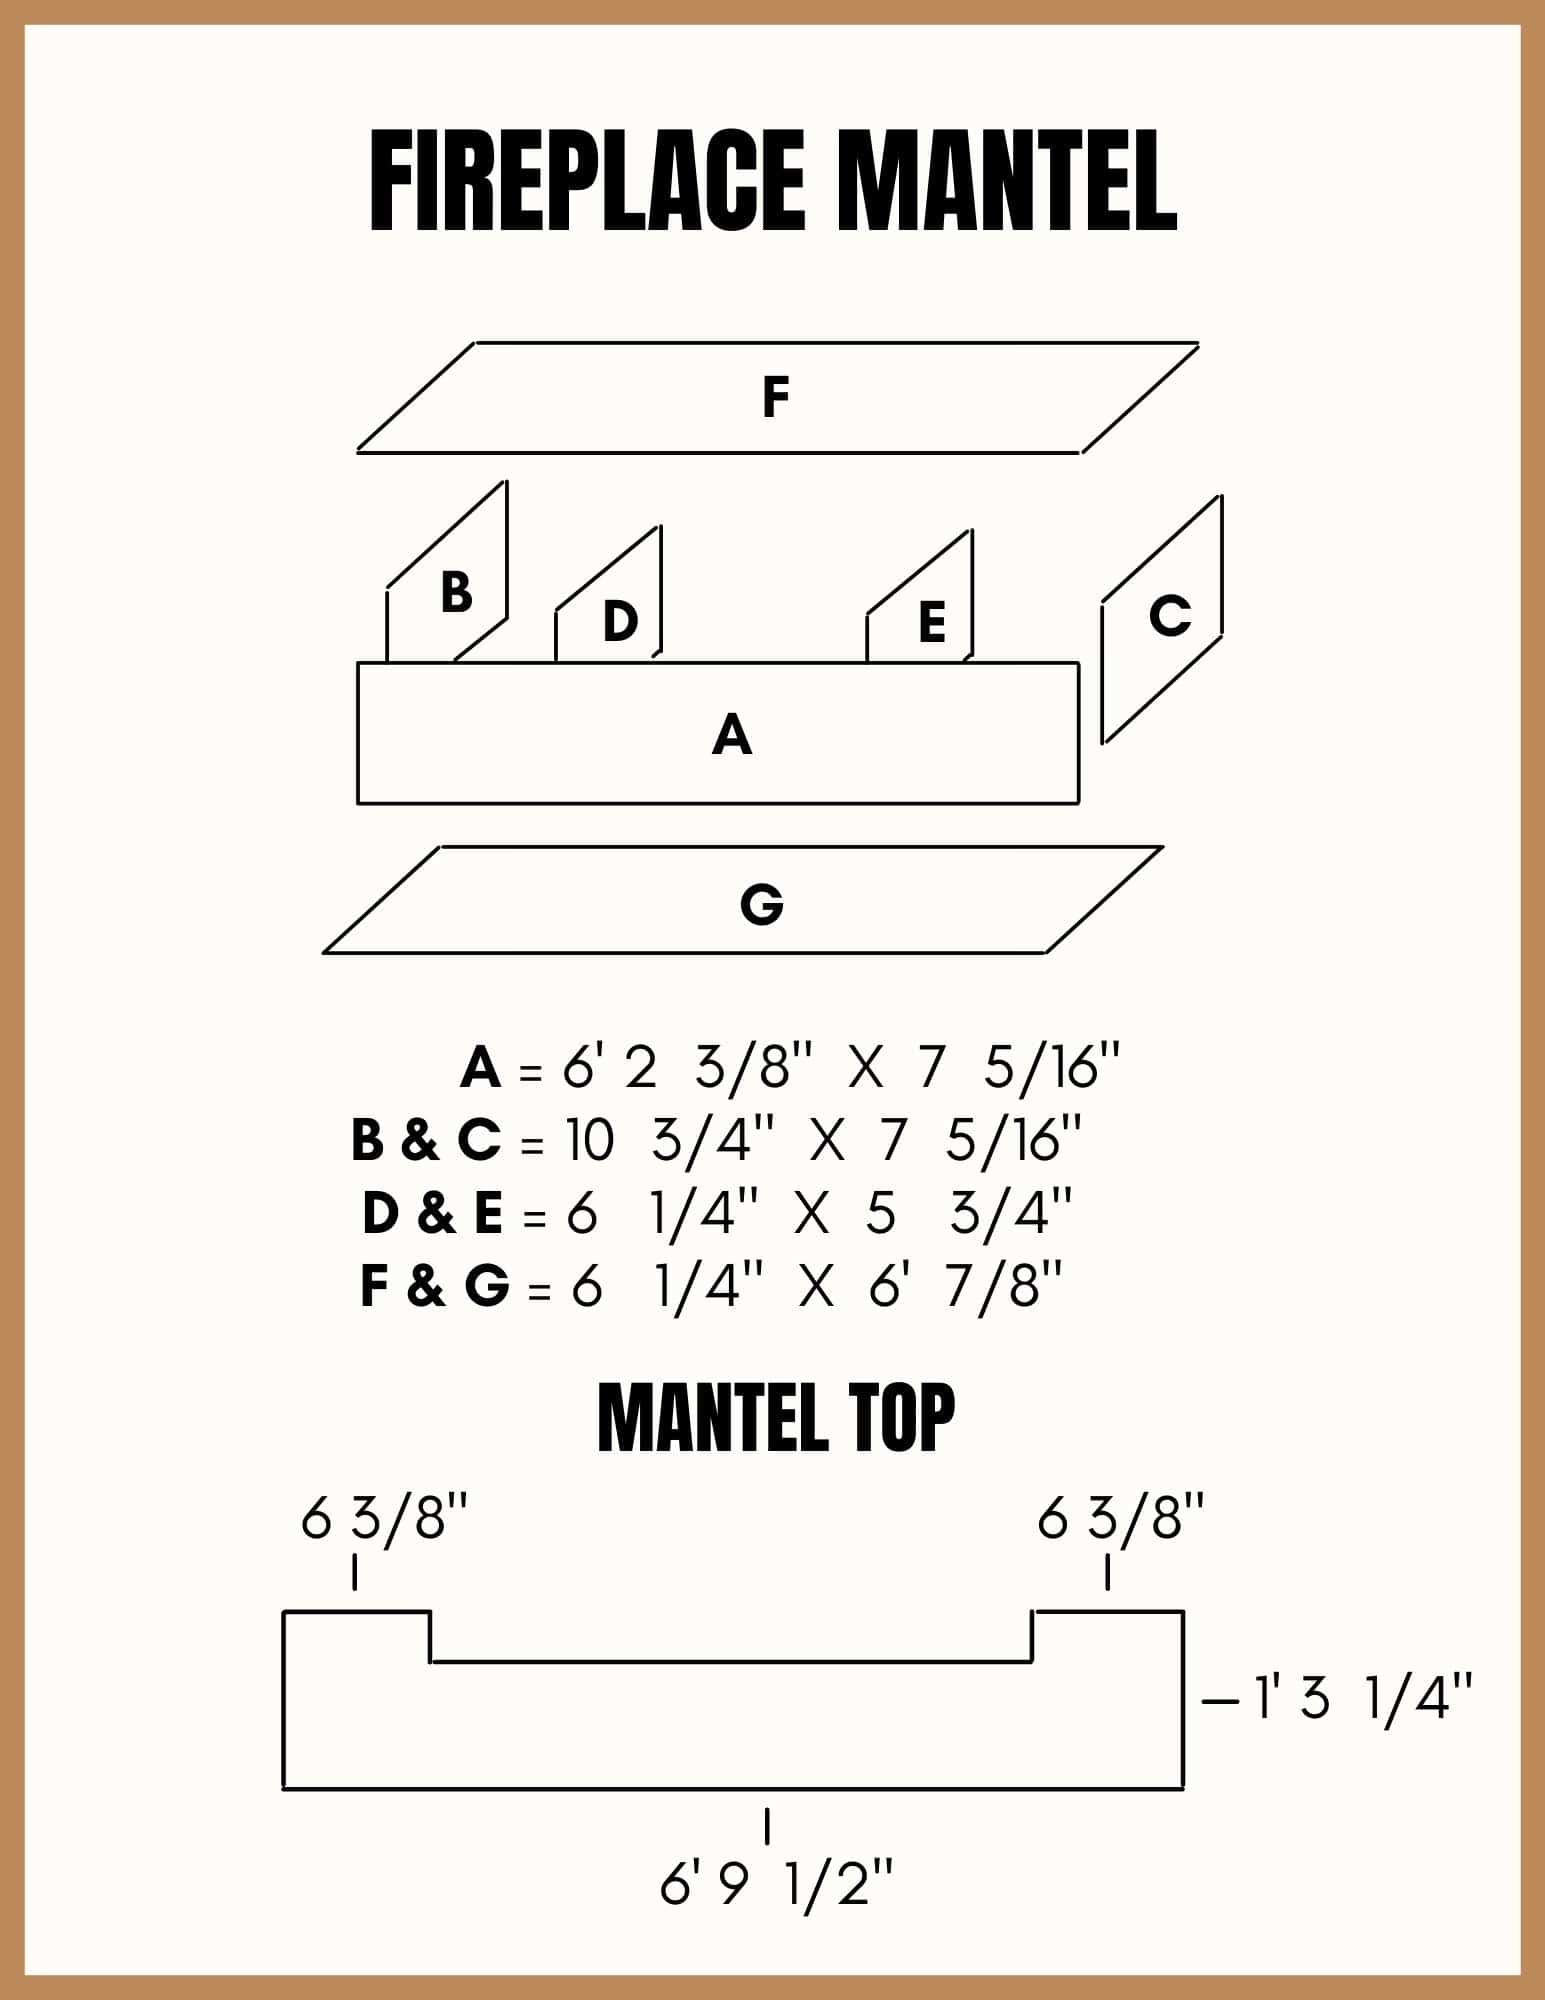
The top dimensions are for the compartment where the actual wood mantlepiece will rest upon. We added parts D and E for support.
Once we had all of our pieces cut, glued, and nailed it was time to add the wood panel for the mantel and crown molding. I explain why I chose a wood panel for the mantel instead of MDF in Part 1 of this DIY faux fireplace built-in series.
We decided to have very simple trim pieces but you can choose something a little more elaborate.
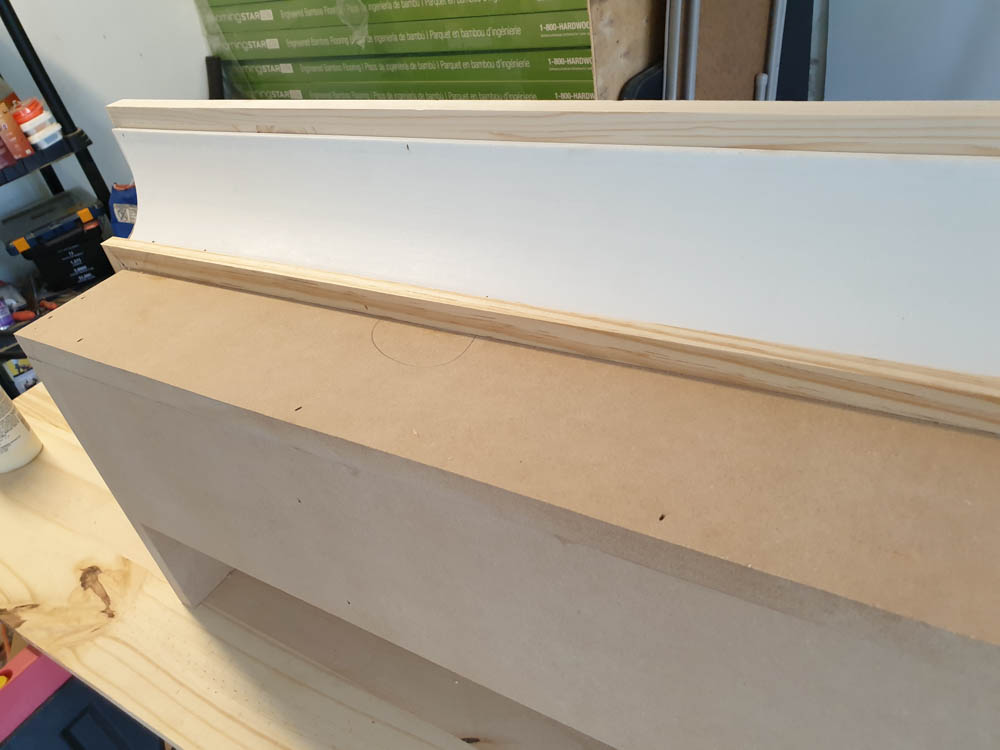
These trim pieces help maintain that modern farmhouse look we were going for.
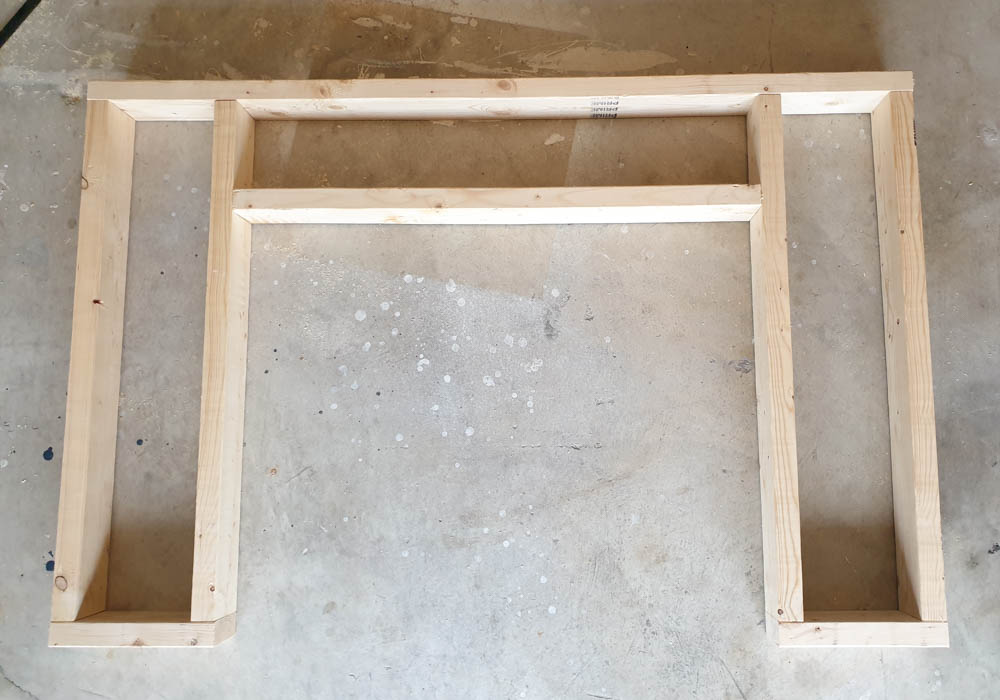
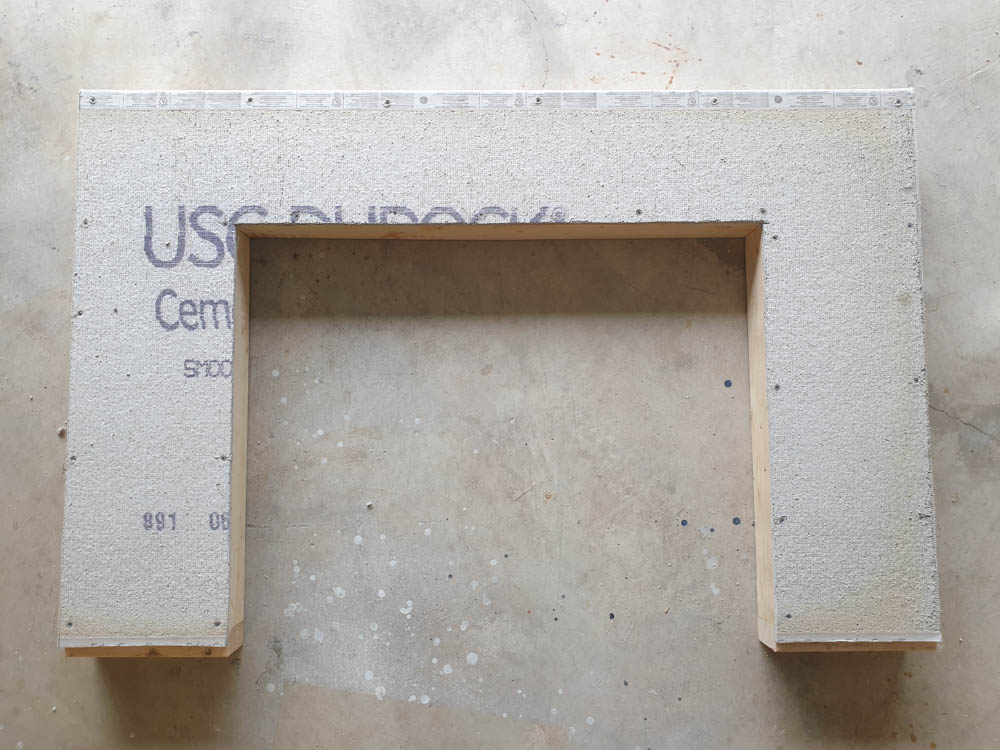
DIY Faux Fireplace Built-In – Surround Cement Board
The surround for this fireplace was framed out separately from the main framing that will go directly on the wall.
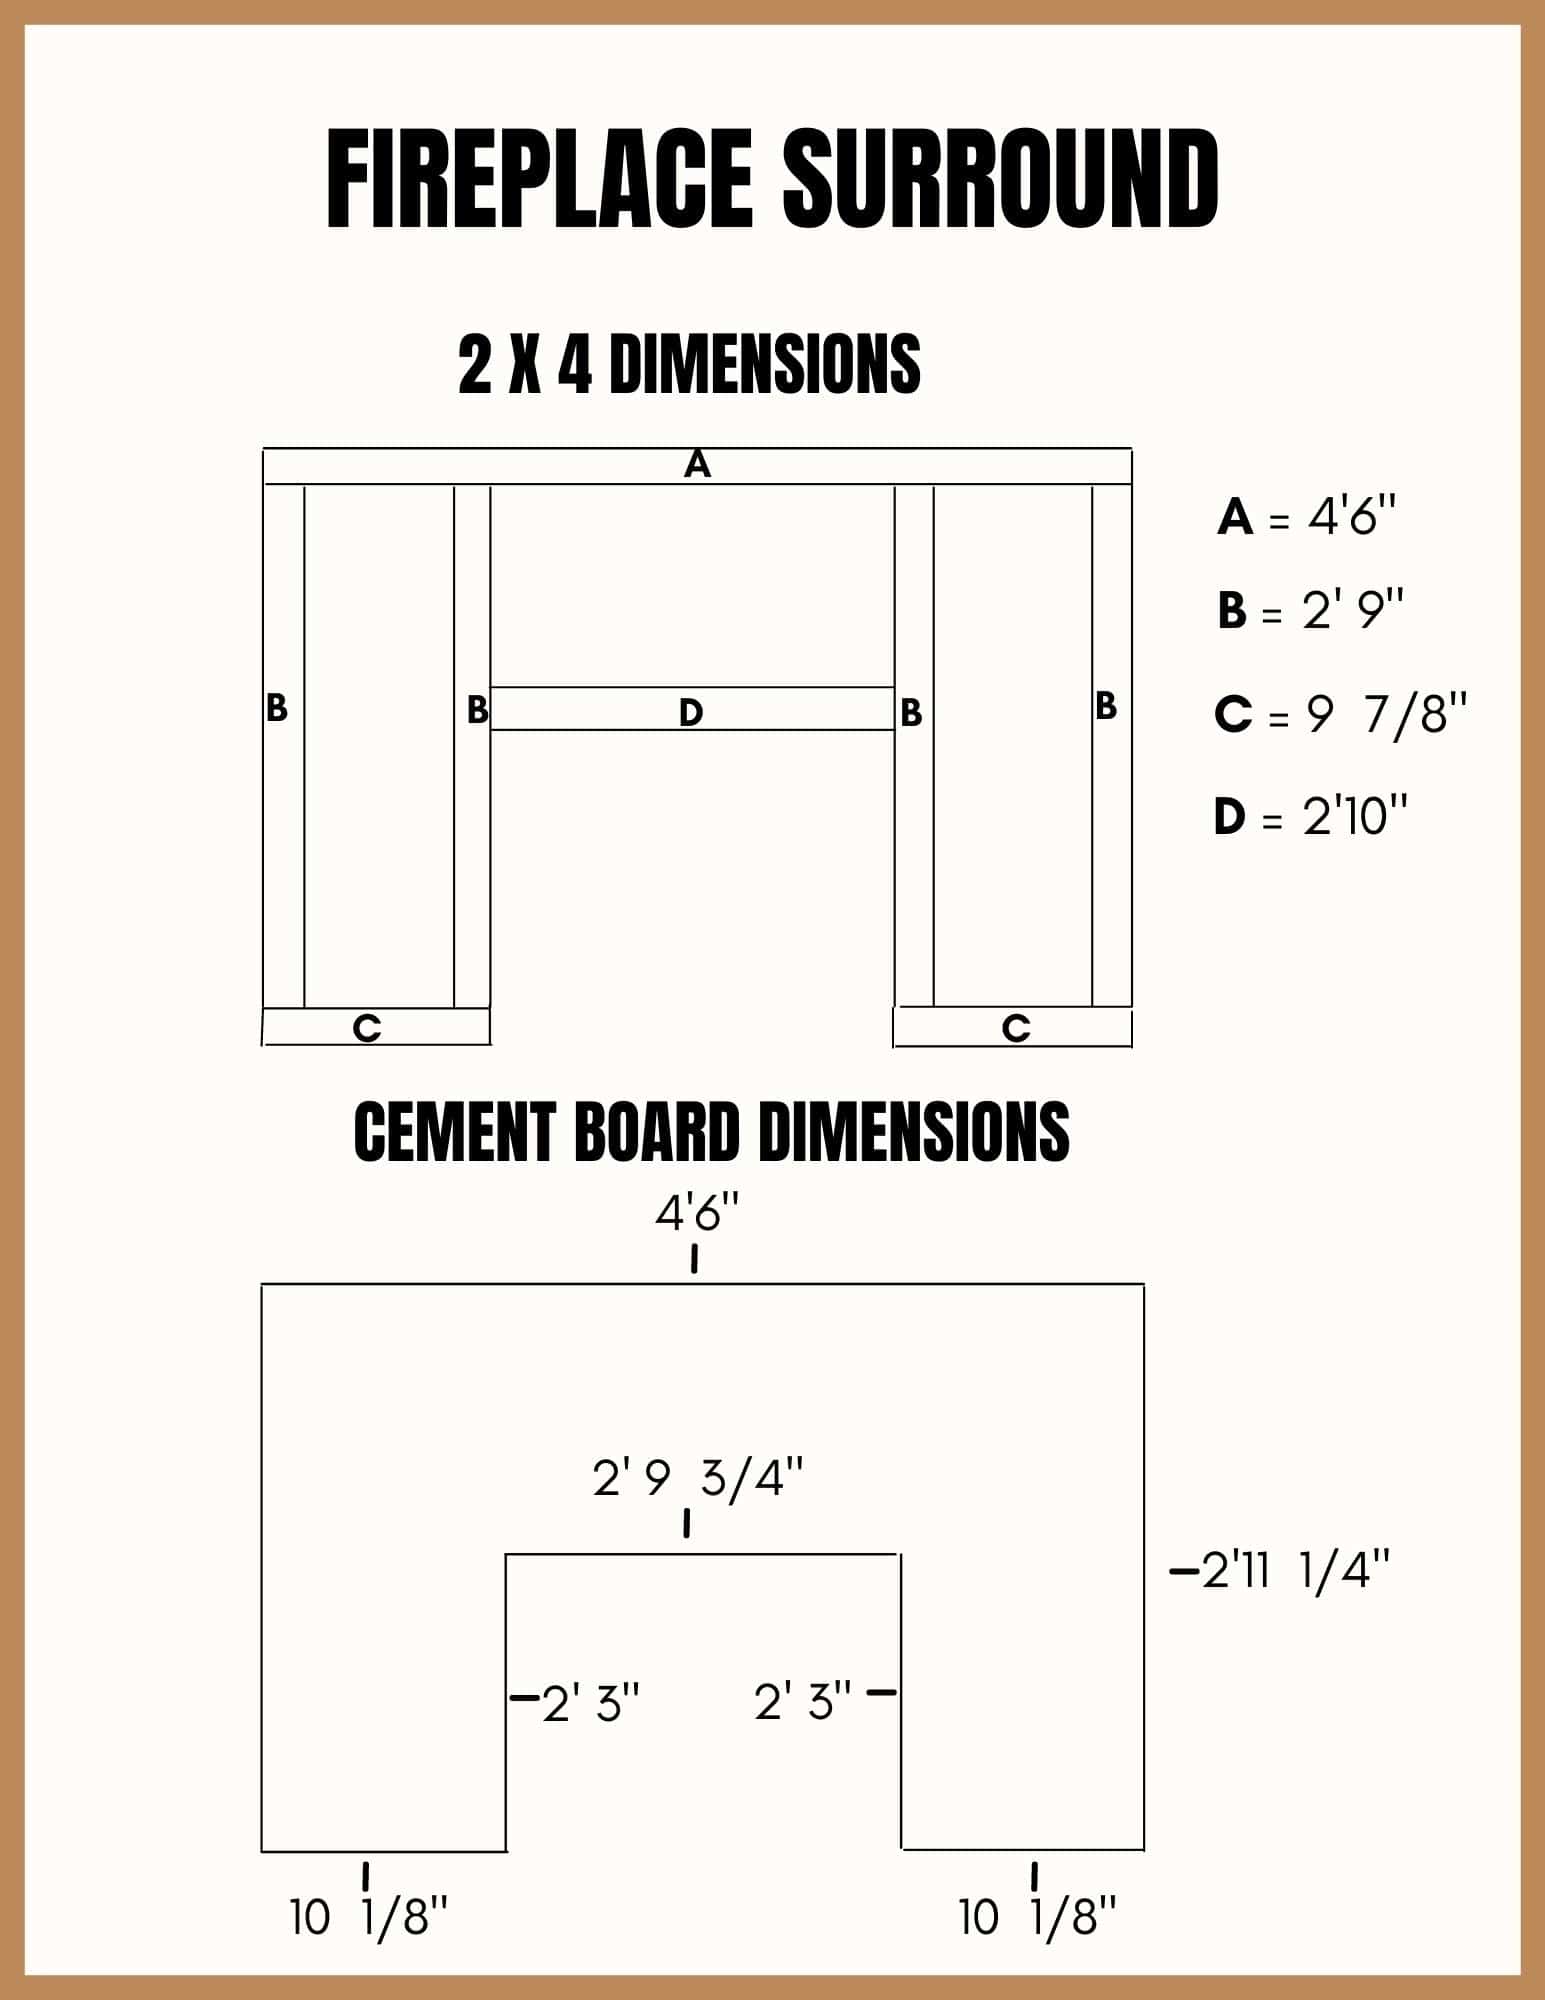
We used 2 by 4’s for the framing and 3″ zinc plated construction screws to attach them.
This 3 x 5 cement board was cut to size with an angle grinder. Which actually worked out really well!
We used 1-1/4″ Rock-On Cement Board Screws to attach the cement board onto the frame.
Okay, so now we have built all the pieces you see in the photo below!
And that is it for Part 2 of this DIY faux fireplace built-in series! Make sure to check out the 3rd and final part of this DIY Faux Fireplace Built-In series to see how we did the framing, assembling, shiplap, paint, and tiling!
Pin It For Later! DIY FAUX FIREPLACE BUILT-IN PART 2!

Click here for the 3rd and last part of my DIY Faux Fireplace Built-In series!
And subscribe to my newsletter to receive updates on projects like this and more straight to your inbox!
You May Also Like


Leave A Comment