
My son Nathan turned 11 this year so of course we had to throw a Harry Potter birthday party worthy of Hogwarts itself! I DIYed tons of the decorations and party goodies to make sure every guest felt the magic of the Wizarding world from the moment they walked in.
Today I will be sharing all of these enchanting Harry Potter birthday ideas and crafts with you so let’s dive right in!
NOTE: Make sure to check out my DIY Harry Potter Escape Room For Kids which comes with FREE printables! This really took our Harry Party Birthday to the next level!
Harry Potter Birthday Home Tour
My top priority was making guests feel as if they’d stepped right into Harry Potter’s world the instant they entered the house. The Wizarding World is so vast that it offers endless inspiration for creative decorating. But there are specific Harry Potter scenes and places that I wanted to bring to life so let me take you on a “walk” through my Harry Potter Birthday home.
Entrance – Aragog and Diagon Alley Entrance
To start, you have Aragog and his family welcoming you to our front door. The DIY “Follow The Spiders” sign was the perfect finishing touch.
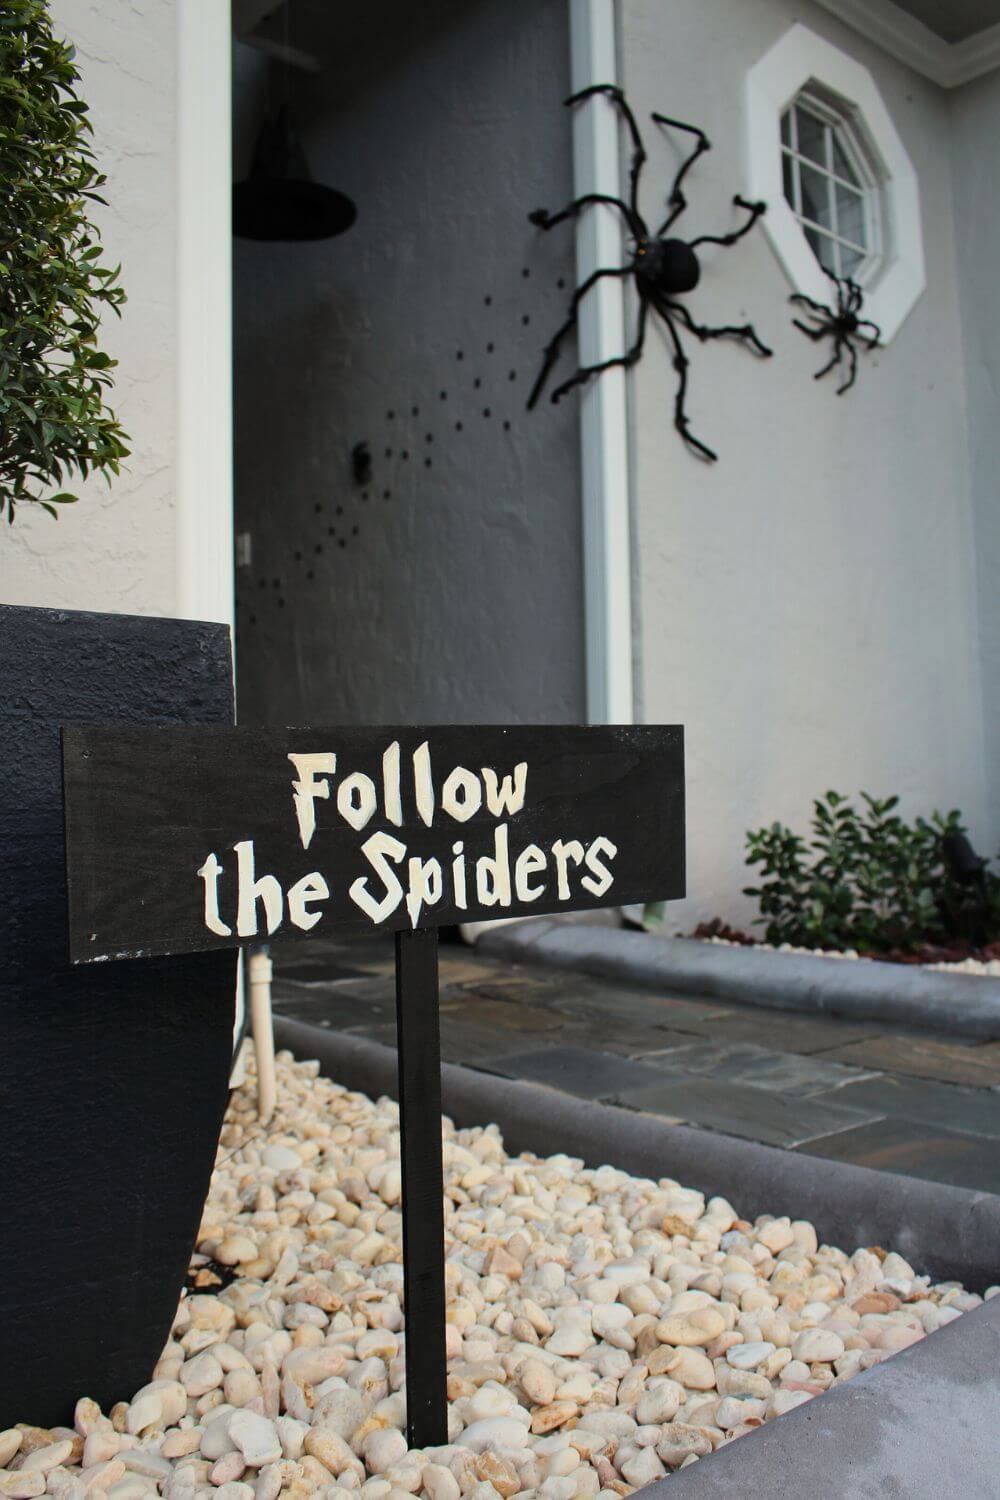
This was actually part of my Harry Potter Halloween decor, and since my son’s party was the day after Halloween we still had everything up. Obviously your birthday might not fall near Halloween so putting spiders outside of your home might be excessive. Or not! When it comes to creating a Harry Potter world, I say go big or go home! In fact, any Halloween decor you already have might come in handy! Check out how I created a Harry Potter Halloween theme here.
Next, I recreated the brick wall behind the Leaky Cauldron that gives you access to Diagon Alley on my front door.
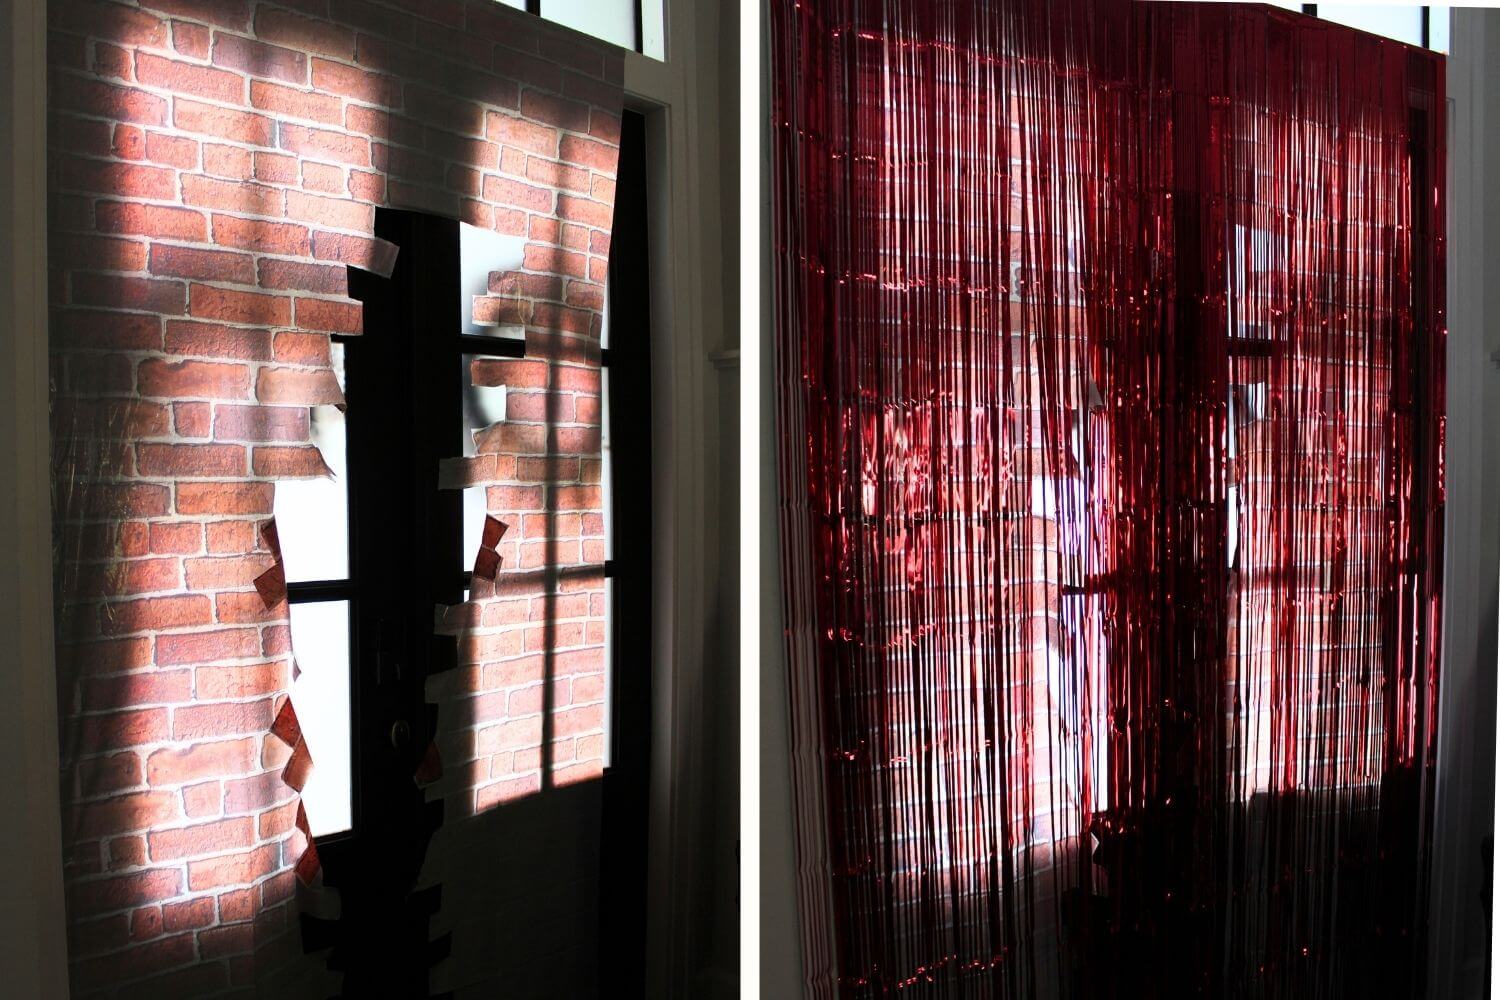
In order to make guests feel like they are really walking through the brick I cut a brick print table cloth giving the illusion that the bricks are splitting apart. Then I hung it over my door (on the inside of my home since my front door opens out) with double sided tape.
To cover the plain white backside of the tablecloth and to create the illusion of walking through something I attached dark red foil fringe curtains behind it. I also made sure to cut the bottoms way off from the floor so that no one would trip on them.
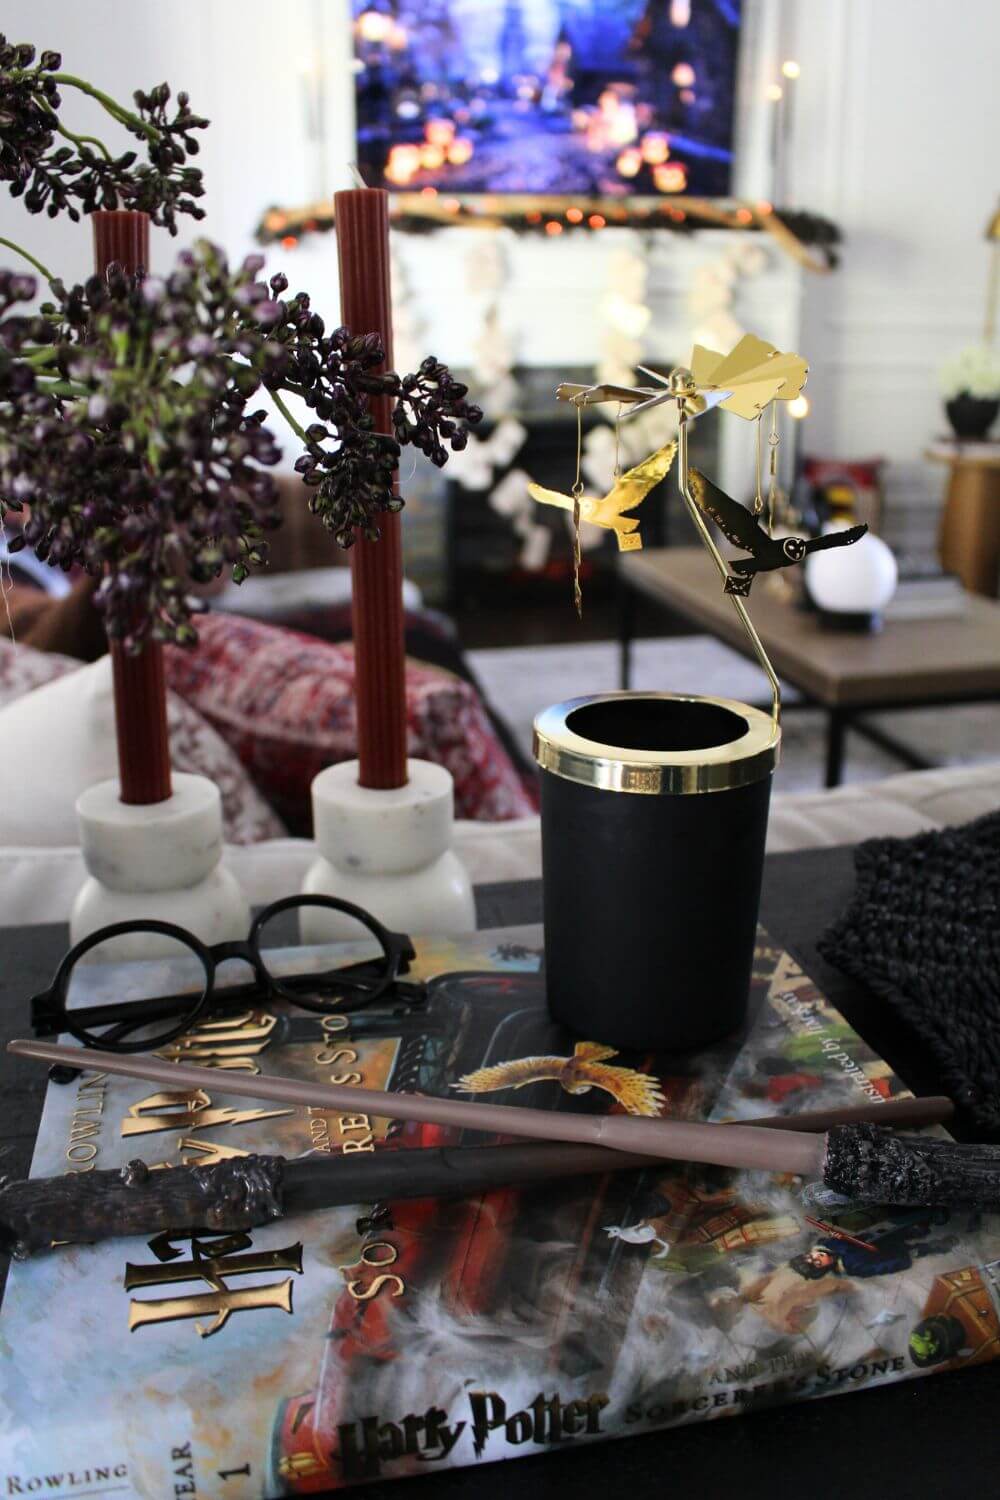
Living Area – Gryffindor Common Room
Once you enter my home you will note that I have many Harry Potter props to instantly transport into the wizarding world.
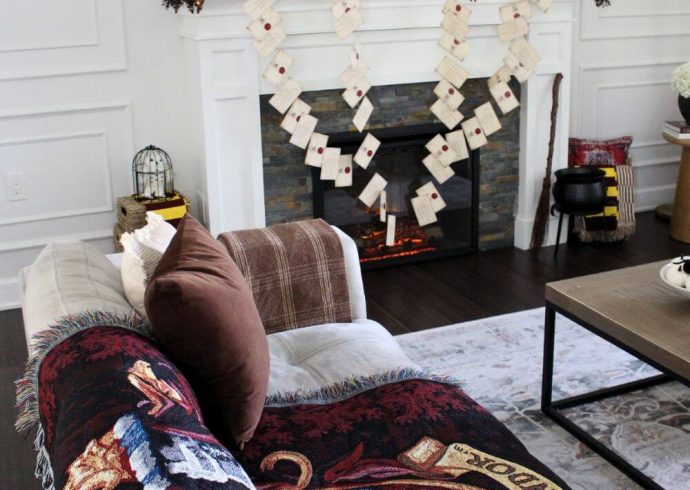
I have the Hogwarts Letters coming out of my fireplace, with I solemnly Swear that I am Up to No Good ribbon on my mantle.
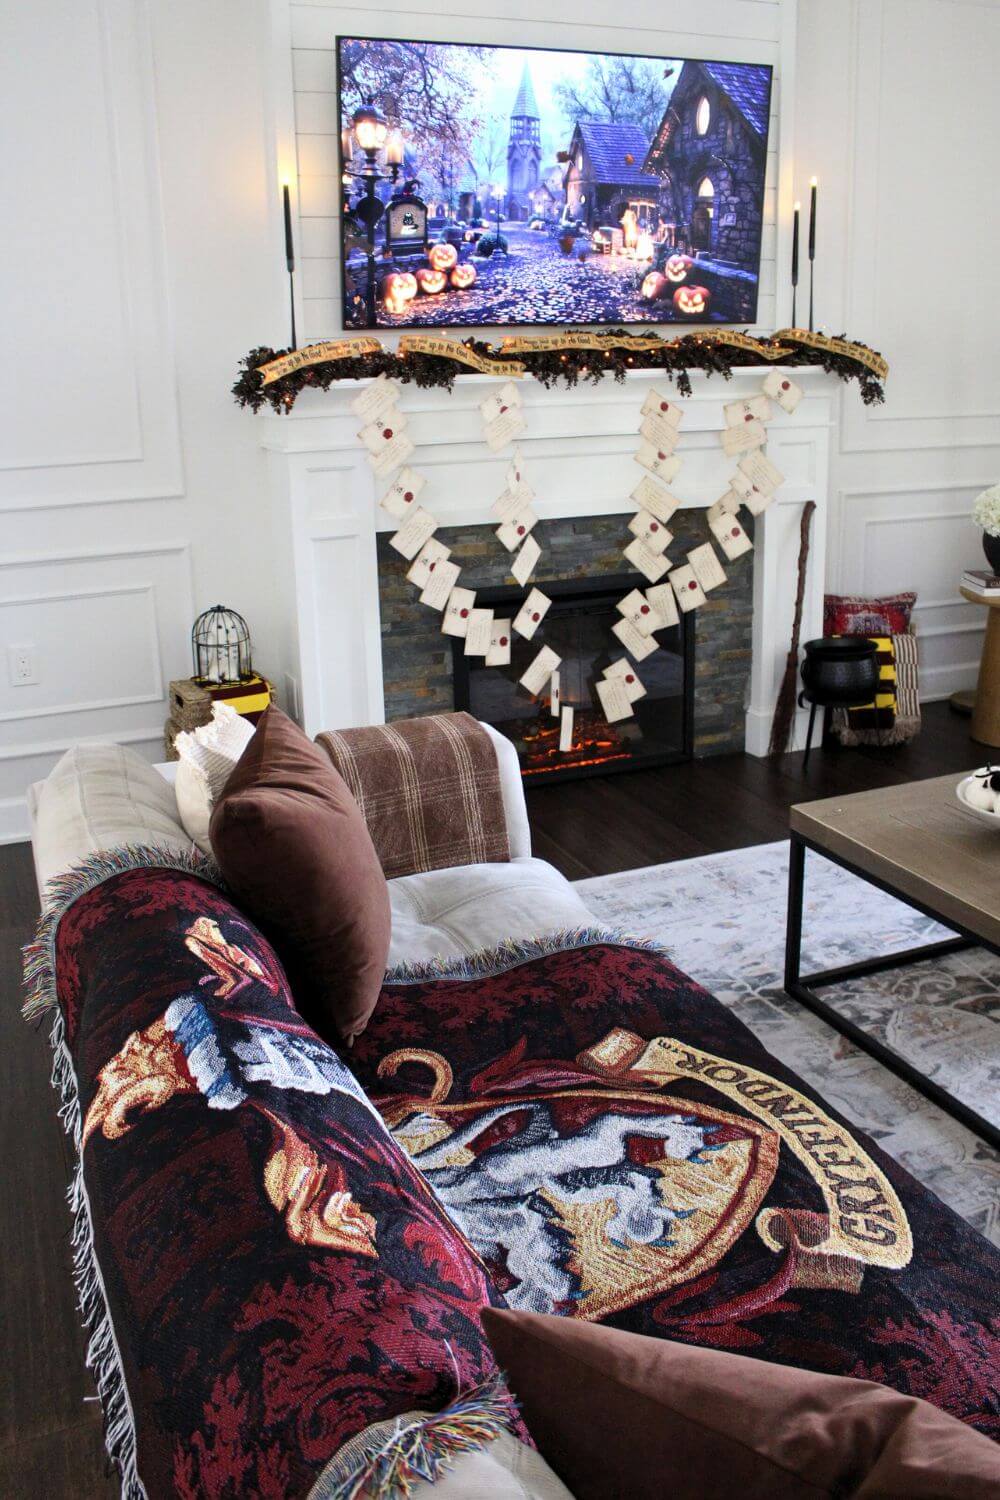
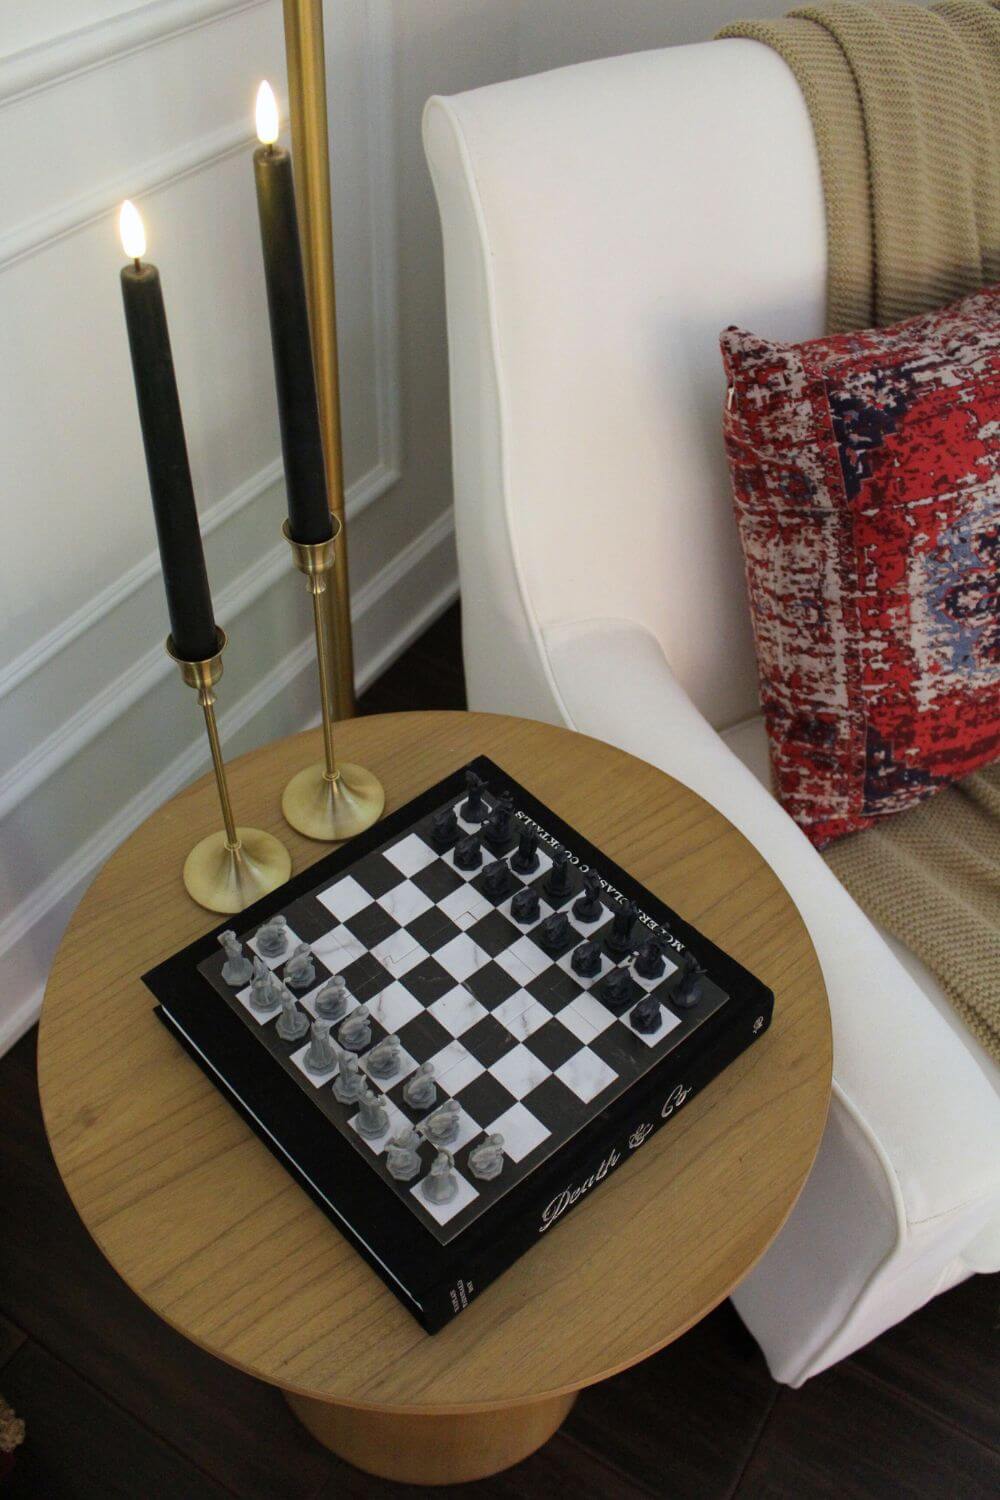
The Gryffindor throw blanket adds a cozy common room vibe to my living room. But the mini Wizard’s Chess on my side table and this Gryffindor vibes pillow cover make this corner my favorite spot in the house.
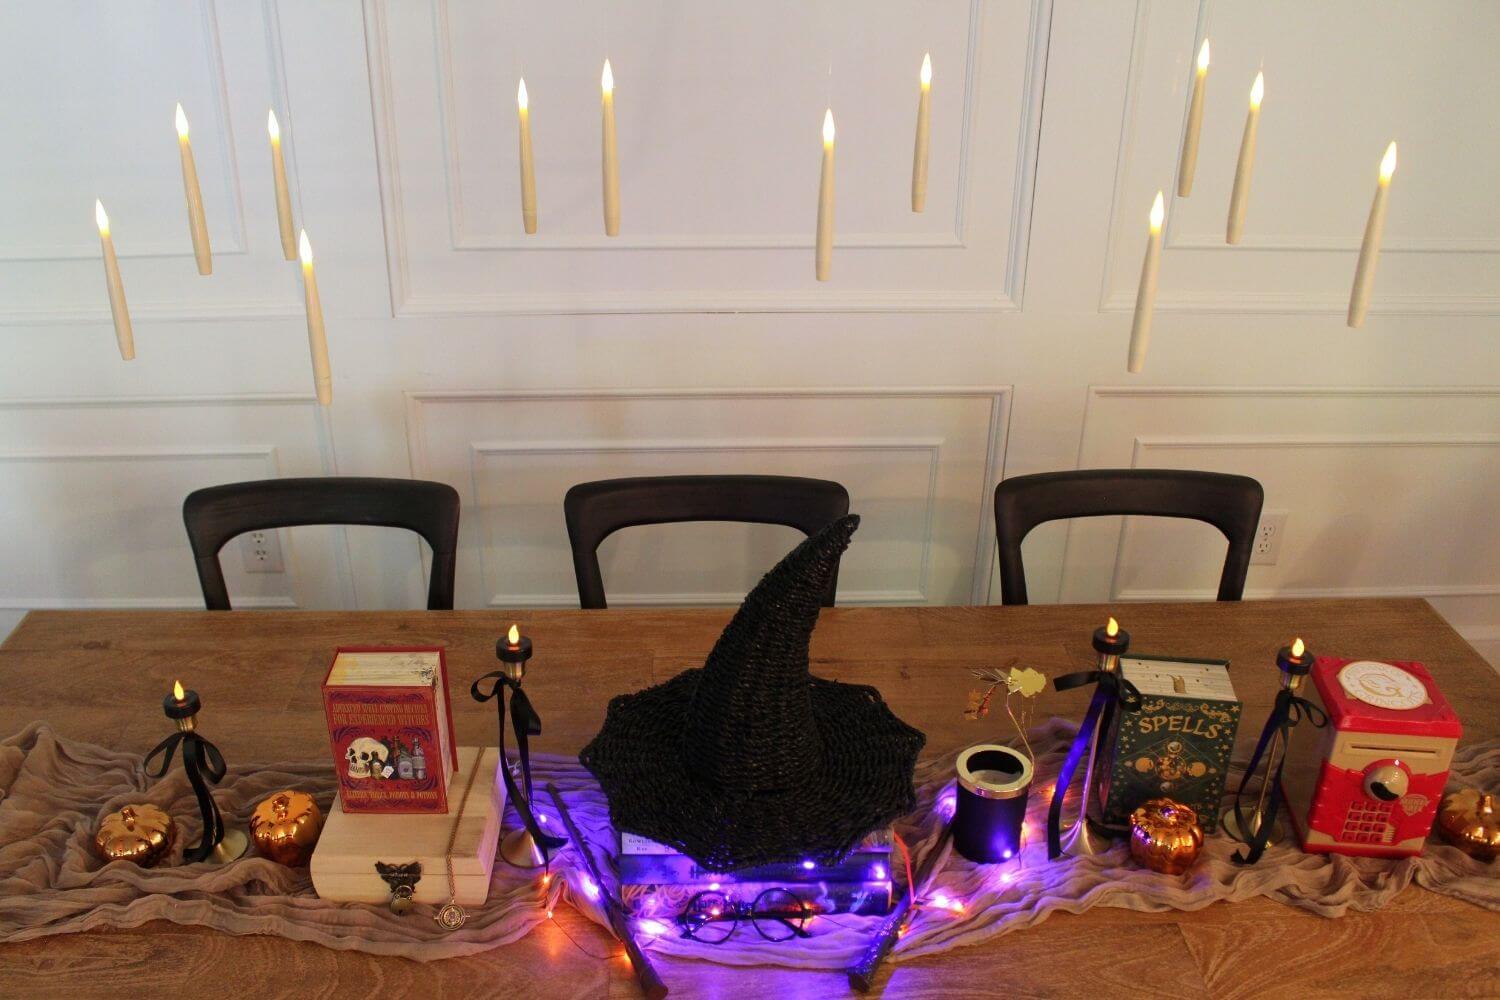
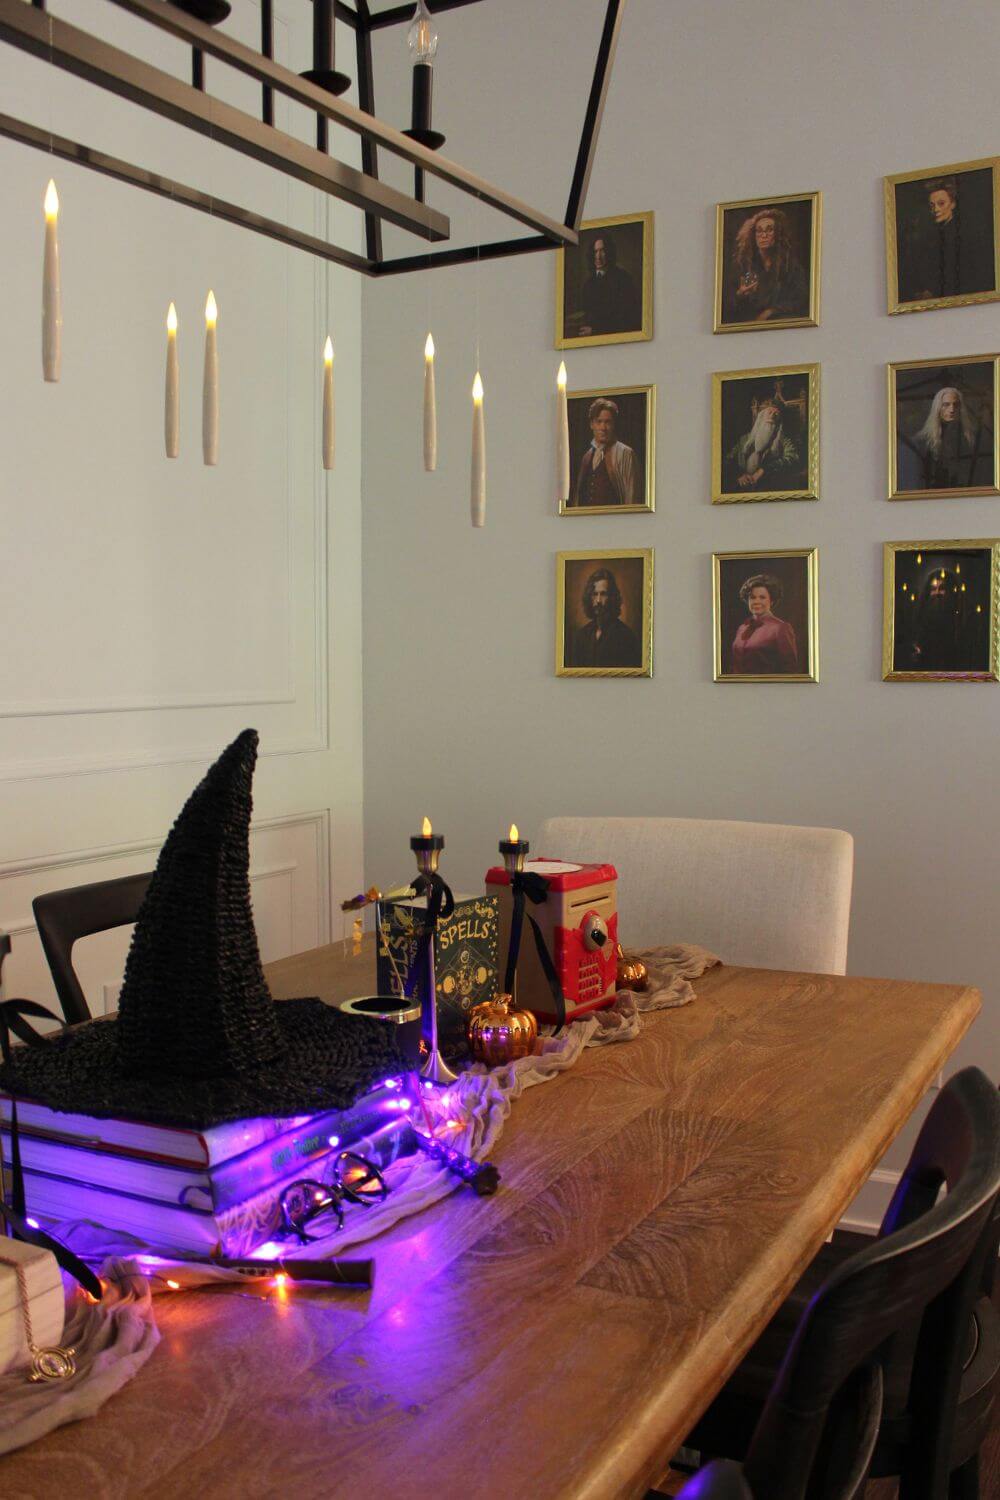
Dining Room – Great Hall
To create a Great Hall vibe in my dining area I hung these floating candles to my chandelier with fish wire that comes with it! The best part is the remote control wand that turns them on!
Then I added a mix of Dumbledore’s office vibes with this set of Harry Potter Portraits. I already have a gallery wall on that wall so I just replaced my picture frames with Dollar Tree frames and printed the portraits on cardstock paper.
Part on the Harry Potter Escape Room was set up on my dining table as well!
Hogwarts Classes
Dividing my home into “classes” was something I wanted to do from the start. So I set up tables around my home for this purpose.
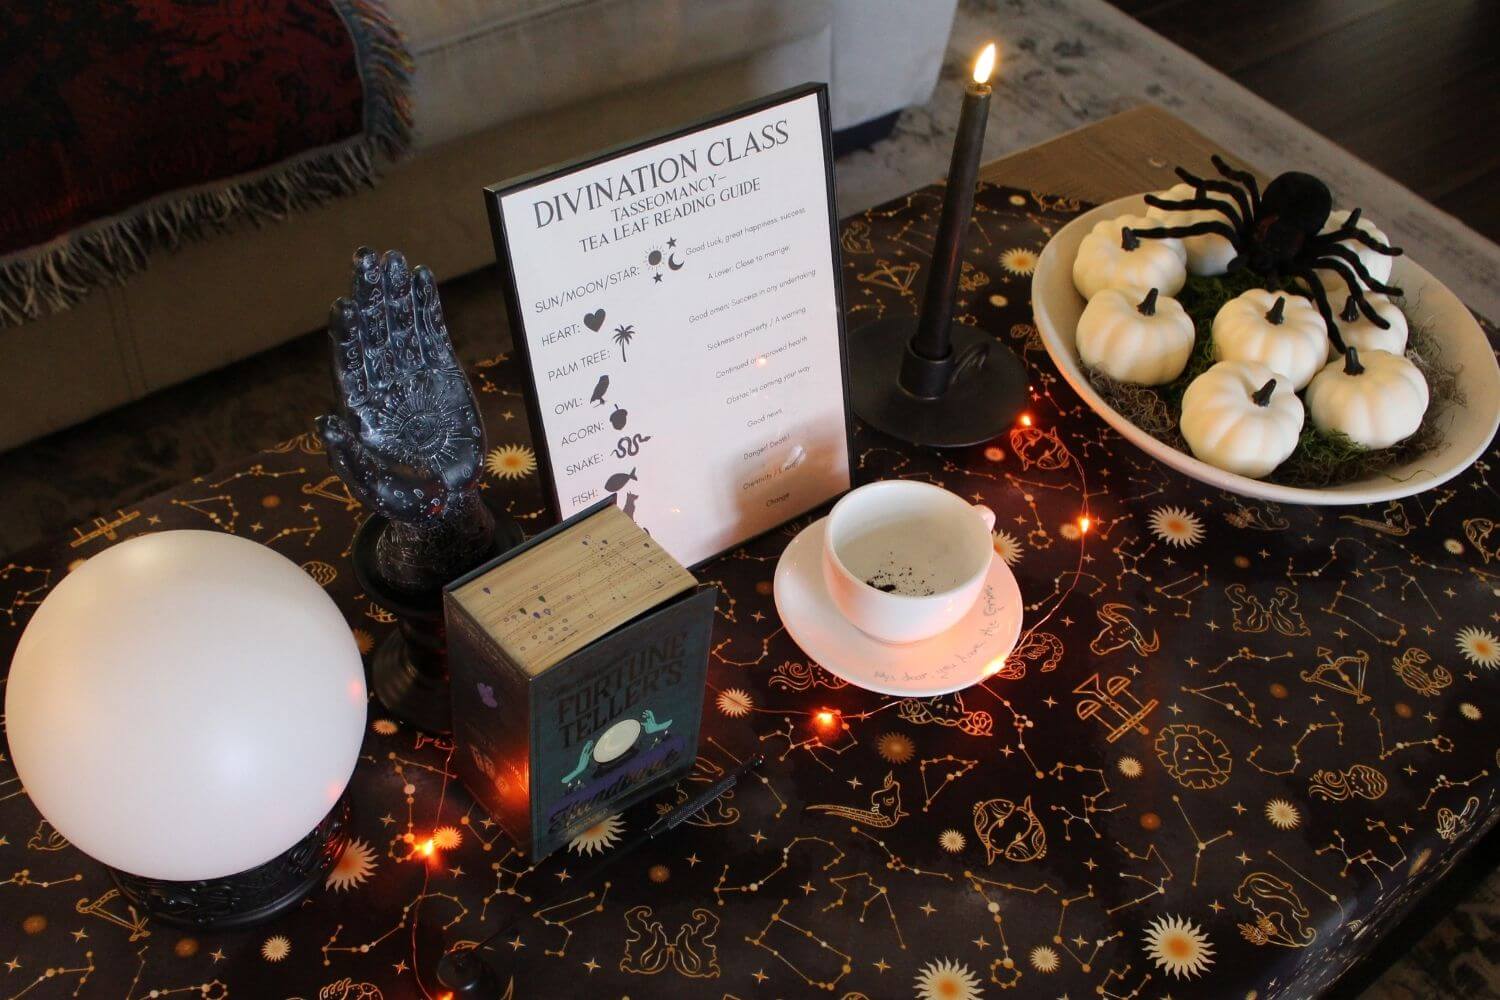
Divination Class
For example, I have a “Divination class” coffee table. Here I placed a crystal ball, a palmistry hand figure, (which I got at Dollar Tree during Halloween season) and a tasseomancy guide which you can download below.
DIVINATION CLASS – TASSEOMANCY GUIDE PDF
Recreating the Grim tea cup was easily done by brushing on the figure of the Grim with Mod Podge and sprinkling coffee grinds on top. You can watch exactly how I did it here.
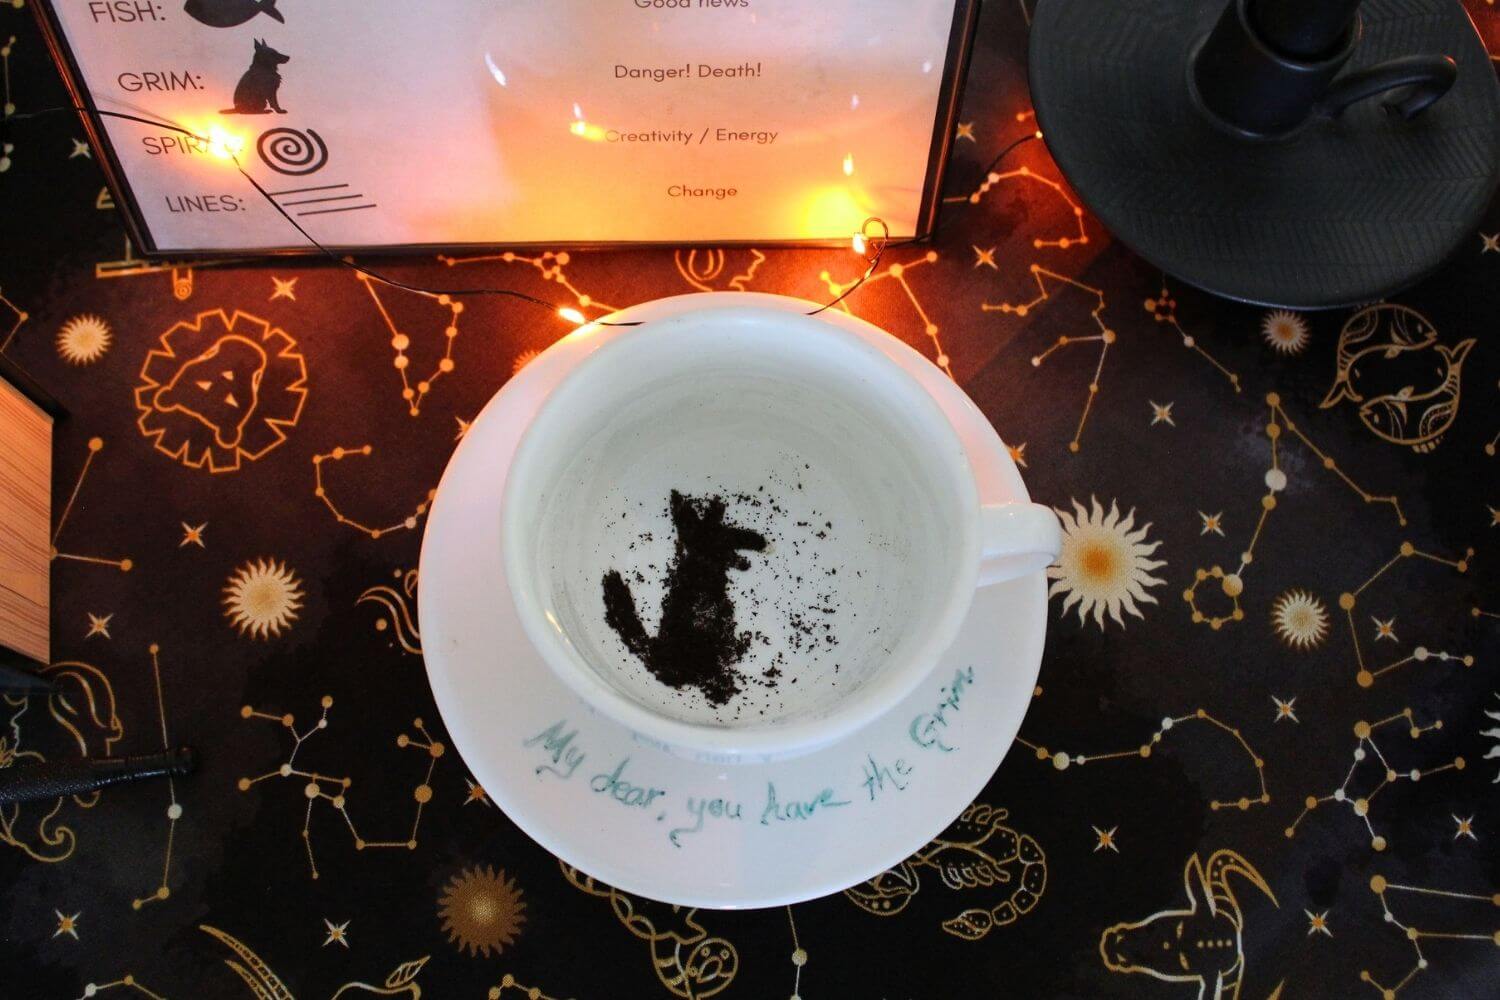
I placed it all on this zodiac fabric I found at Walmart for an added touch of Divination vibes.
Transfiguration Class
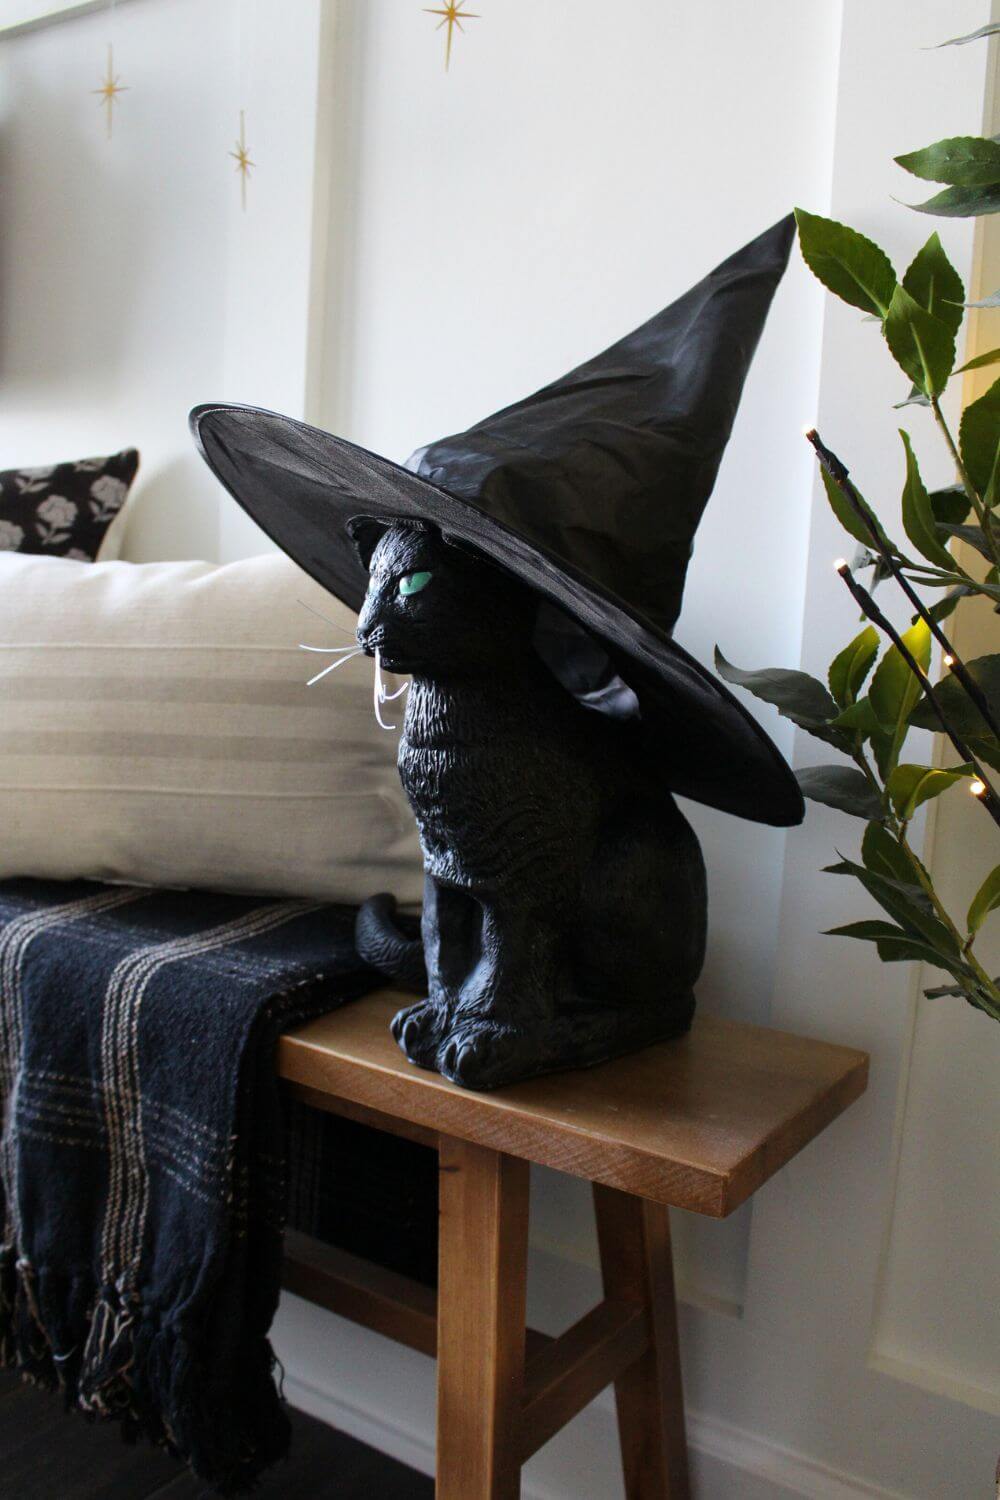
And I may have skipped a Transfiguration class setup, but adding a witch hat to this black cat instantly brought Professor McGonagall’s classroom to life.
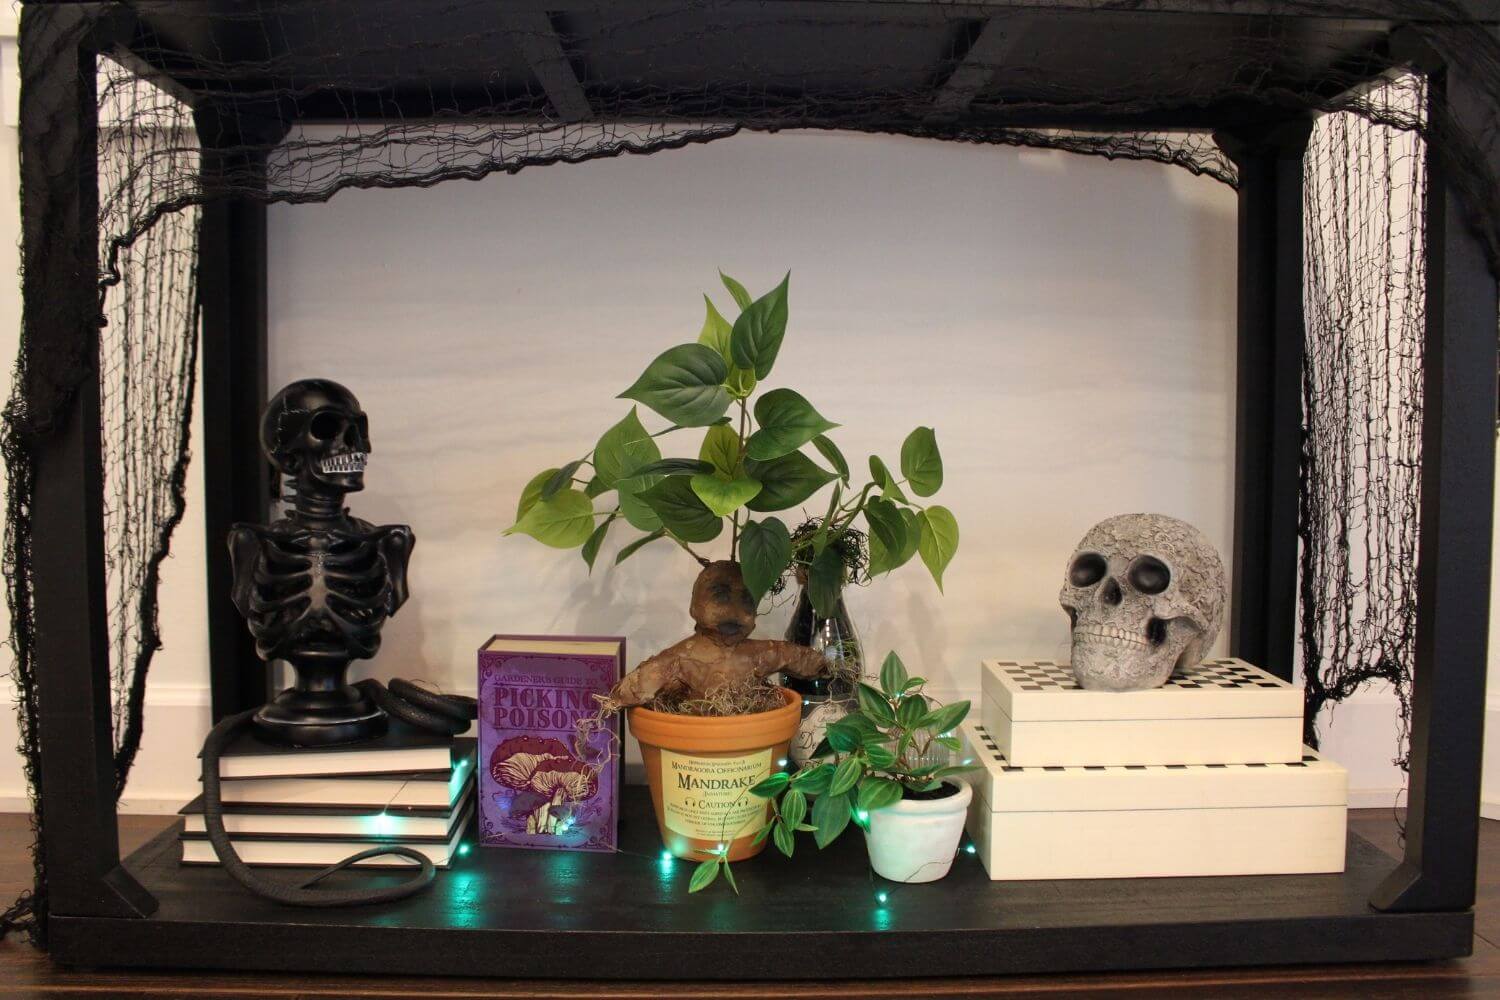
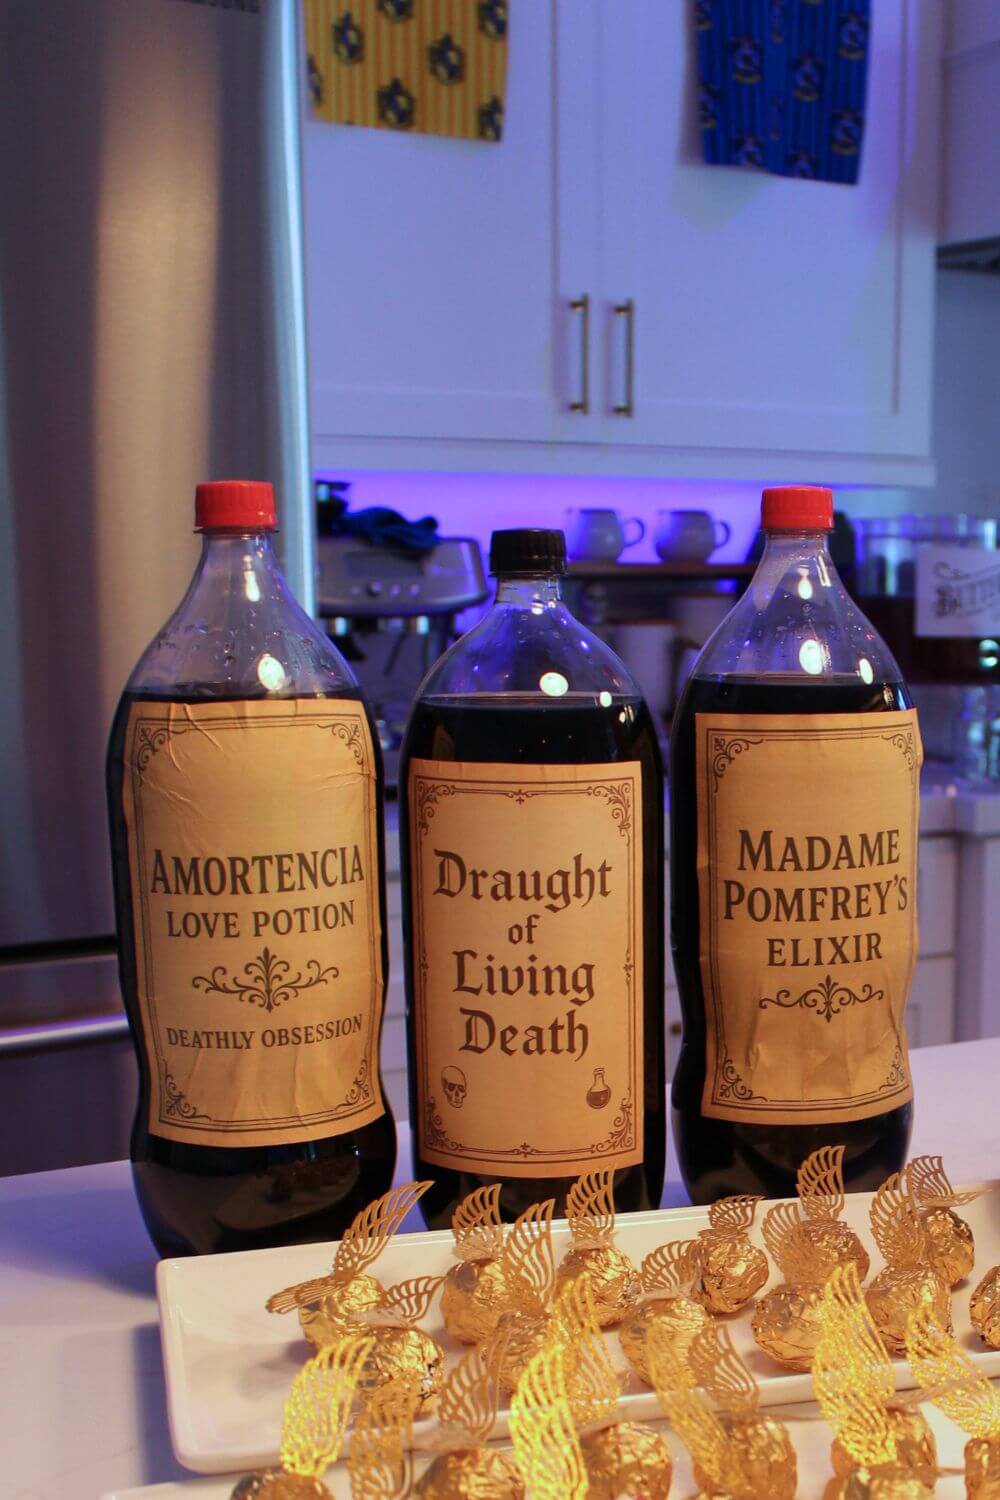
Potions Class
Next we have our Potion’s class on the top section of my console table. Here we have all kinds of potions and ingredients, such as Basilisk Fangs, Gillyweed, Dittany, Phoenix Tears and Bezoars!
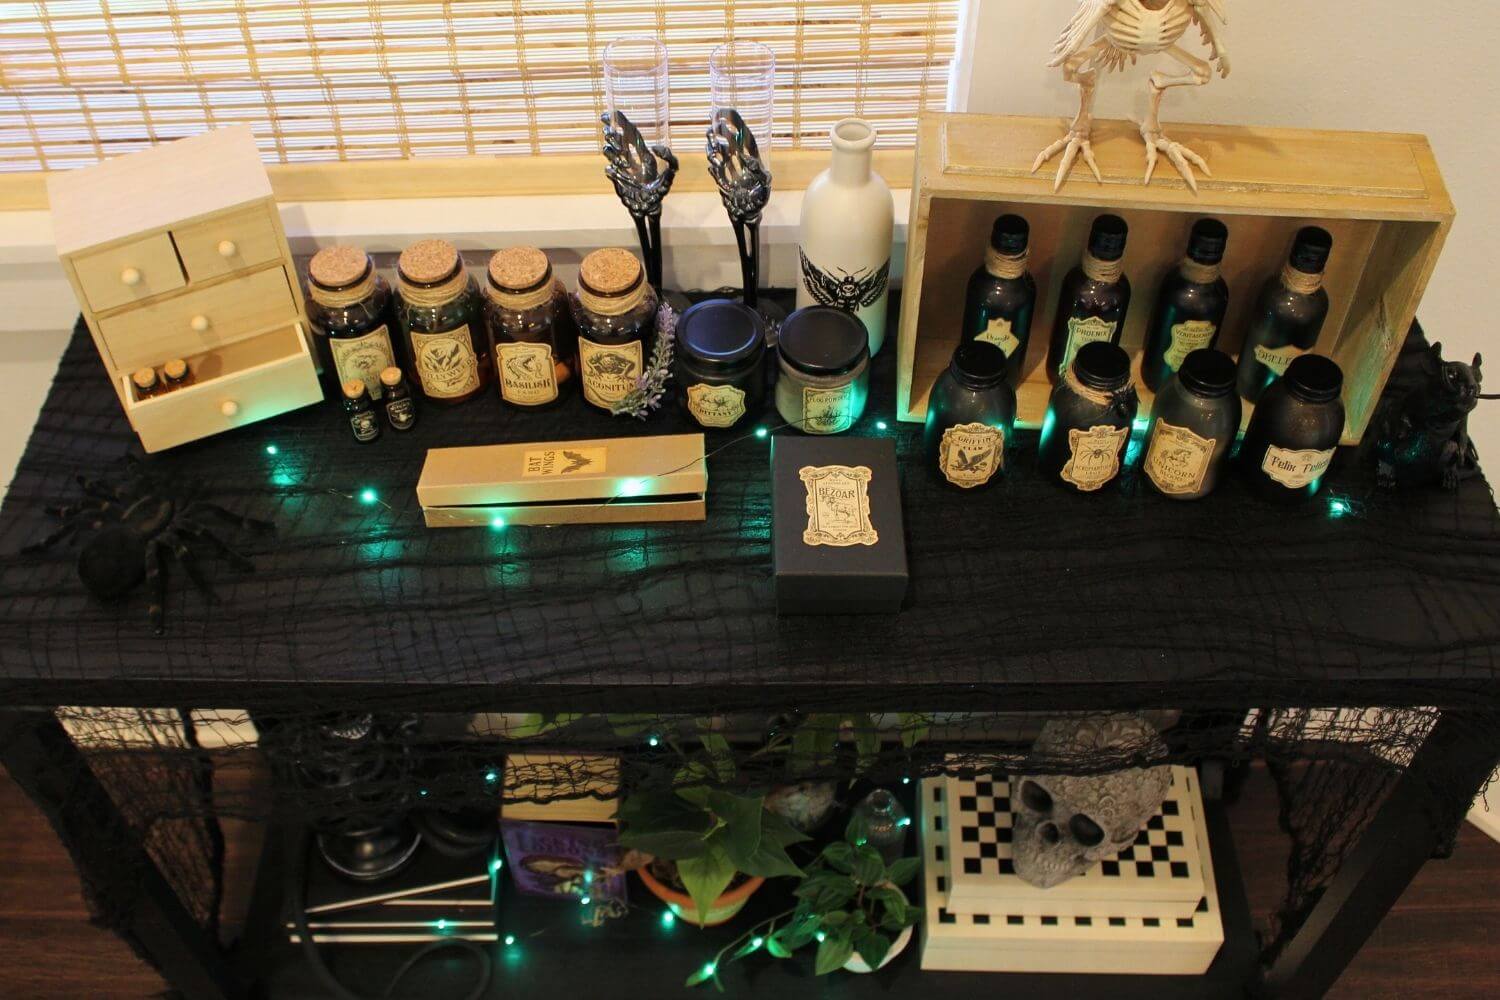
This was a fun DIY for me. You can use recycled bottles or buy some at the craft section at Dollar Tree. I got a mixture of both and decided to spray paint them black but you don’t have to. Then I printed these Harry Potter potion labels on regular computer paper, cut them and pasted them onto the bottles using Mod Podge. The fun part was filling them up with color liquids, glitter and even soap to make them look realistic! You can watch how I did it here.
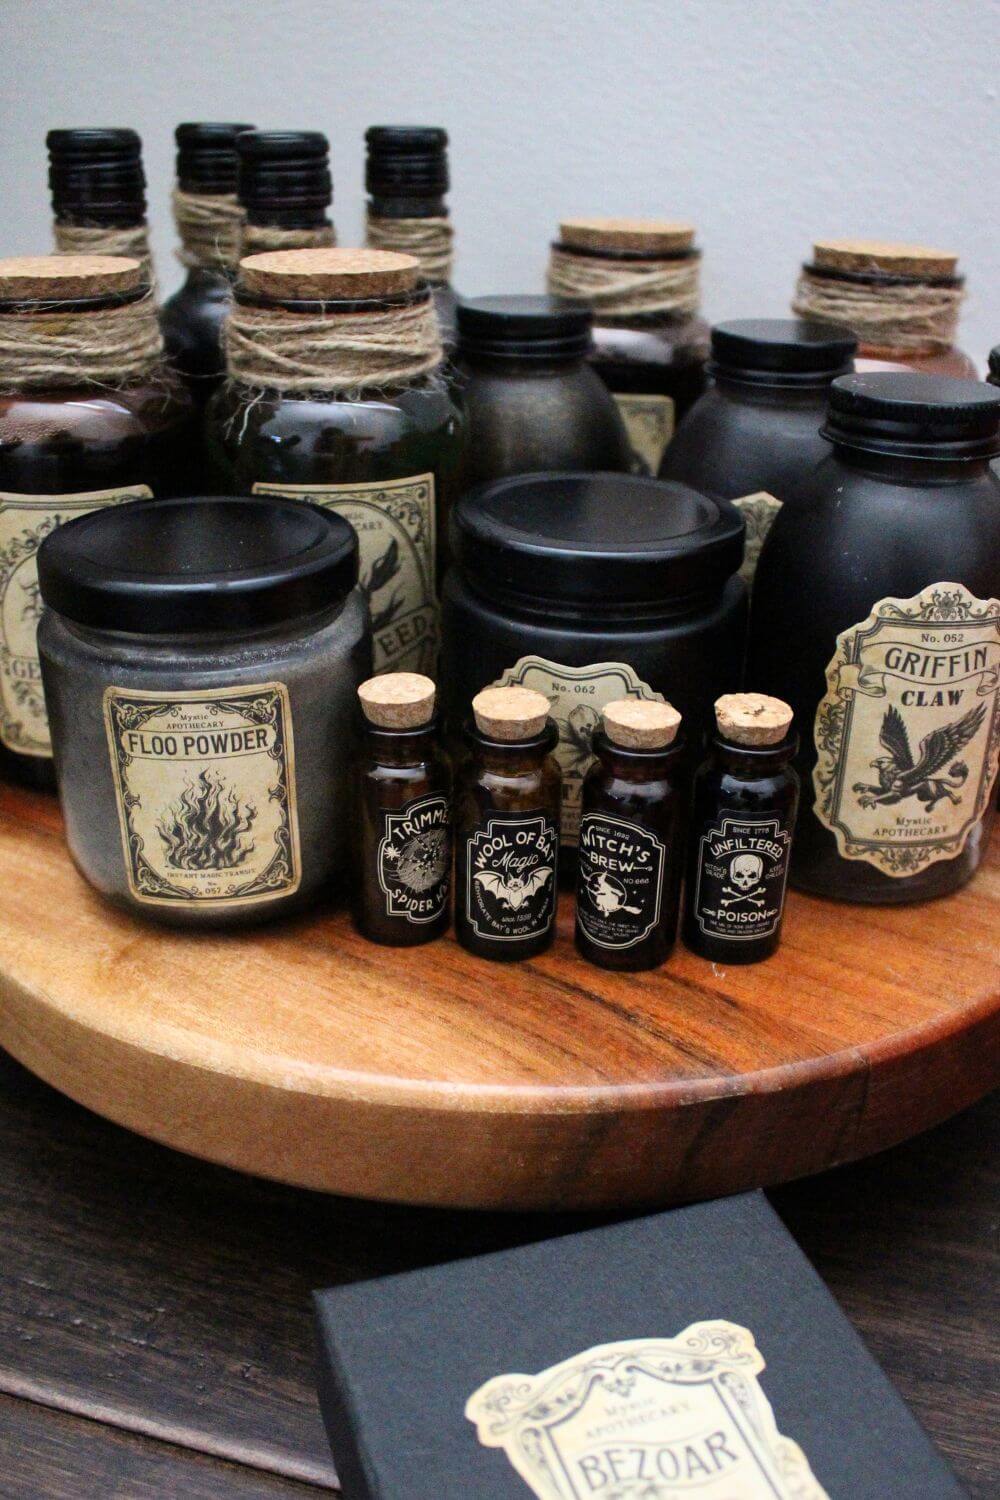
I also found other labels on Pinterest that I copied and printed such as Veritaserum, Felix Felicis and Polyjuice Potion!
Herbology Class
Finally, on the bottom of the console table I have some DIY crafts for my Herbology class including a DIY Mandrake and DIY Devil’s Snare.
This DIY Devil’s Snare was super easy to make. I did get inspiration from this YouTube video but I tweaked it for a much more budget friendly craft.
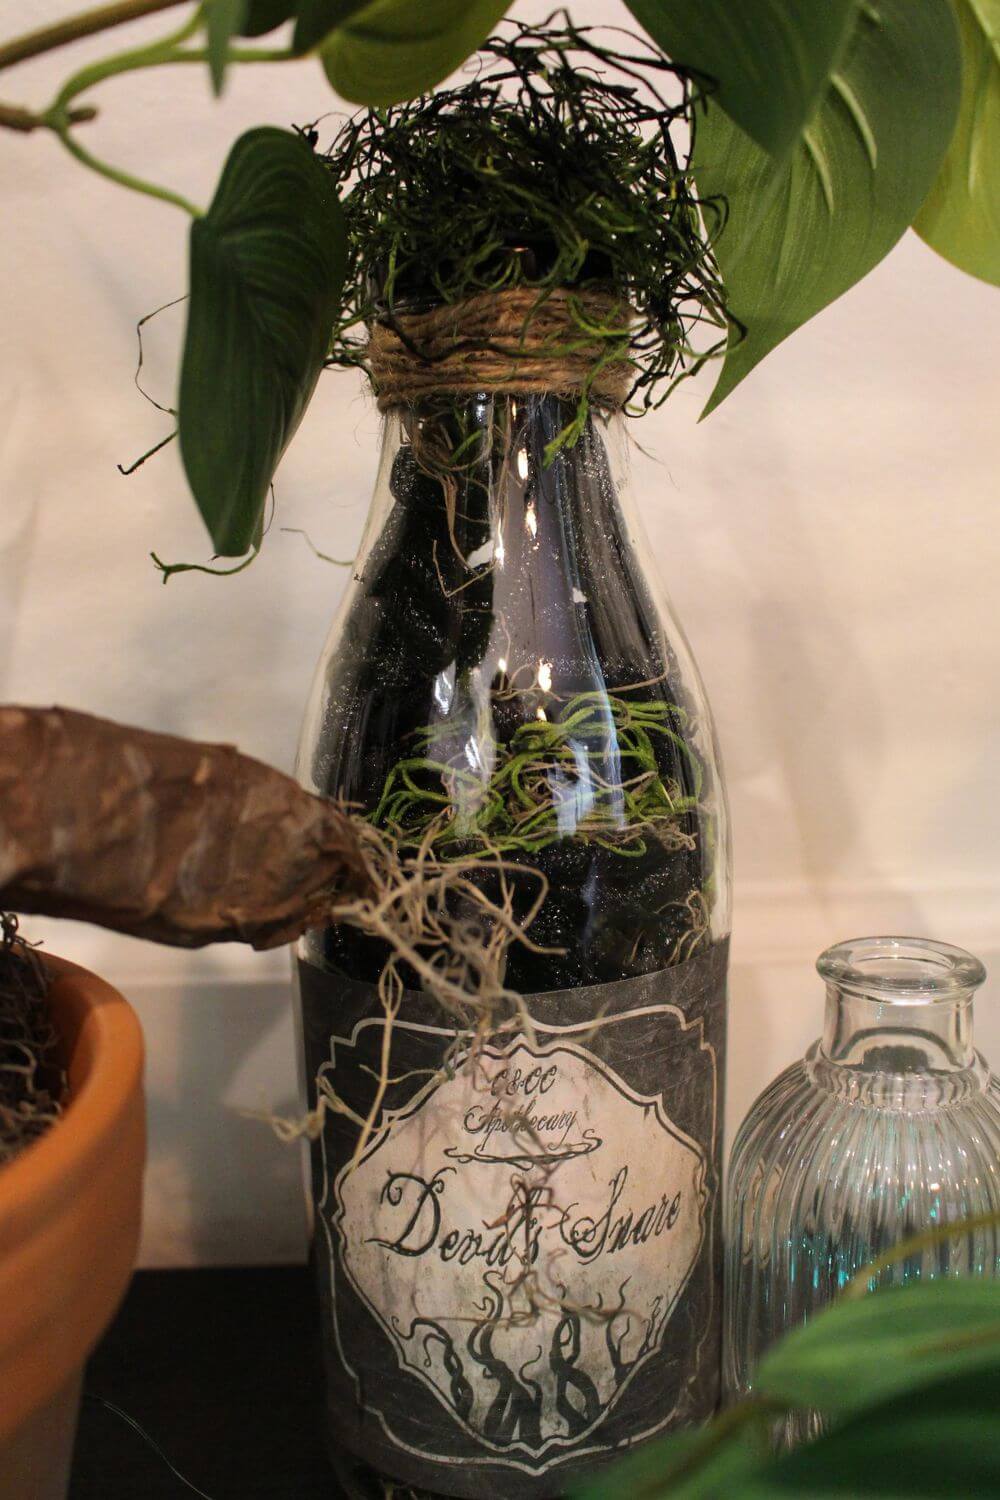
First of all, the bottle is a recycled vinegar bottle. And instead of using black raffia I used this black mesh tube from Dollar Tree. And honestly, it worked perfectly for the intended purposes. I didn’t use black moss. I used a combination of brown and green moss that I already had. The moss on top of my bottle was painted black with this acrylic paint from Walmart. I glued on some twine around the top of the bottle and placed a Devil’s Snare label on it with Mod Podge.
This craft was absolutely FREE for me because I already had everything I needed! And it was part of my Escape Room Challenge for the kids!
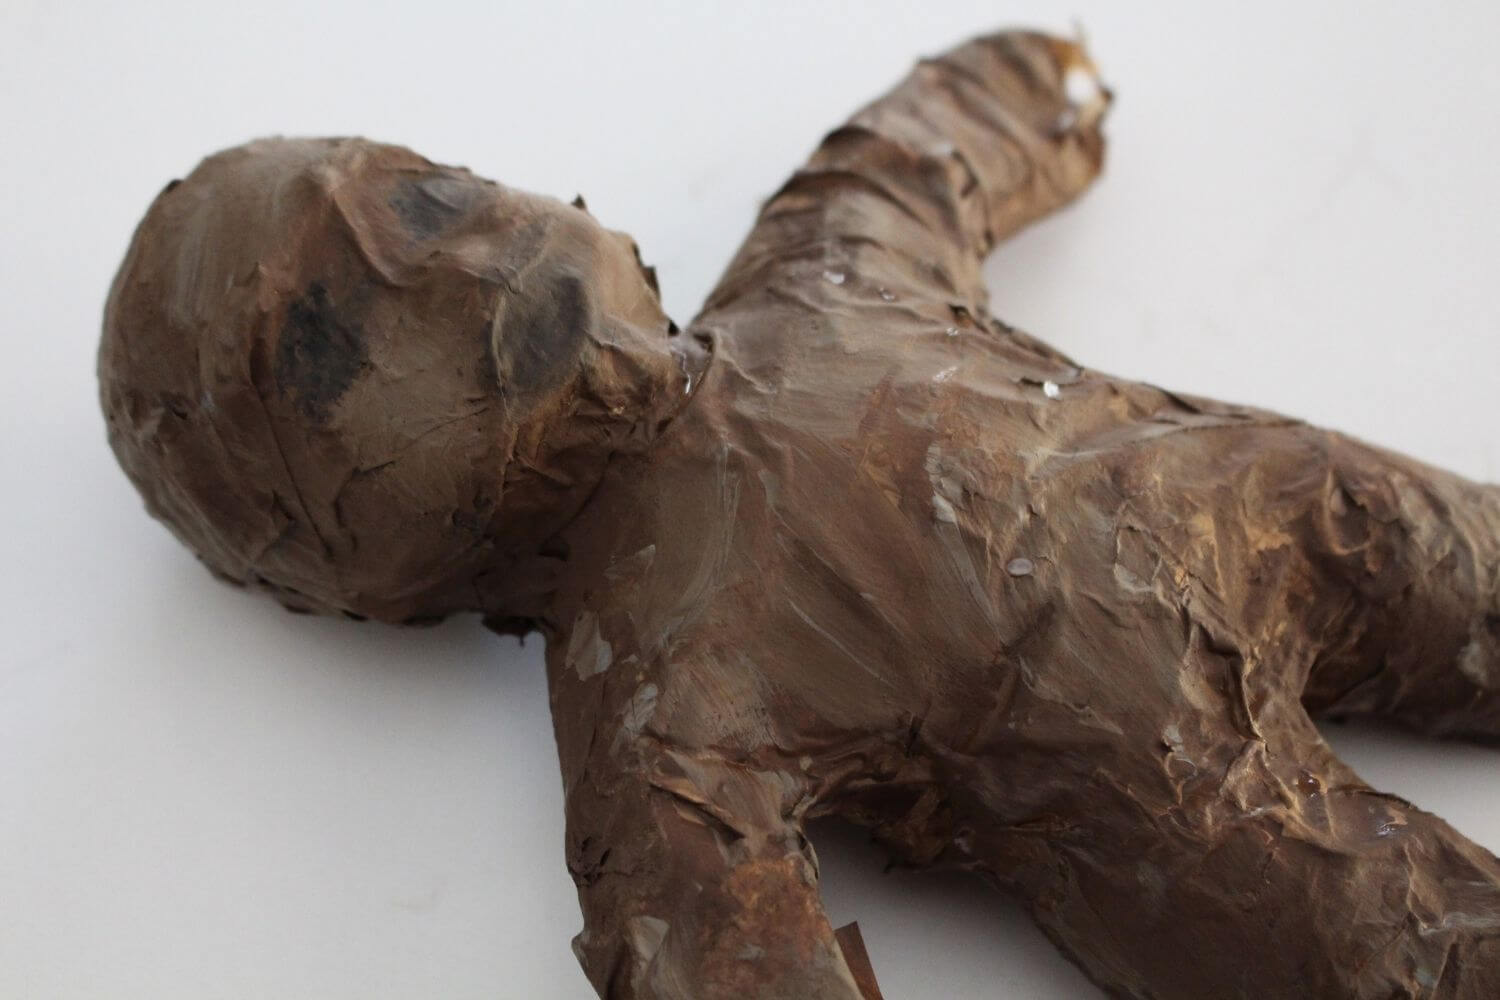
This mandrake was a total last-minute idea! I was in the zone, and determined to make every corner of our home feel like Hogwarts!
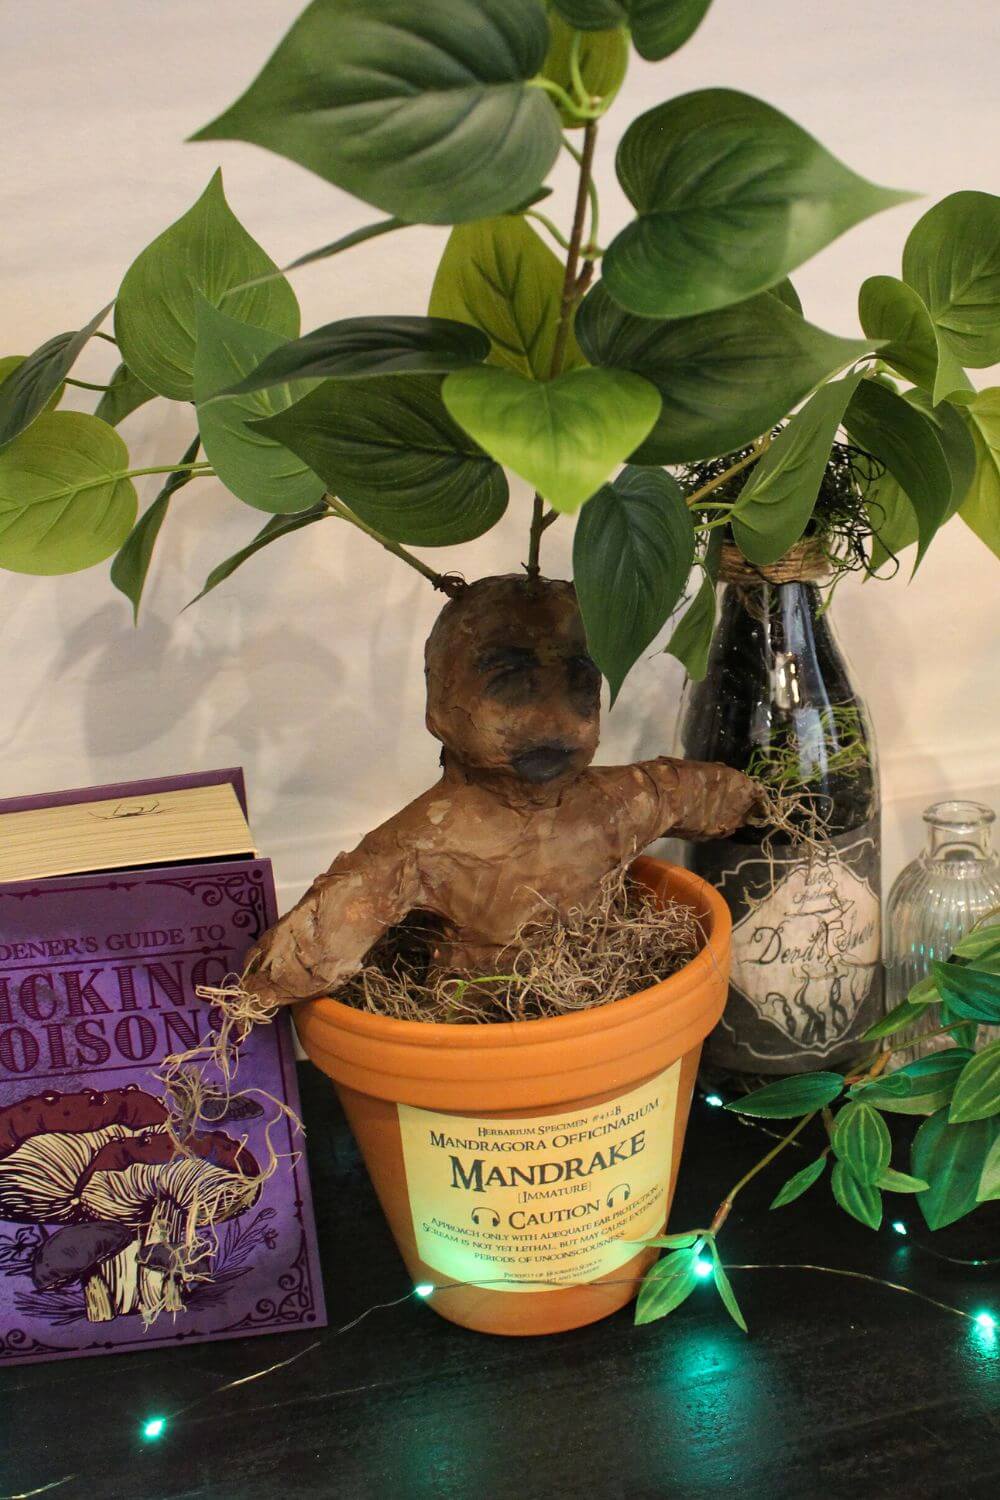
I got my inspiration from this YouTube video for a DIY mandrake.
This DIY mandrake craft took a few days only because it takes a long time for the paper mache to dry. First I got this cheap baby doll at Dollar Tree and covered the entire body, except the head, in masking tape. After cutting strips of brown napkins from Wendy’s, I wet them in a mixture of Mod Podge and water to create my paper mache. I put the wet paper mache on the front of the doll and let it dry for the day. Then I did the same for the back on the second day. On the third day I painted it with a mixture of brown, and gray acrylic paint.
Once it was completely dry I put it in a 6″ ceramic pot with some brown moss and I glued some of the brown moss to the ends of his hands.
The last thing I did, which I regret now, was to put the leaves on top of the mandrake’s head. I had to use a large needle to stab 3 holes on it for the stems to go in. Still it was too thin to I used green wire and left half of it sticking out so that I could wrap the green wire around the stems.
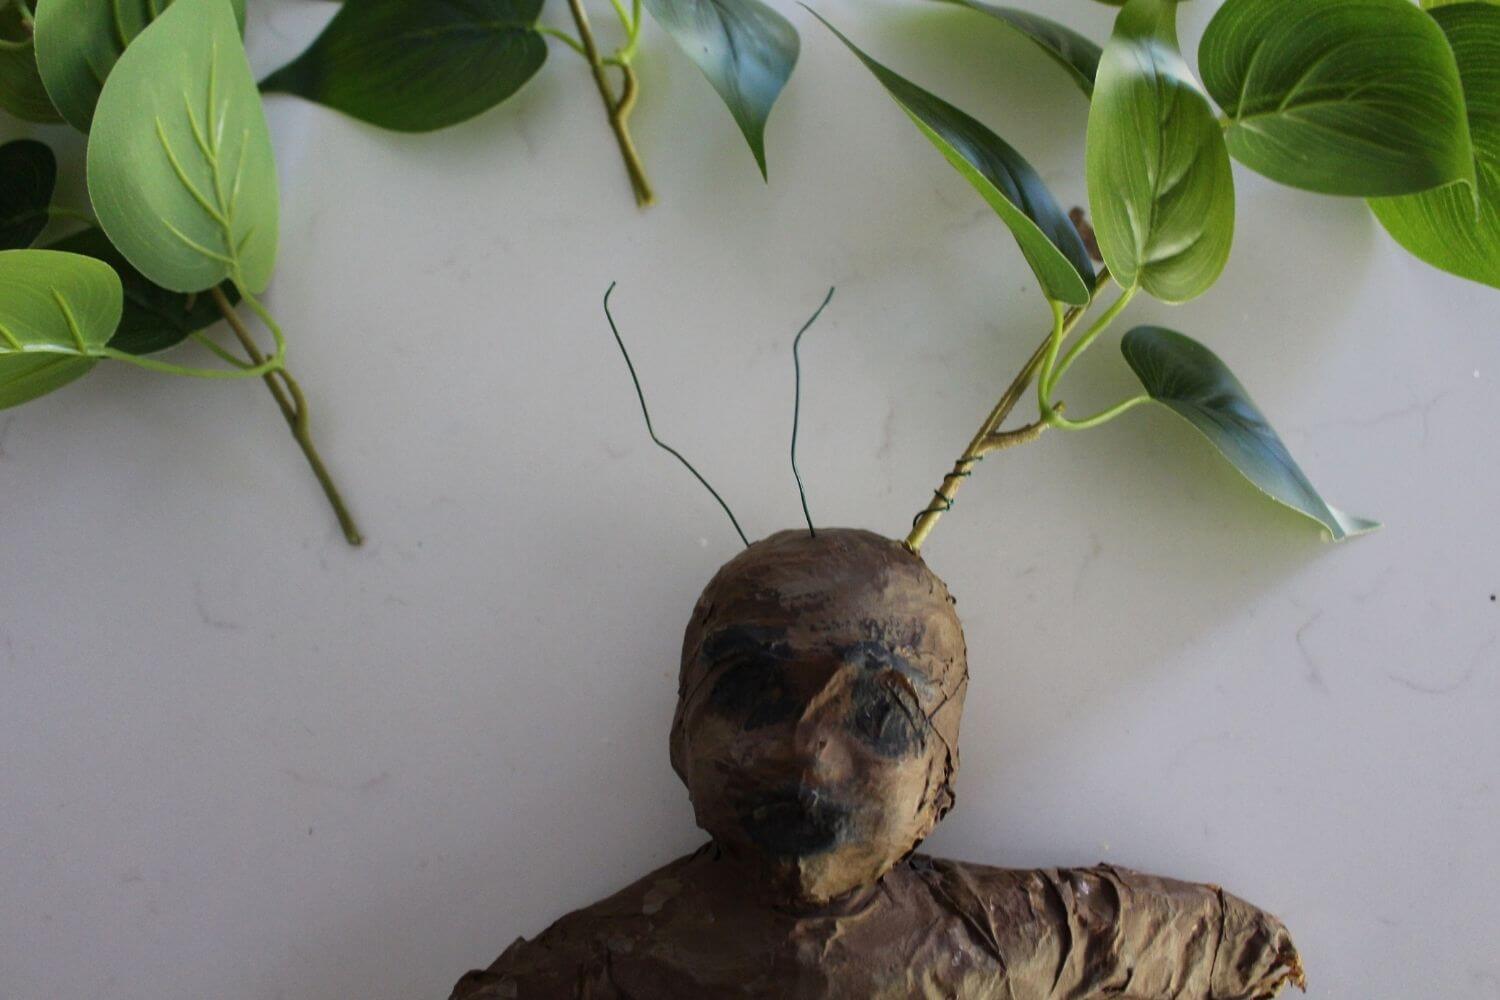
That wasn’t enough so I ended up using hot glue to support the stems. Then I painted the glue with my brown acrylic paint to hide it. Learn from my mistakes and put the stems on first, before the paper mache!
The mandrake label is from Pinterest. Just copy, paste, and print! Stick it on your pot with Mod Podge and you have yourself a mandrake that you can use not only for this party but for Halloween decor as well!
If you want to save yourself this hassle but want a mandrake at your party get yourself this mini mandrake! It’s so affordable and it actually cries!
Corridors And Bathrooms
These Harry Potter Birthday add-ons were simple and very affordable or if not completely FREE considering I already had everything I needed, cardstock paper, a printer, and double sided tape.
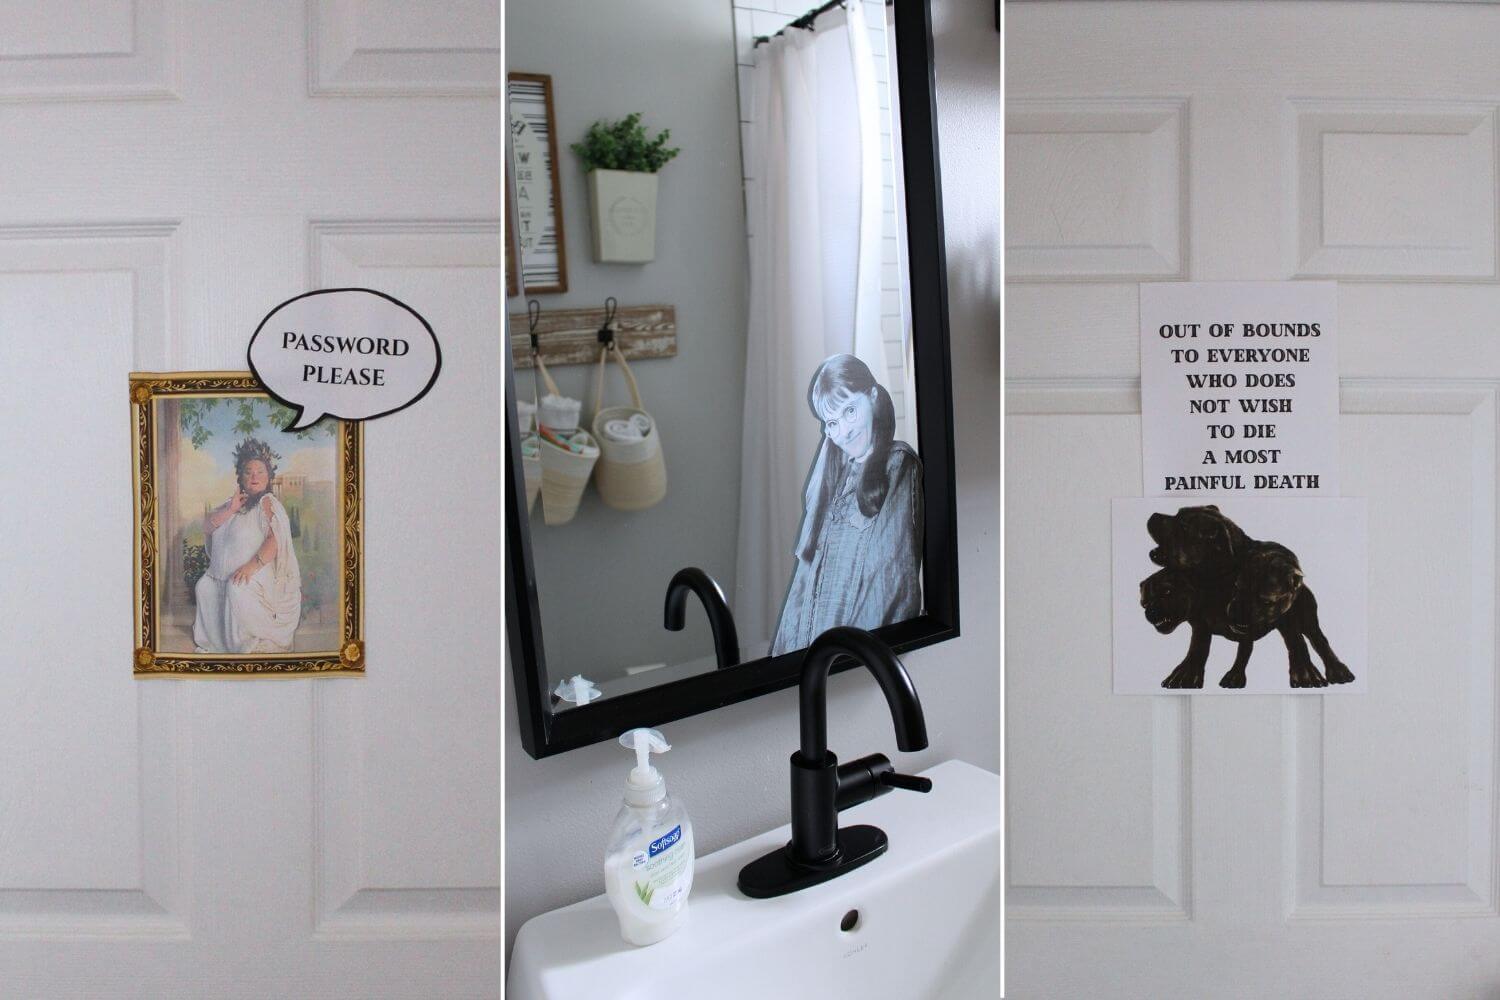
The Fat Lady portrait was placed on my son’s bedroom door. I used Canva to make my own bubble sign asking for the password which was part of the Harry Potter Escape Room!
These last two images were found online with a quick Google Image Search. I couldn’t resist Moaning Myrtle in the bathroom! And Fluffy was guarding my husband’s office door.
Hogwarts Train Station
Every Harry Potter birthday party has to have a Platform 9 and 3/4 in my opinion!
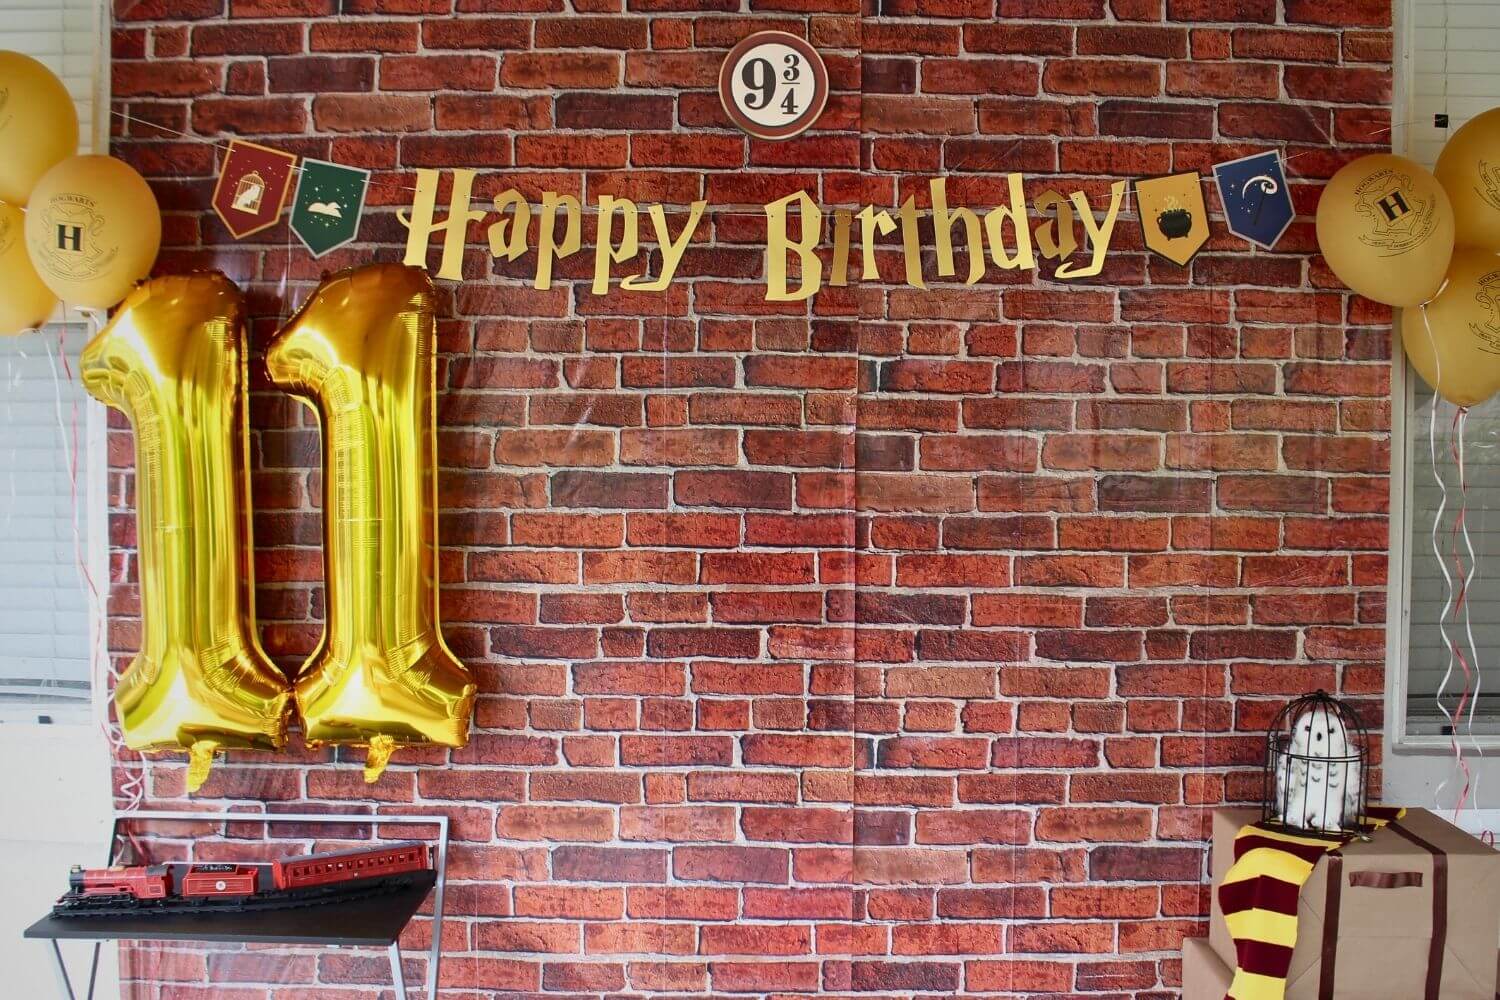
I made this as a backdrop, specifically for picture taking. We took many pictures and sang Happy Birthday here.
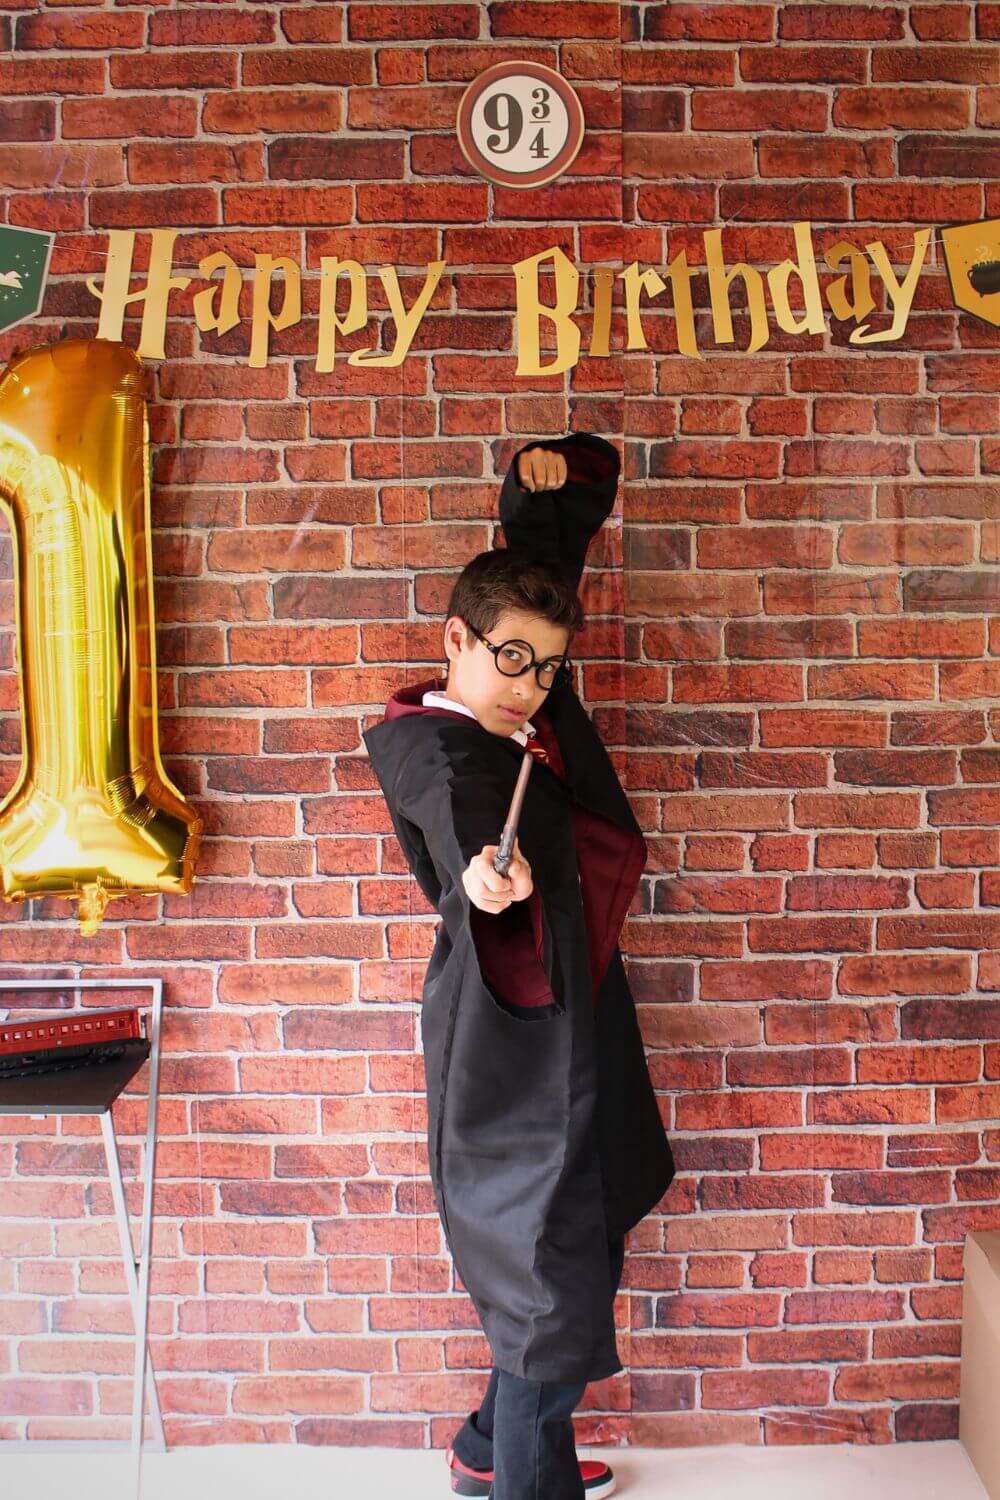
To make this backdrop I used the same brick table cloths from before. I attached them to my stucco wall with heavy duty double sided tape, making sure to align the bricks as much as possible. I downloaded and printed the 9 and 3/4 sign on cardstock paper and added this Harry Potter Happy Birthday sign below. These gold Hogwarts balloons were stuck to the wall with balloon tape to make them look like they are floating. And last but not least I had to get the big 11 number balloons! In front of my backdrop I have Hedwig in her cage sitting on top of Harry’s DIY luggage.
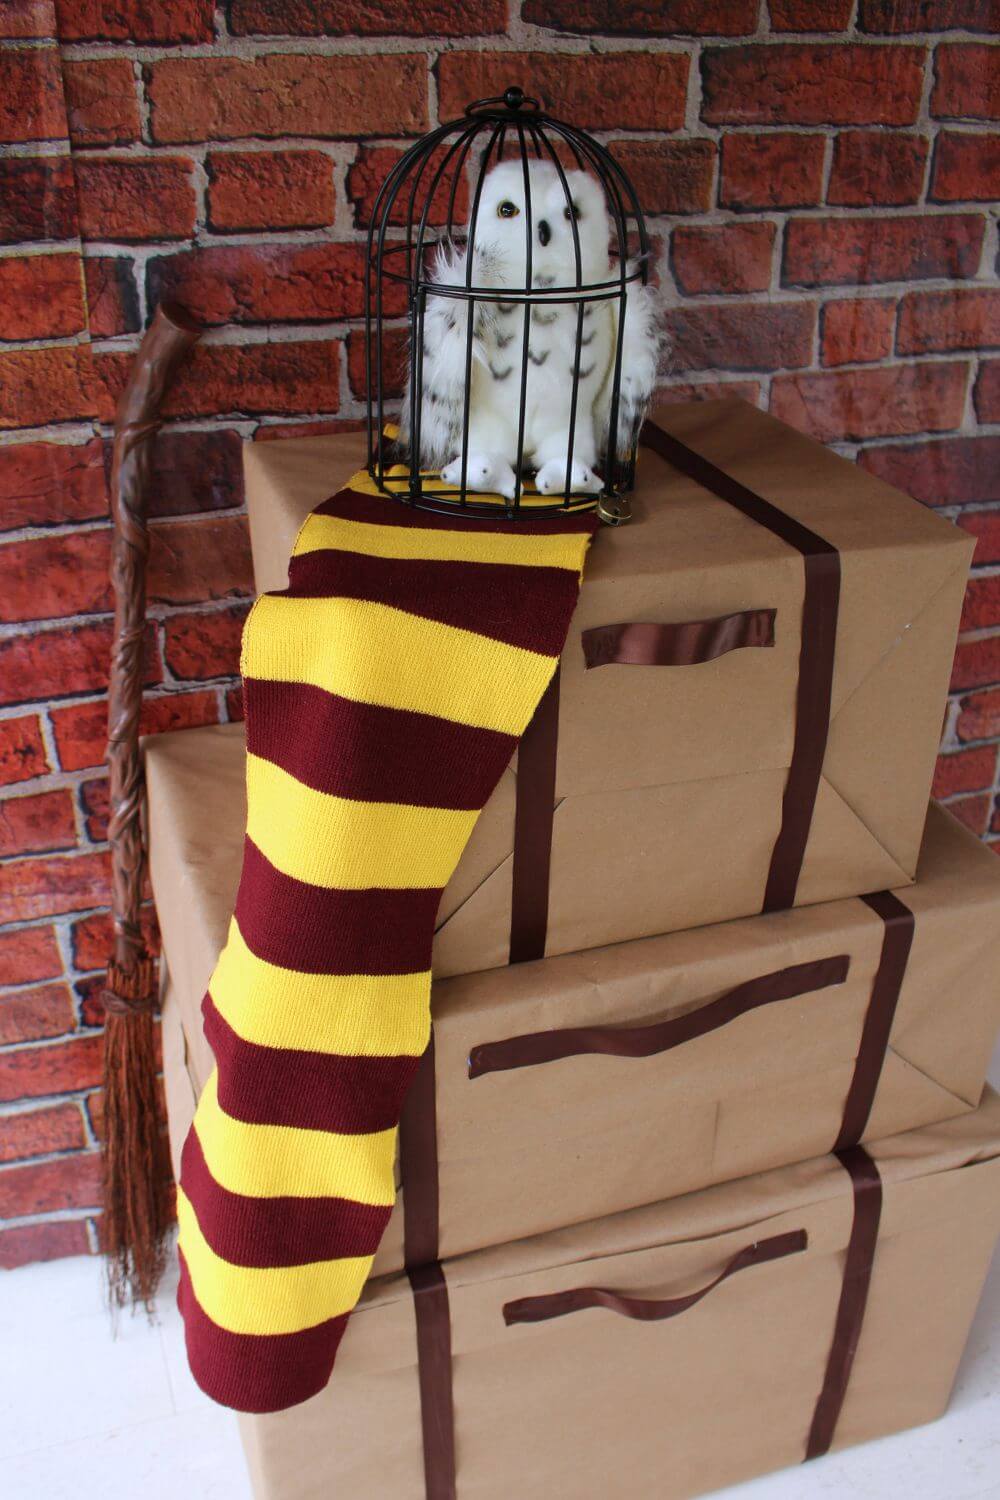
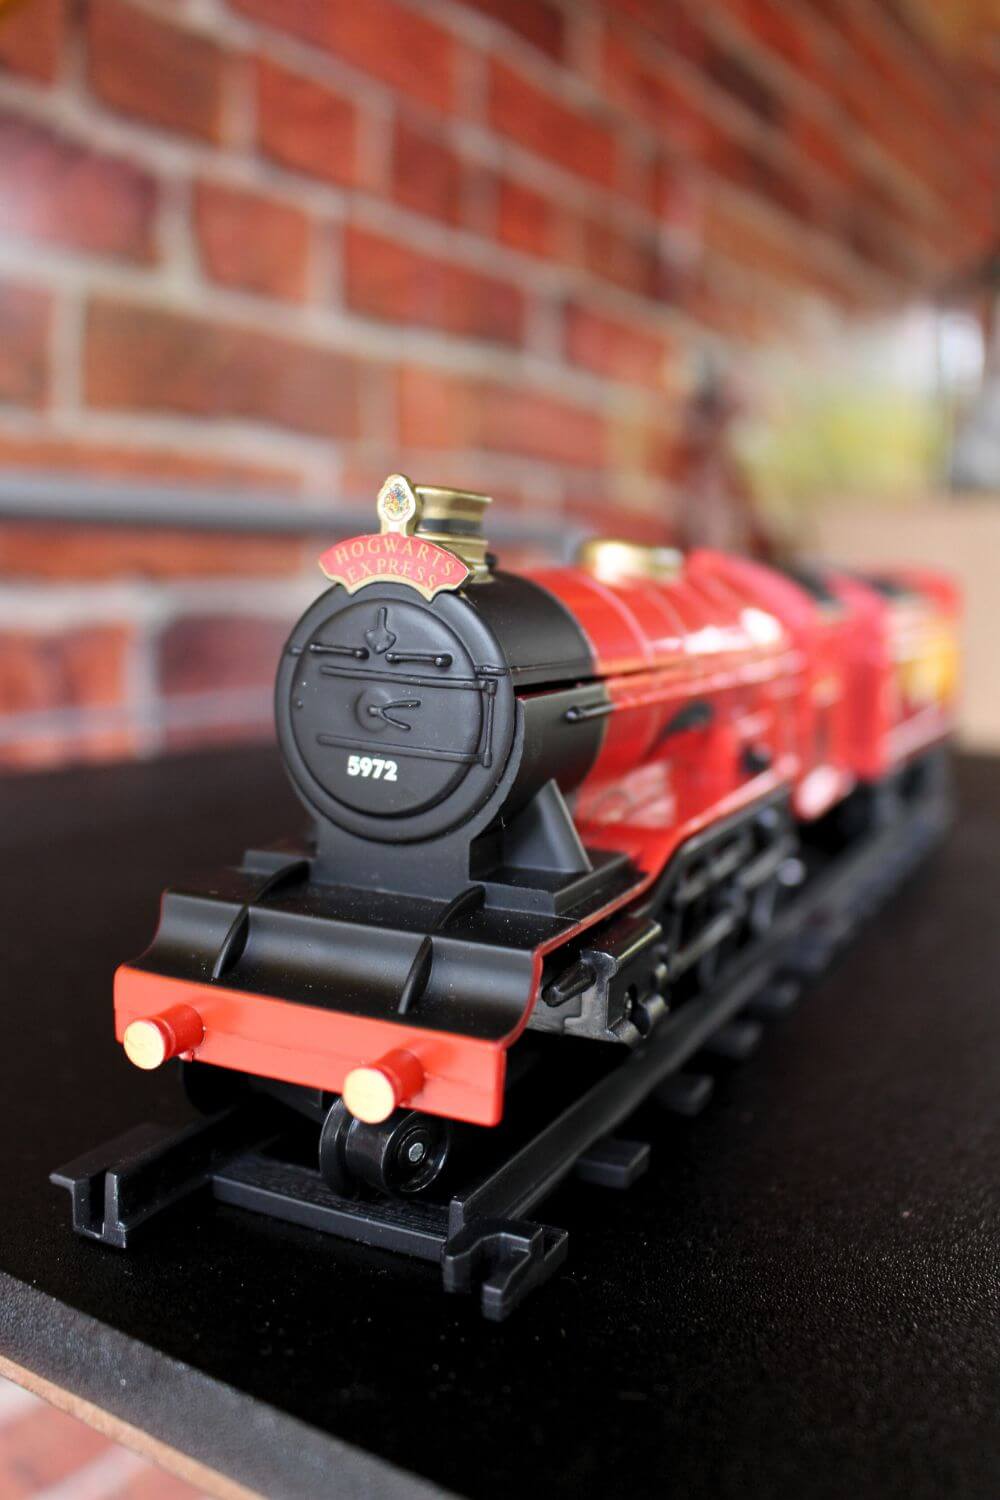
My Amazon boxes came in useful! I wrapped them with kraft wrapping paper which you can find at Dollar Tree. Then I hot glued brown ribbon on the front to make them look like handles. And around the boxes as well for added detail. On the other side of my brick backdrop I placed a small table with my son’s Hogwarts train on it. It was the finishing touch to my 9 and 3/4 station!
Okay so I know that was a lot of decor ideas but I really enjoyed making all the DIY Harry Potter crafts and making my home Hogwarts heaven!
Harry Potter Birthday Attire
Another way to create the perfect Harry Potter birthday party ambiance is with the right attire! I provided the kids with witch hats and “cloaks” to make them feel like they were a part of the wizarding world and not just a bystander.
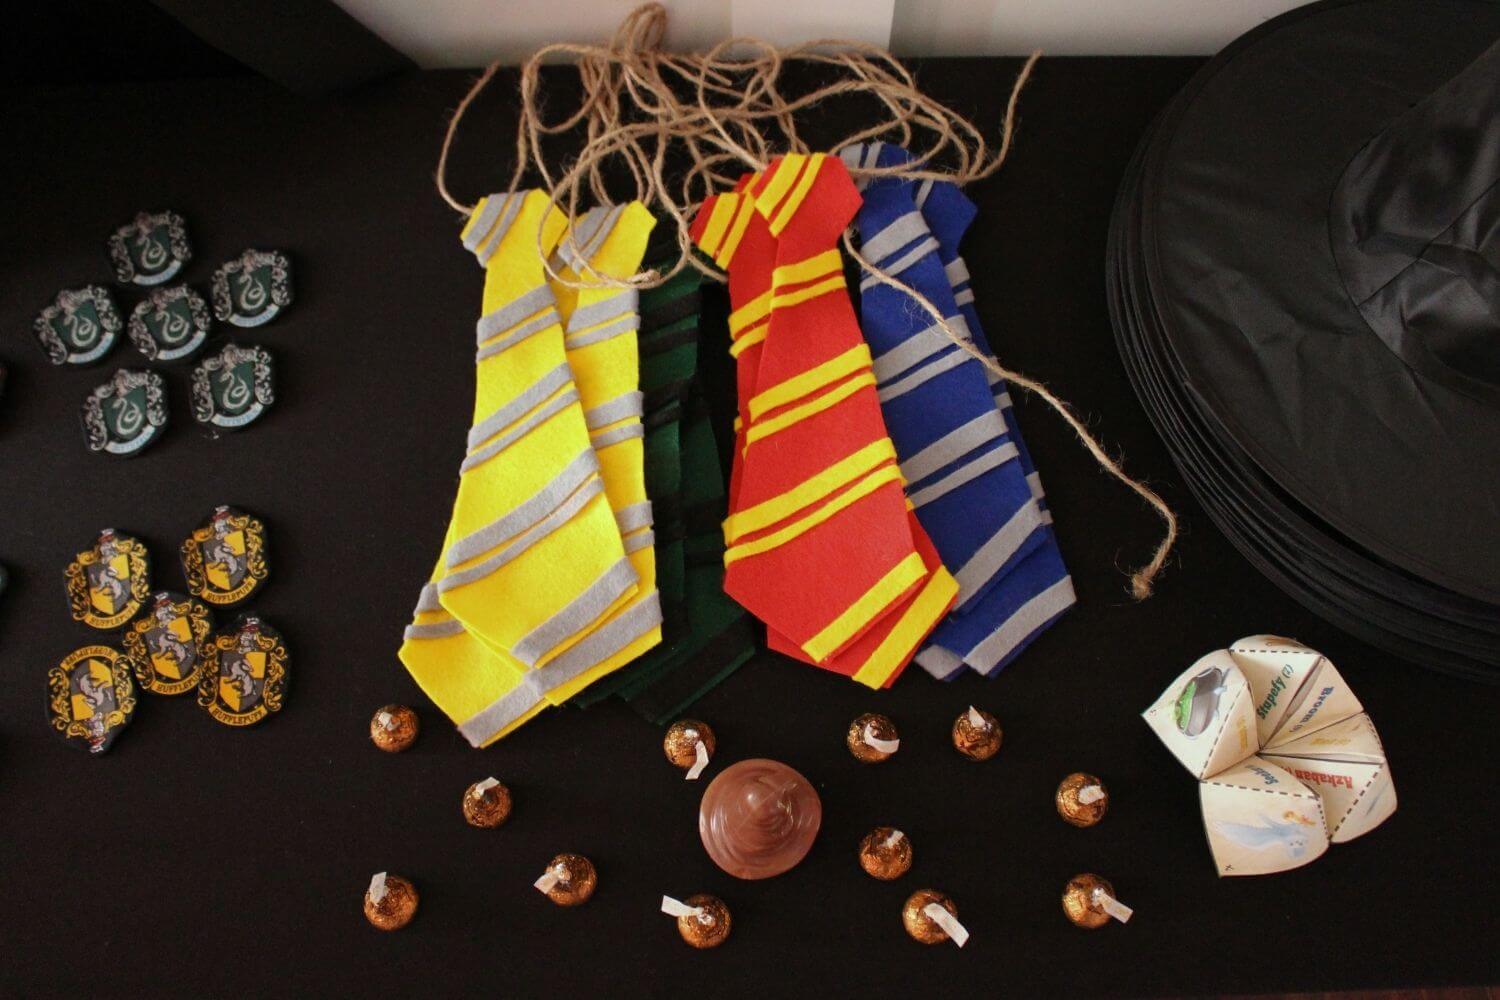
DIY Harry Potter House Badge
First I DIYed Hogwarts House badges using this fabric. I cut around all of the “badges” from the fabric, making sure to leave about a quarter inch extra space around each one. Once that was done I traced each house symbol onto cardstock paper by placing the fabric on top and pressing down with a pencil along the edges of the House symbol. This made dot marks in the cardstock. I simply connected all the dots and cut out the shape. You will have to do this step for each Hogwarts House symbol as they all have a unique shape. Once you cut one out on the cardstock you can trace as many as you need for that house before continuing.
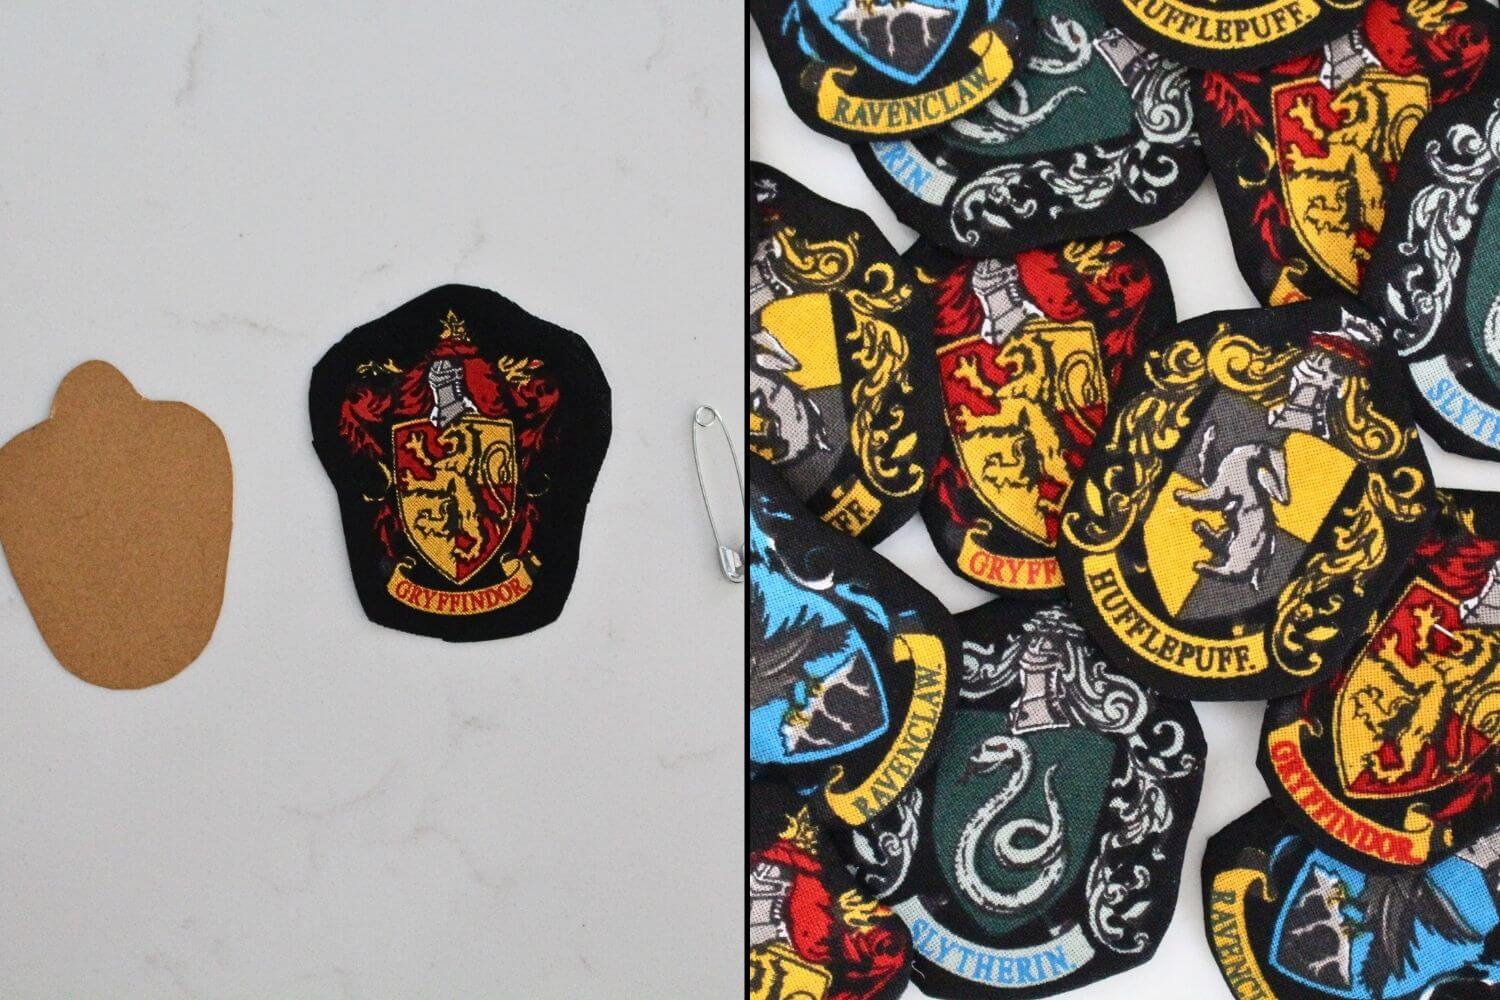
Once I had all my all of my fabric and cardstock cutouts I hot glued them together, folding the extra 1/4 inch fabric around the back of the cardstock. Finally, I added a safety pin in the back and voila! Your very own House badge! You can see how I did it here!
Harry Potter House Ties
Once I had the badges I had to make some ties to well, tie it all together! So I cut felt into ties and hot glued stripes on them depending on the colors of the houses. Finally I hot glued twine on the back so that they can easily tie it around their necks! You can watch how I made these here.
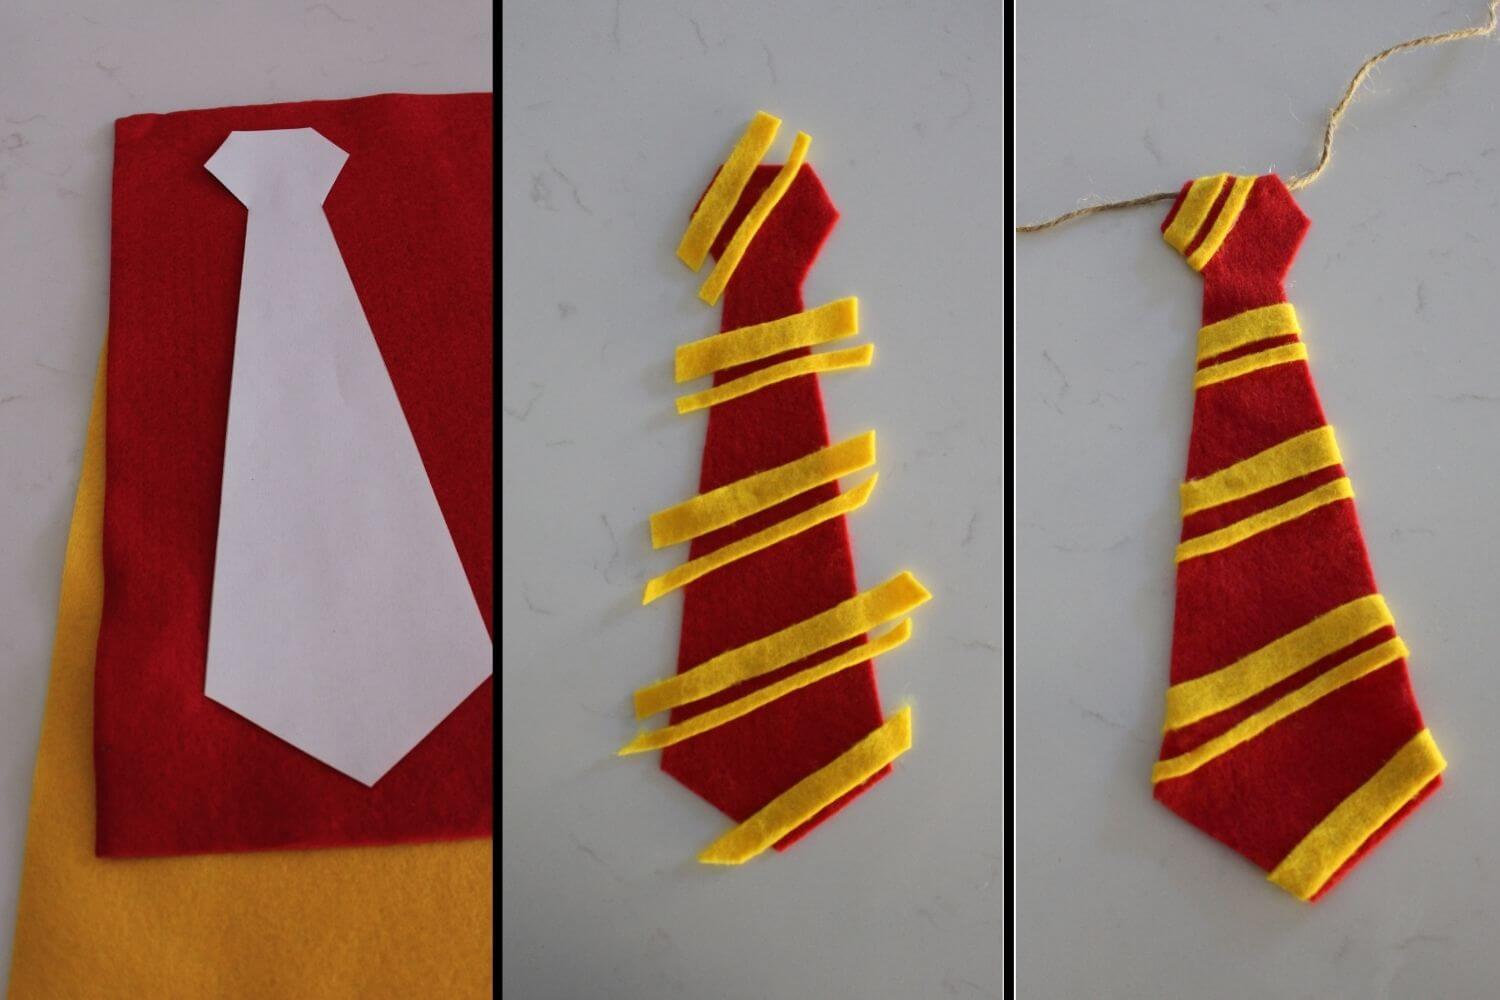
Download the tie template below!
HOGWARTS HOUSE TIE TEMPLATE PDF
Sorting Hat
The children can grab whatever house colors they like as they walk in or you could make it more fun and let the sorting hat choose for them! There are many ways to sort the kids into their houses and you can get very creative with it. I got these Harry Potter HERSHEY’S Kisses that look like little hats and have a house symbol on the bottom!
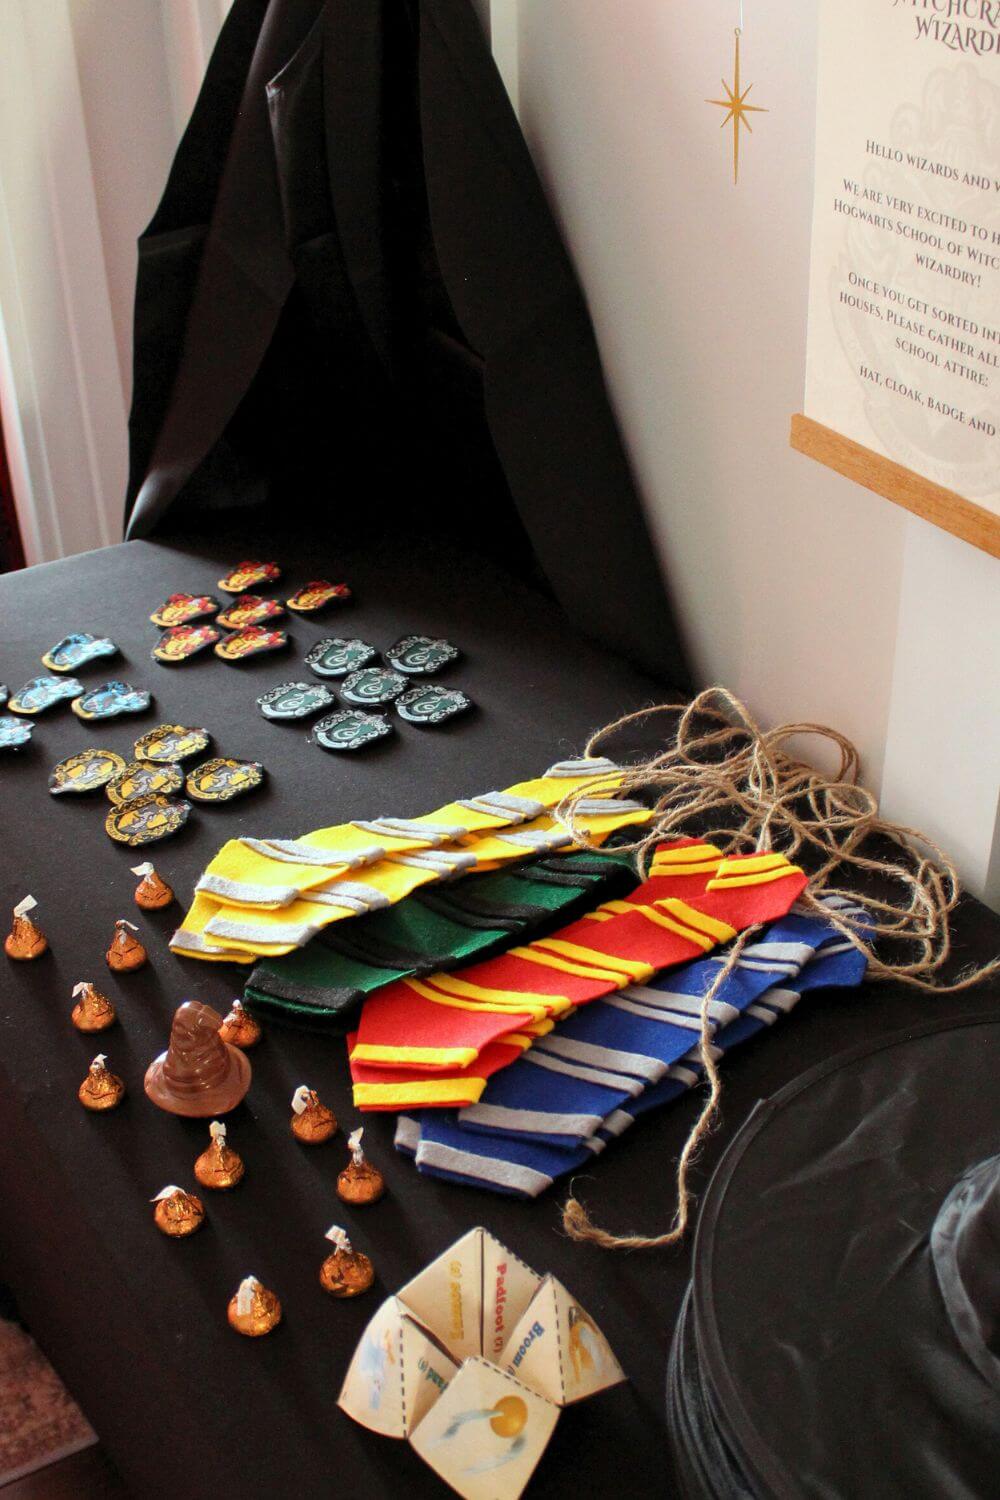
Since there were 12 kids I got 3 Hershey’s kisses for each house to make it even. They just had to pick one and whatever they picked was their house!
There is also this adorable mini sorting hat that shouts the name of a house when you press it down on your head. Or this Harry Potter Origami Sorting Hat FREE PRINTABLE that I found and printed for the kids to have fun with. No matter how you sort them, the kids love the anticipation of finding out what house they belong to!
Once the kids got sorted into their houses they put on all of their attire belonging to their houses. Now not only do my guests feel like they are in the Harry Potter Wizarding World, but they feel like they are a part of it! But there is one more thing that is crucial in any Harry Potter Birthday party!
Harry Potter Birthday Treats
You must have Harry Potter treats for a Harry Potter birthday party!
Harry Potter Candy
Bertie Botts Every flavor beans are a hit with the kids! They love tasting all the weird things they can find like soap, grass, booger, dirt, and ear wax. There is even a vomit bean! Don’t worry they have good tasting jelly beans as well. But these are the most popular with the kiddos!
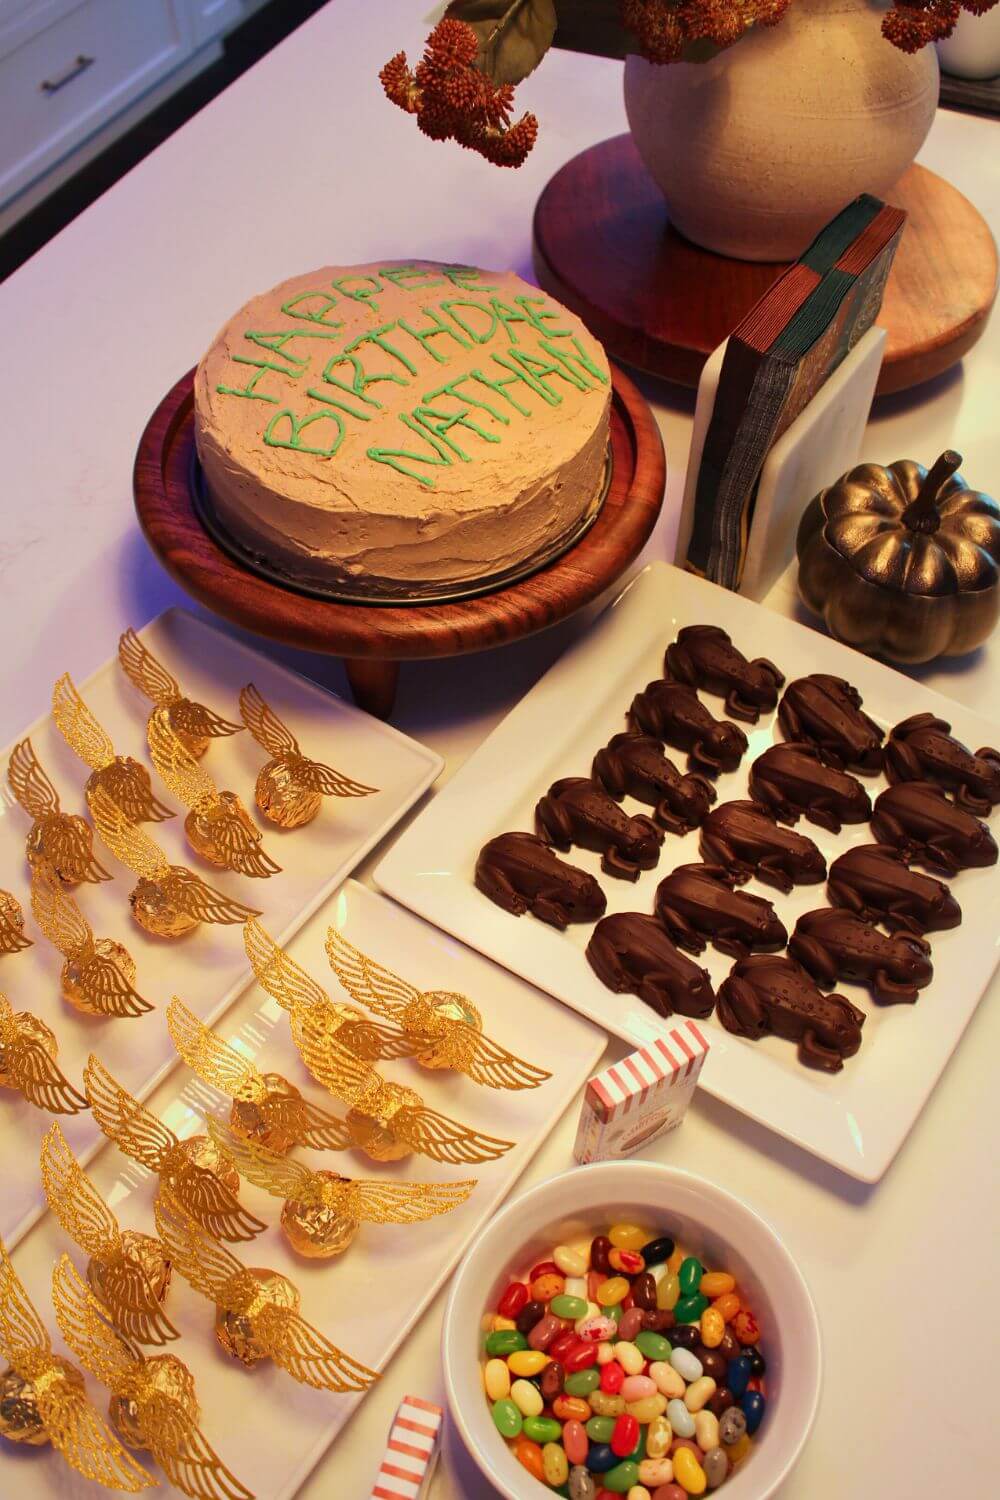
Next we have chocolate snitch balls! Which are basically Ferrero Rocher chocolates with Gold Snitch Wings glued on top!
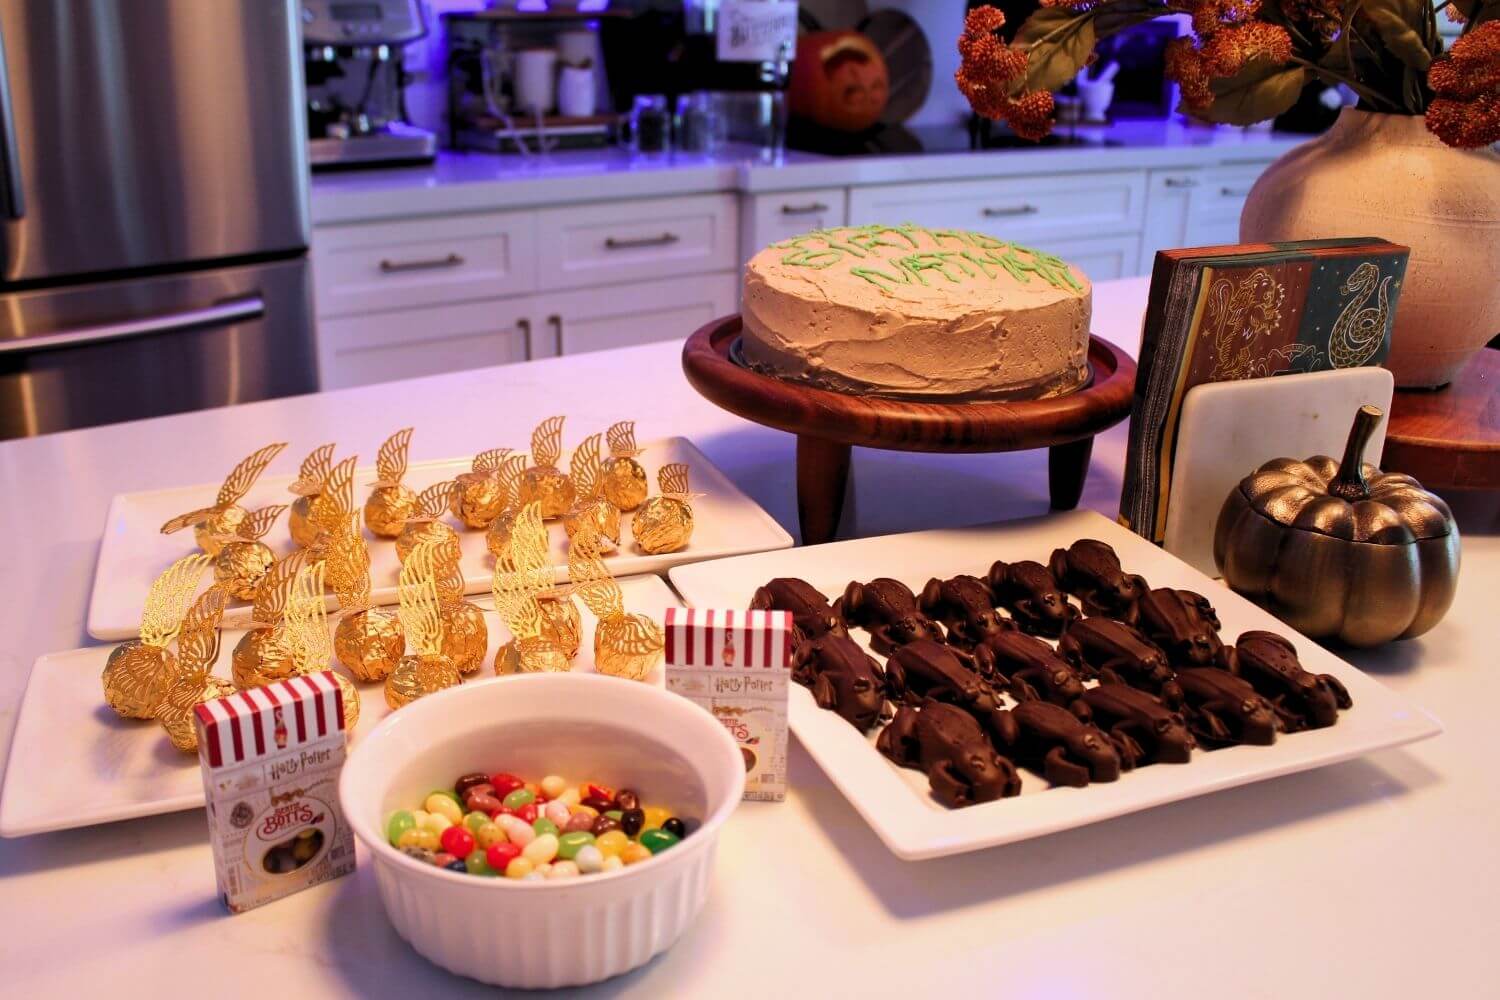
And if you have to have chocolate frogs but don’t want to spend your entire budget on the Official Harry Potter chocolate frogs, I got you. Just get these chocolate frog molds and melt your own chocolate wafers! It’s super easy!
I simply followed the melting instructions and poured the chocolate over my frog molds. Once the chocolate settled a bit and I wiped the excess away I place them in the fridge for about 10 to 15 minutes. I had never done this before and I admit my frogs did not come out perfect but they were still so cute it didn’t matter if some of them might be missing an eye! No one noticed but me!
With just 2 bags of wafers I was able to make 16 chocolate frogs. Not only that but now that I have the molds I can have chocolate frogs whenever I want! These would be great for a Harry Potter Movie night or a Harry Potter Halloween Party!
Harry Potter Drinks
You can also get creative with your bottles of Coke, Pepsi, Sprite, etc. I actually used Chat.com to create vintage labels! You can tell Chat.com exactly what you want and it will generate an image that you can download and print! How cool is that?! All I had to do was remove the Coke sticker and place my printed labels with Mod Podge! You can download these exact labels below!
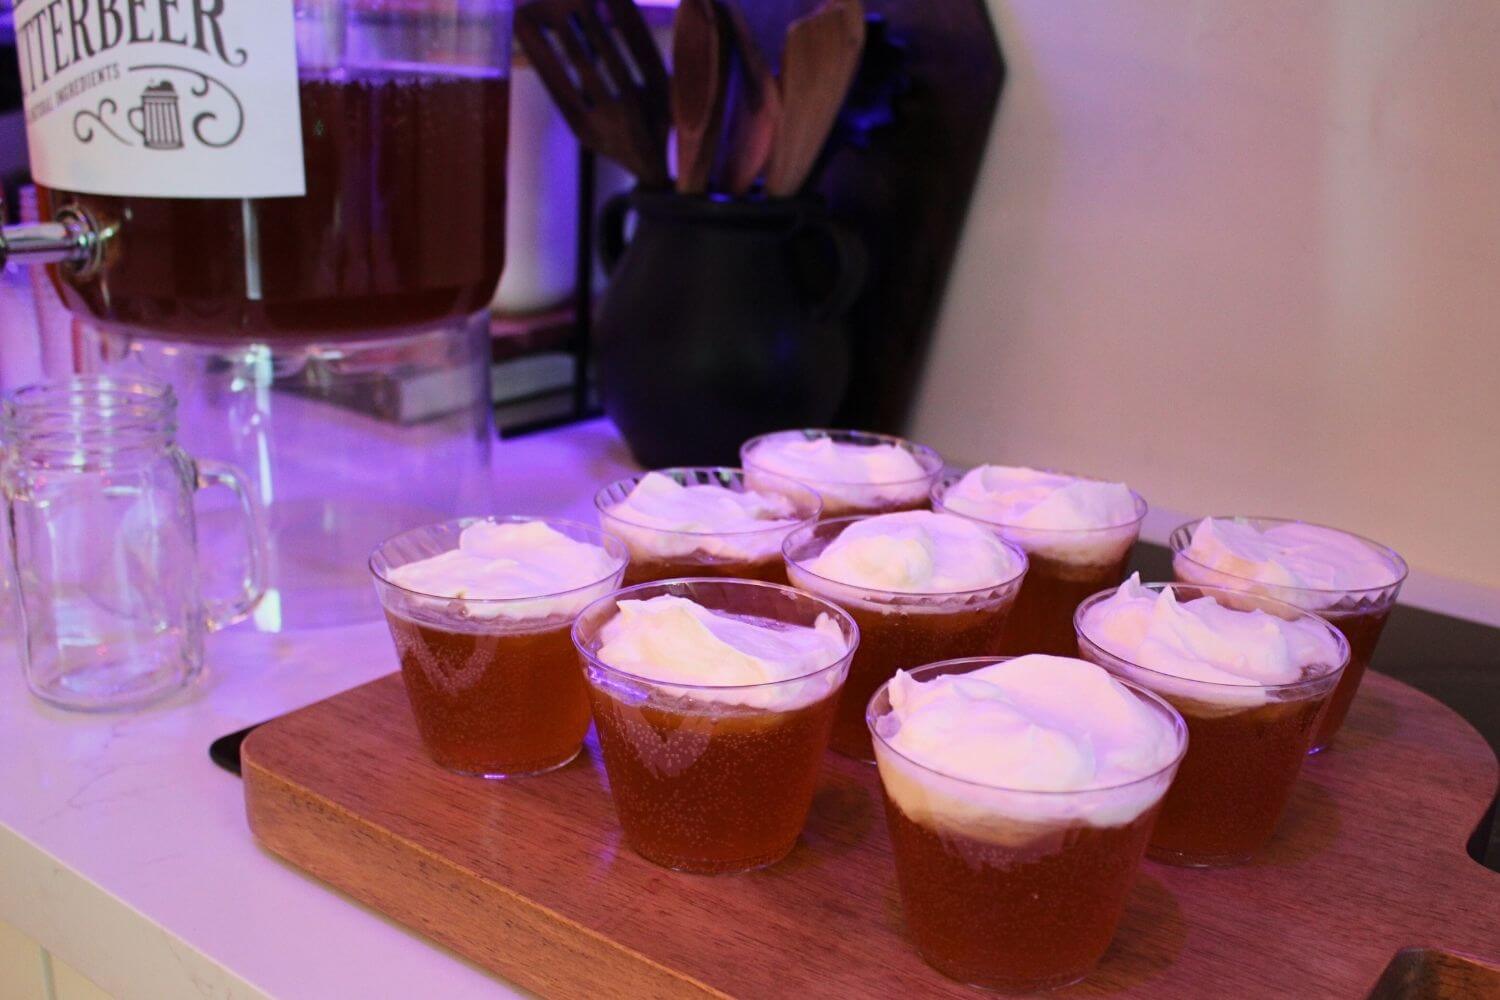
And what is any Harry Potter birthday party without Butterbeer? I found this great Butterbeer recipe online but I substituted the half and half for whipping cream, beating it with the whisk attachment on my mixer until creamy. It just made the cream so much thicker and yummier in my opinion!
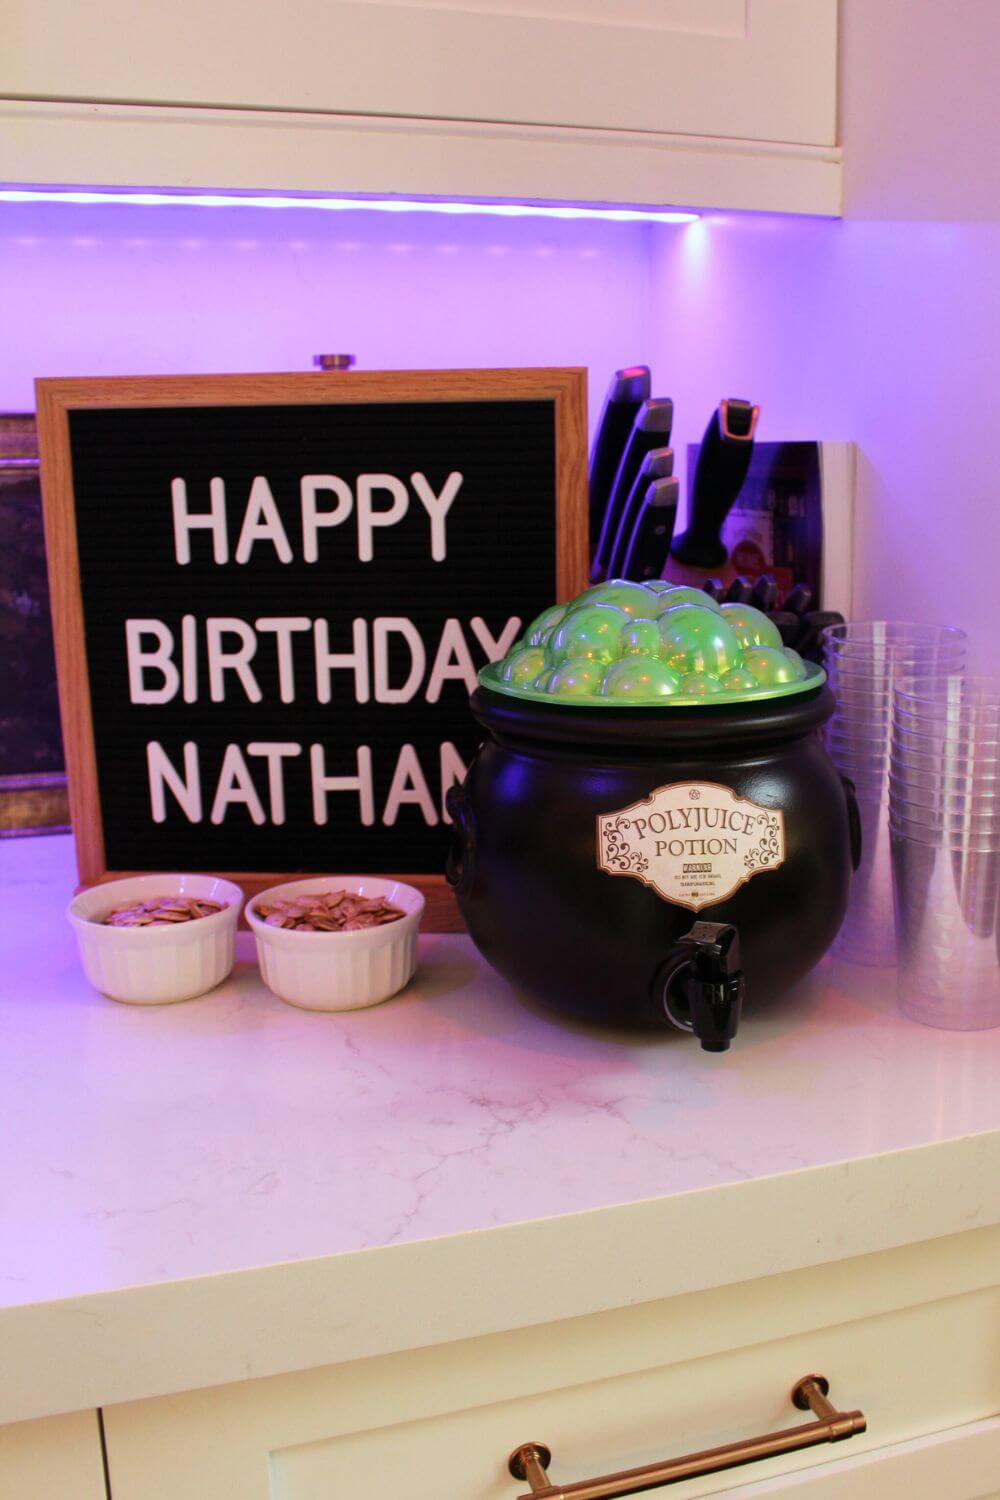
Last but not least, you gotta have the smoking cauldron! This mist maker is placed in water to make the perfect slow, bubbling mist!
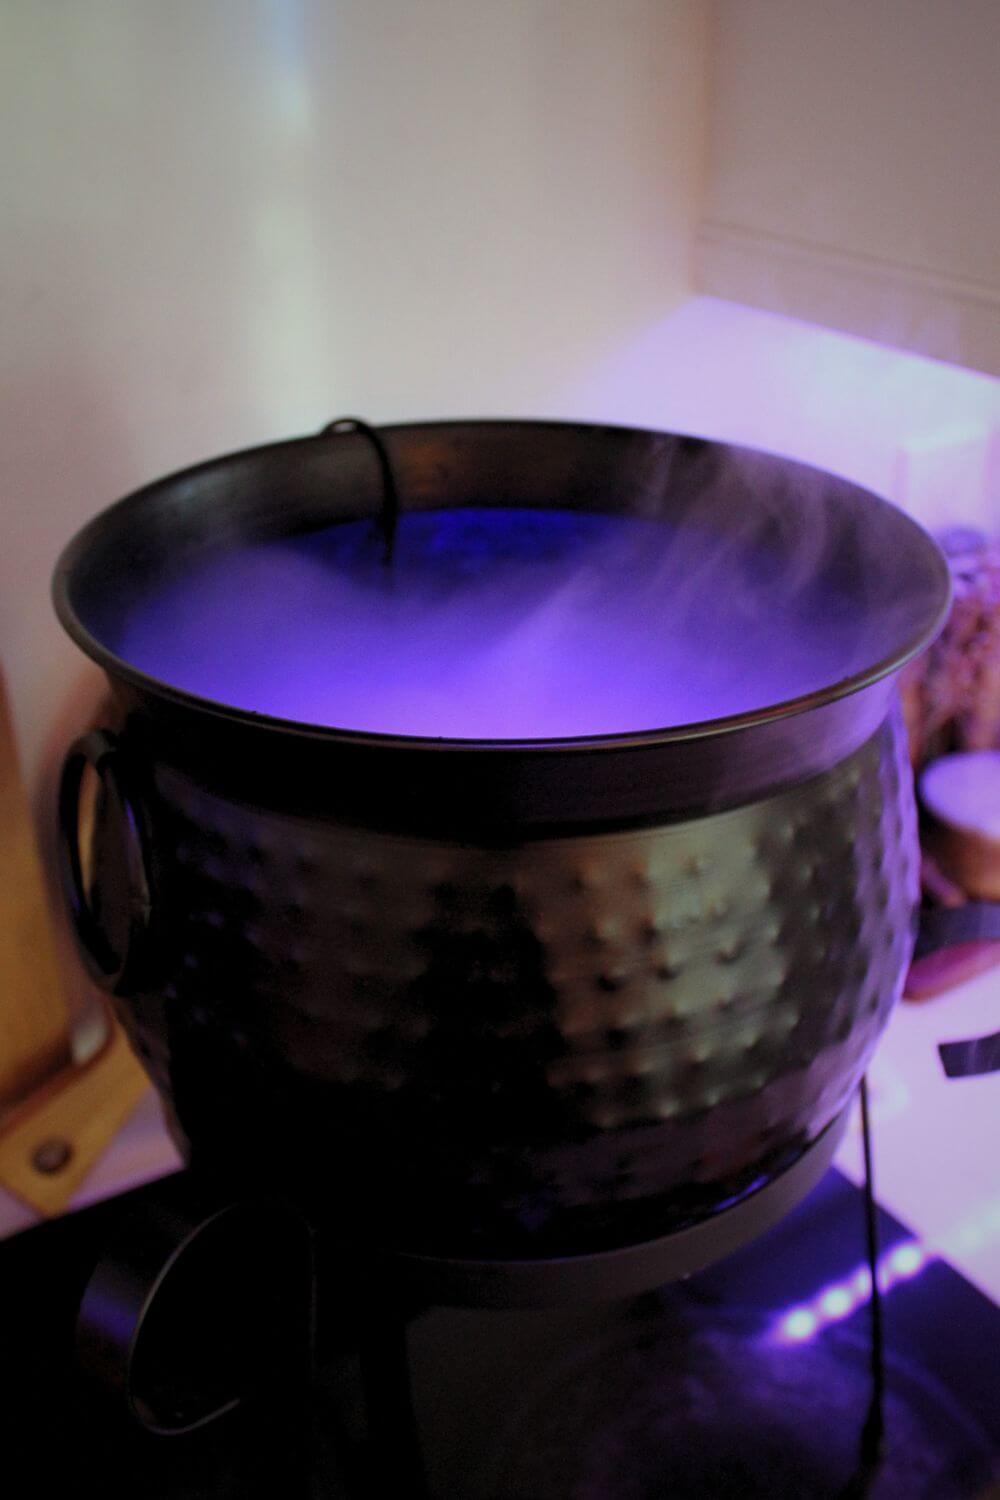
Please note that you cannot add an actual drink in here. If you do, it would have to be poured inside another bowl or container and placed in the cauldron, separate from the mist machine with water. I simply used it as decor but it added the perfect vibe to my Harry Potter treats section!
Harry Potter Birthday Cake
Finally, as the main treat I had to replicate Hagrid’s birthday cake to Harry. I used Betty Crocker’s Triple Chocolate Fudge cake mix for the cake and this recipe for the buttercream frosting which I colored with gel food coloring.
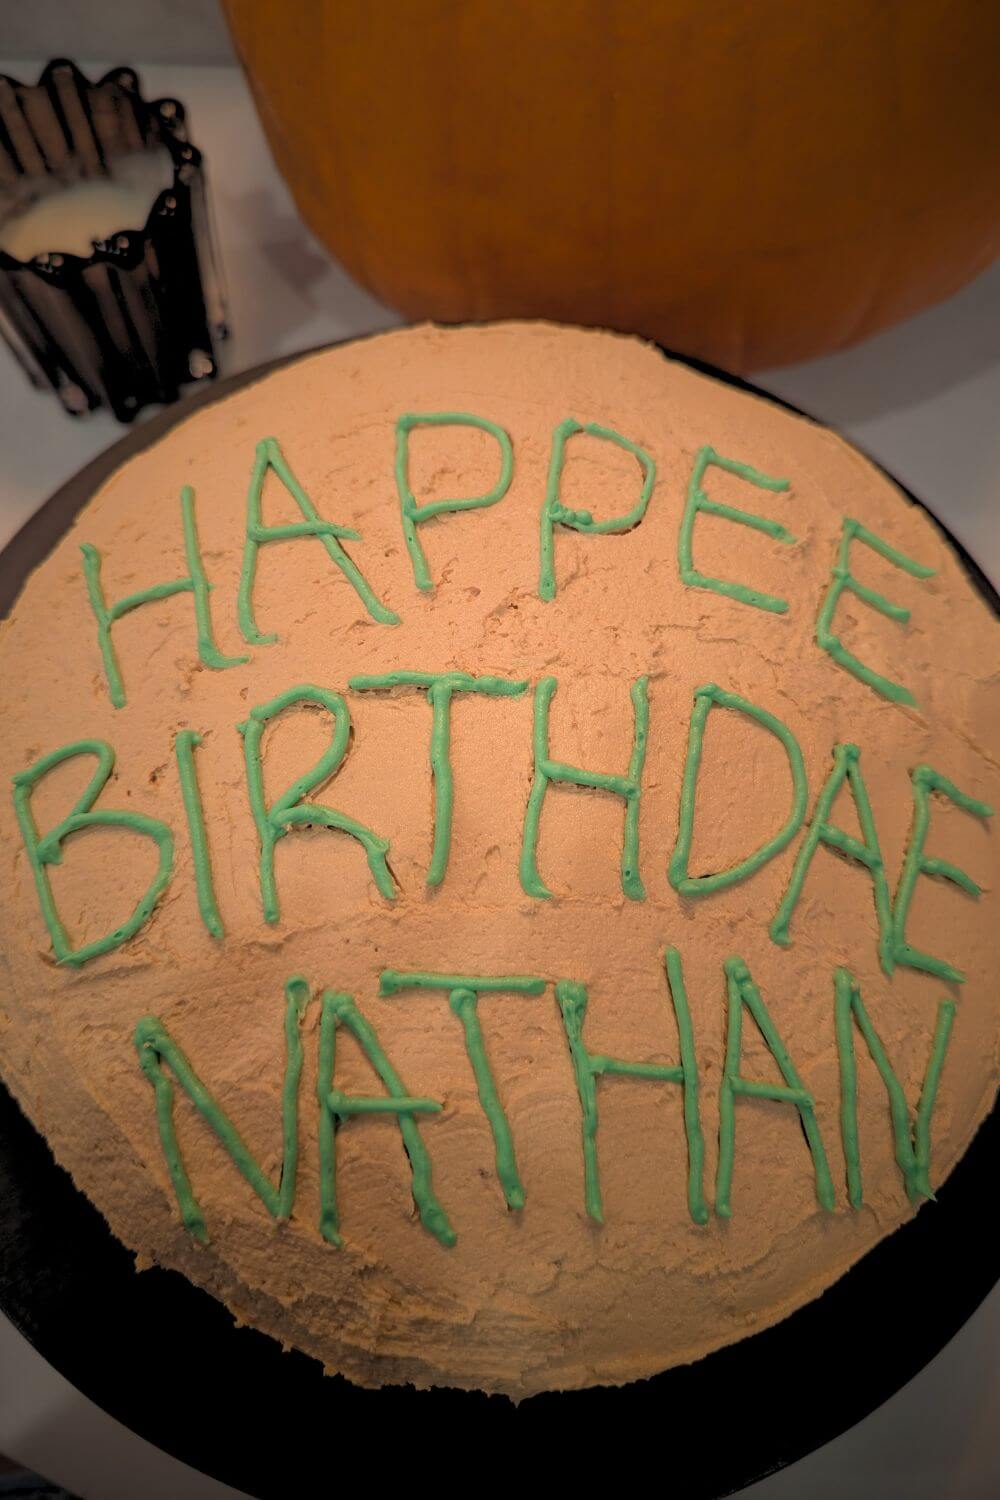
It is important to use gel coloring to keep the right consistency of the buttercream. About two drops of red and a generous amount of brown gel coloring deepened the pink color nicely. This icing worked perfectly for my letters. Getting the right green, however, required a lot of gel food coloring!
Before I piped my letters onto the cake I traced the letters on the frosting with a toothpick. When I was happy with the way it looked I went ahead and piped the letters onto my cake. It reads Happee Birthdae Nathan, because as you know, Hagrid can’t spell!
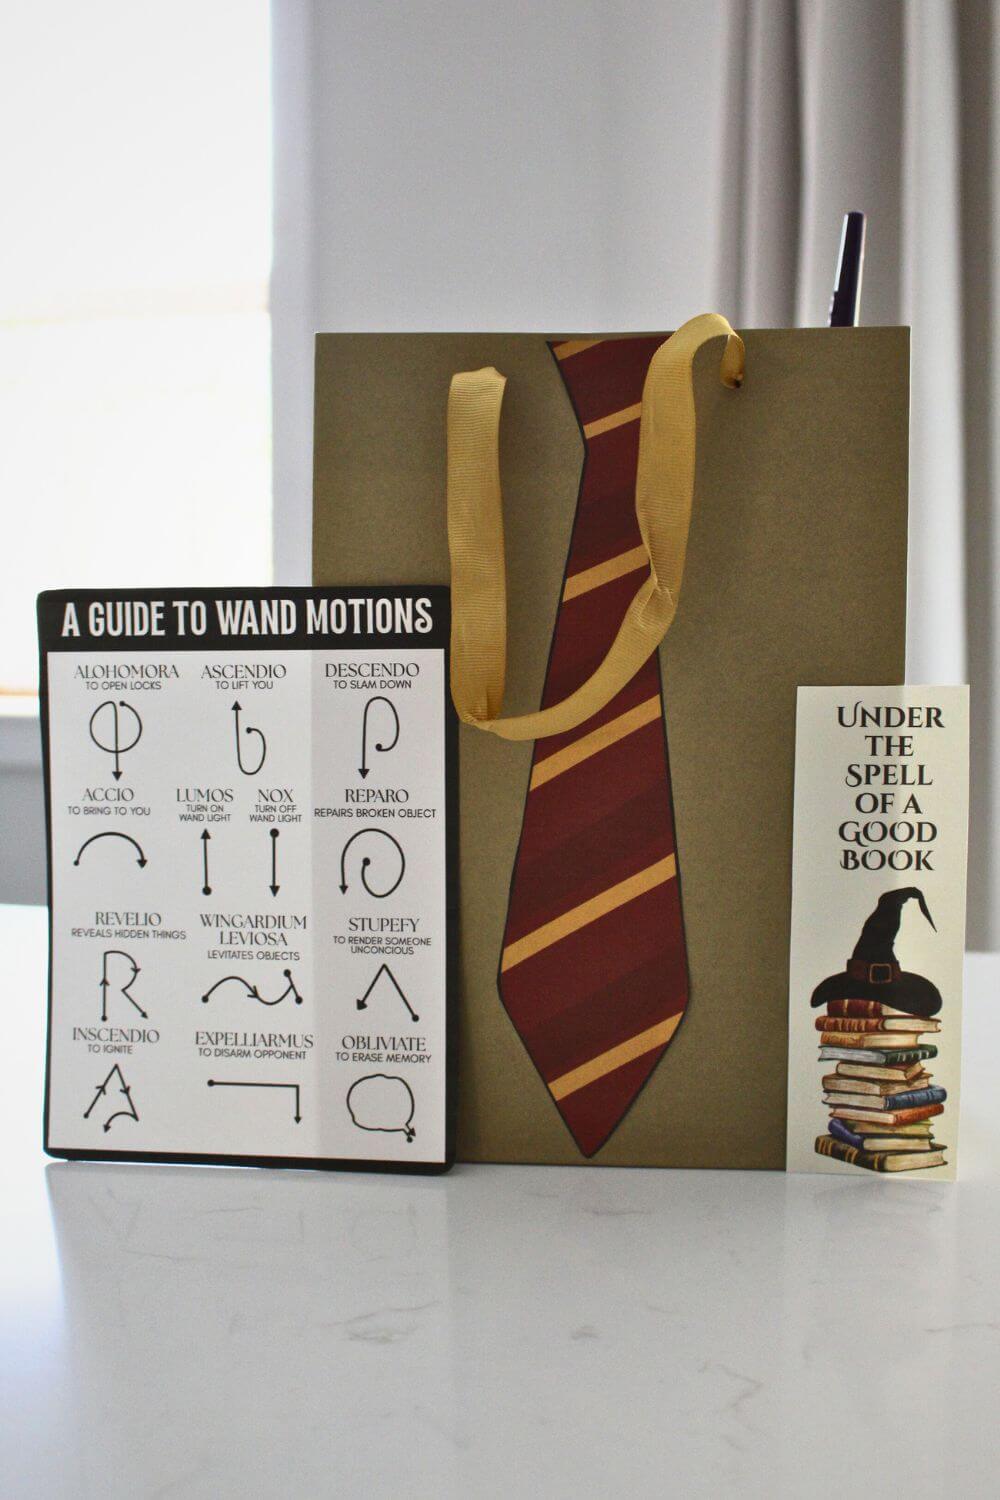
Harry Potter Birthday Favors
Every birthday party needs cute little favors that the kids can take home. So I made sure to make their favor bags extra magical.
I found super affordable paper bags at Walmart so I got them in red, blue, yellow and green, for each Hogwarts house. I also got a gold bag for the birthday boy who is a Gryffindor as well! Then I glued ties on them for each respectable house. You can download the ties below!
COLORFUL HOGWARTS HOUSE TIES PDF
Inside the bags the kids will find Harry Potter tattoos, slugs, wands, mini cauldrons, Bertie Bott’s Every Flavor Beans, and some of those Harry Potter Hershey’s Kisses.
I also included a DIY Bookmark and a DIY Wand Motion Guide that you can download below!
These goodie bags were a hit with the kids, they especially loved the Wand Motion Guide and had lots of fun practicing spells!
PIN IT FOR LATER – Ultimate Harry Potter Birthday Guide
So there you have it! The ultimate Harry Potter Birthday Guide that will be sure to keep your guests talking about it for years to come! But the best part of this Harry Potter birthday was my DIY Harry Potter Escape Room which includes all kinds of FREE PRINTABLES! Make sure to check it out here!
I hope you enjoyed this post. The decor and crafts used here will not go to waste as I will continue to use them for my Harry Potter Halloween decor. Please comment below on any ideas that you would like to try and if you have any questions I will gladly answer them!
You May Also Like
Leave A Comment